A Complete Terraform Setup for EKS Auto Mode: Is it right for you?
One of the things I appreciate about AWS is the range of container options available. I recently wrote about why ECS is my default choice for containers on AWS - it's simple, powerful, and handles most workloads well. But when you need Kubernetes specifically - for portability, ecosystem tooling, or team expertise - EKS Auto Mode is an interesting approach worth exploring.
Instead of managing node groups, installing Karpenter, configuring the VPC CNI plugin, deploying the AWS Load Balancer Controller, setting up the EBS CSI driver, and keeping all of those components updated and compatible with each other - you enable a single flag and AWS handles all of it. The data plane becomes a managed service. The limitations that Auto Mode has are not insignificant but depending on the use case it may make sense for many teams to consider using Auto Mode.
I built a complete production-ready EKS Auto Mode cluster with Terraform to see how it works in practice. All the code is on GitHub: github.com/RDarrylR/eks-auto-mode-terraform.
This post walks through everything: what Auto Mode actually manages, how the Terraform setup works, deploying a real application, autoscaling from pods to nodes, observability with Container Insights, the security posture you get out of the box, custom NodePools for cost optimization, and the honest trade-offs you should know about before adopting it.
Why EKS Auto Mode?
If you've ever managed an EKS cluster, you know the operational burden. The control plane is managed by AWS, but everything else is on you:
- Node management - Choosing instance types, managing AMIs, patching OS, handling node drains and replacements
- Networking - Installing and configuring the VPC CNI plugin, managing pod IP allocation, setting up network policies
- Storage - Deploying the EBS CSI driver, managing StorageClasses, handling volume lifecycle
- Load balancing - Installing the AWS Load Balancer Controller, configuring IngressClasses, managing target group bindings
- Scaling - Deploying Karpenter or Cluster Autoscaler, configuring NodePools, tuning consolidation policies
- Add-on compatibility - Making sure all these components work together after every Kubernetes version upgrade
Multiply this across multiple clusters and environments, and you are spending more time on infrastructure plumbing than on the applications running on top of it.
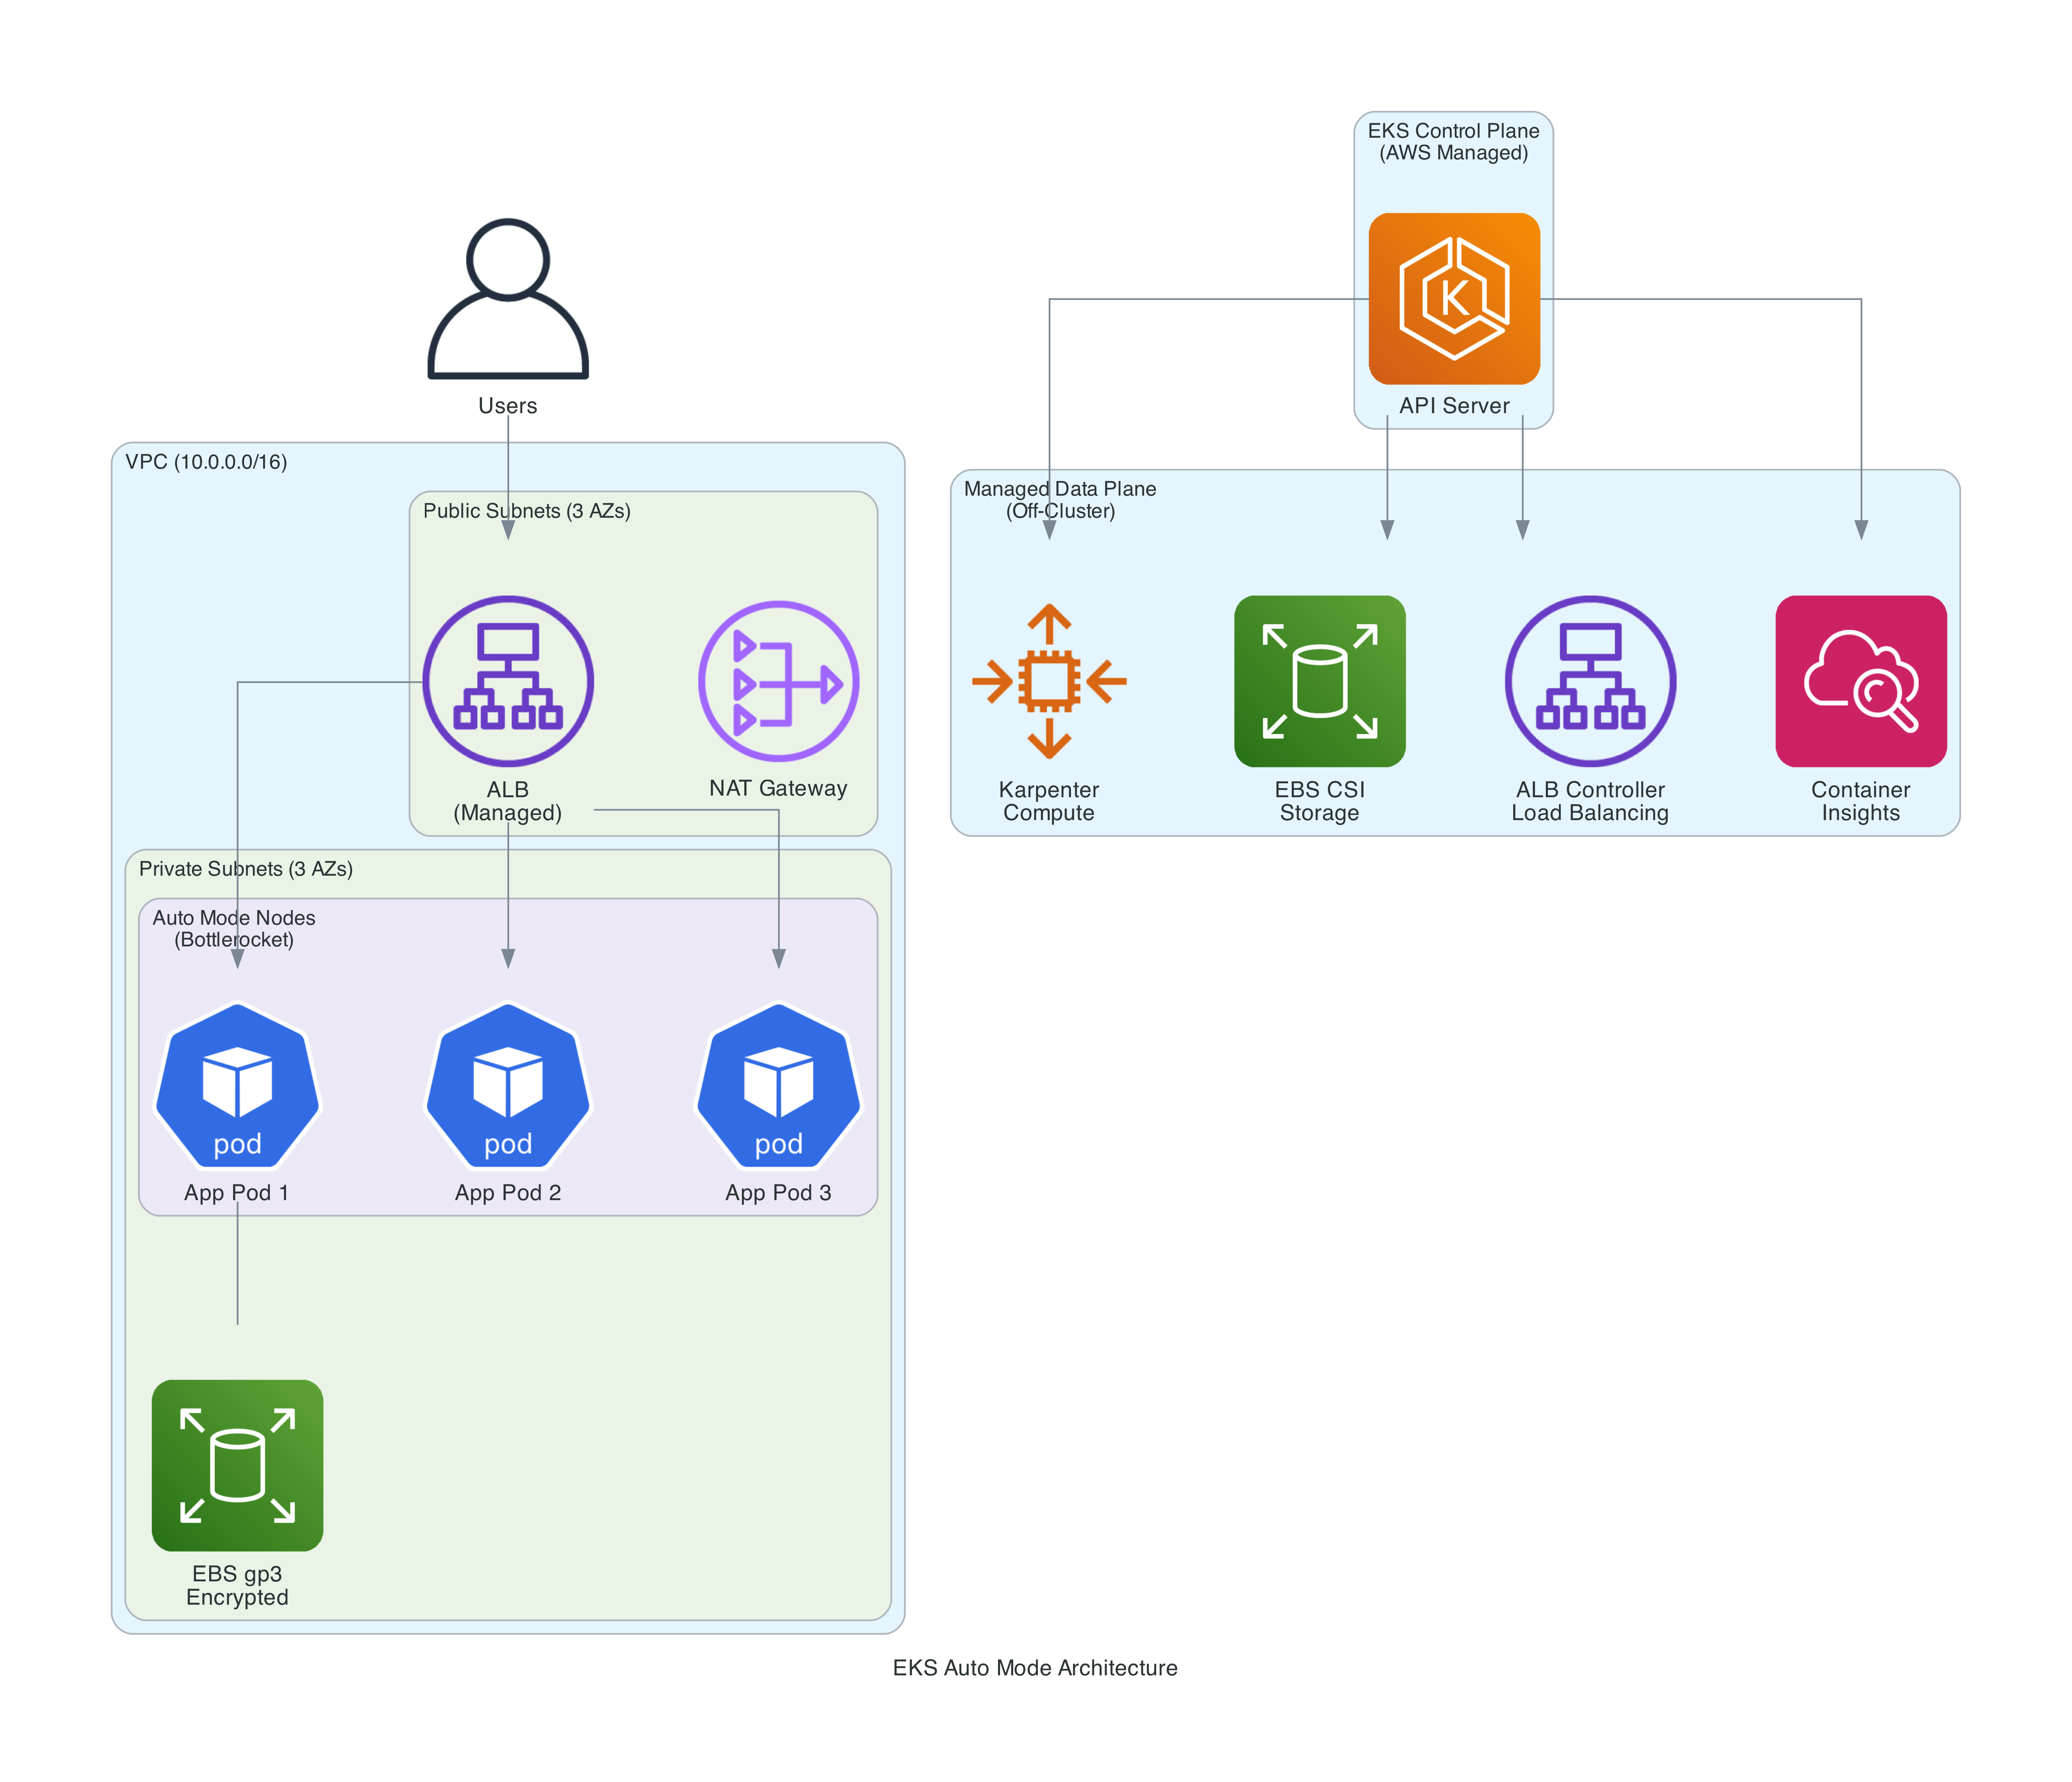
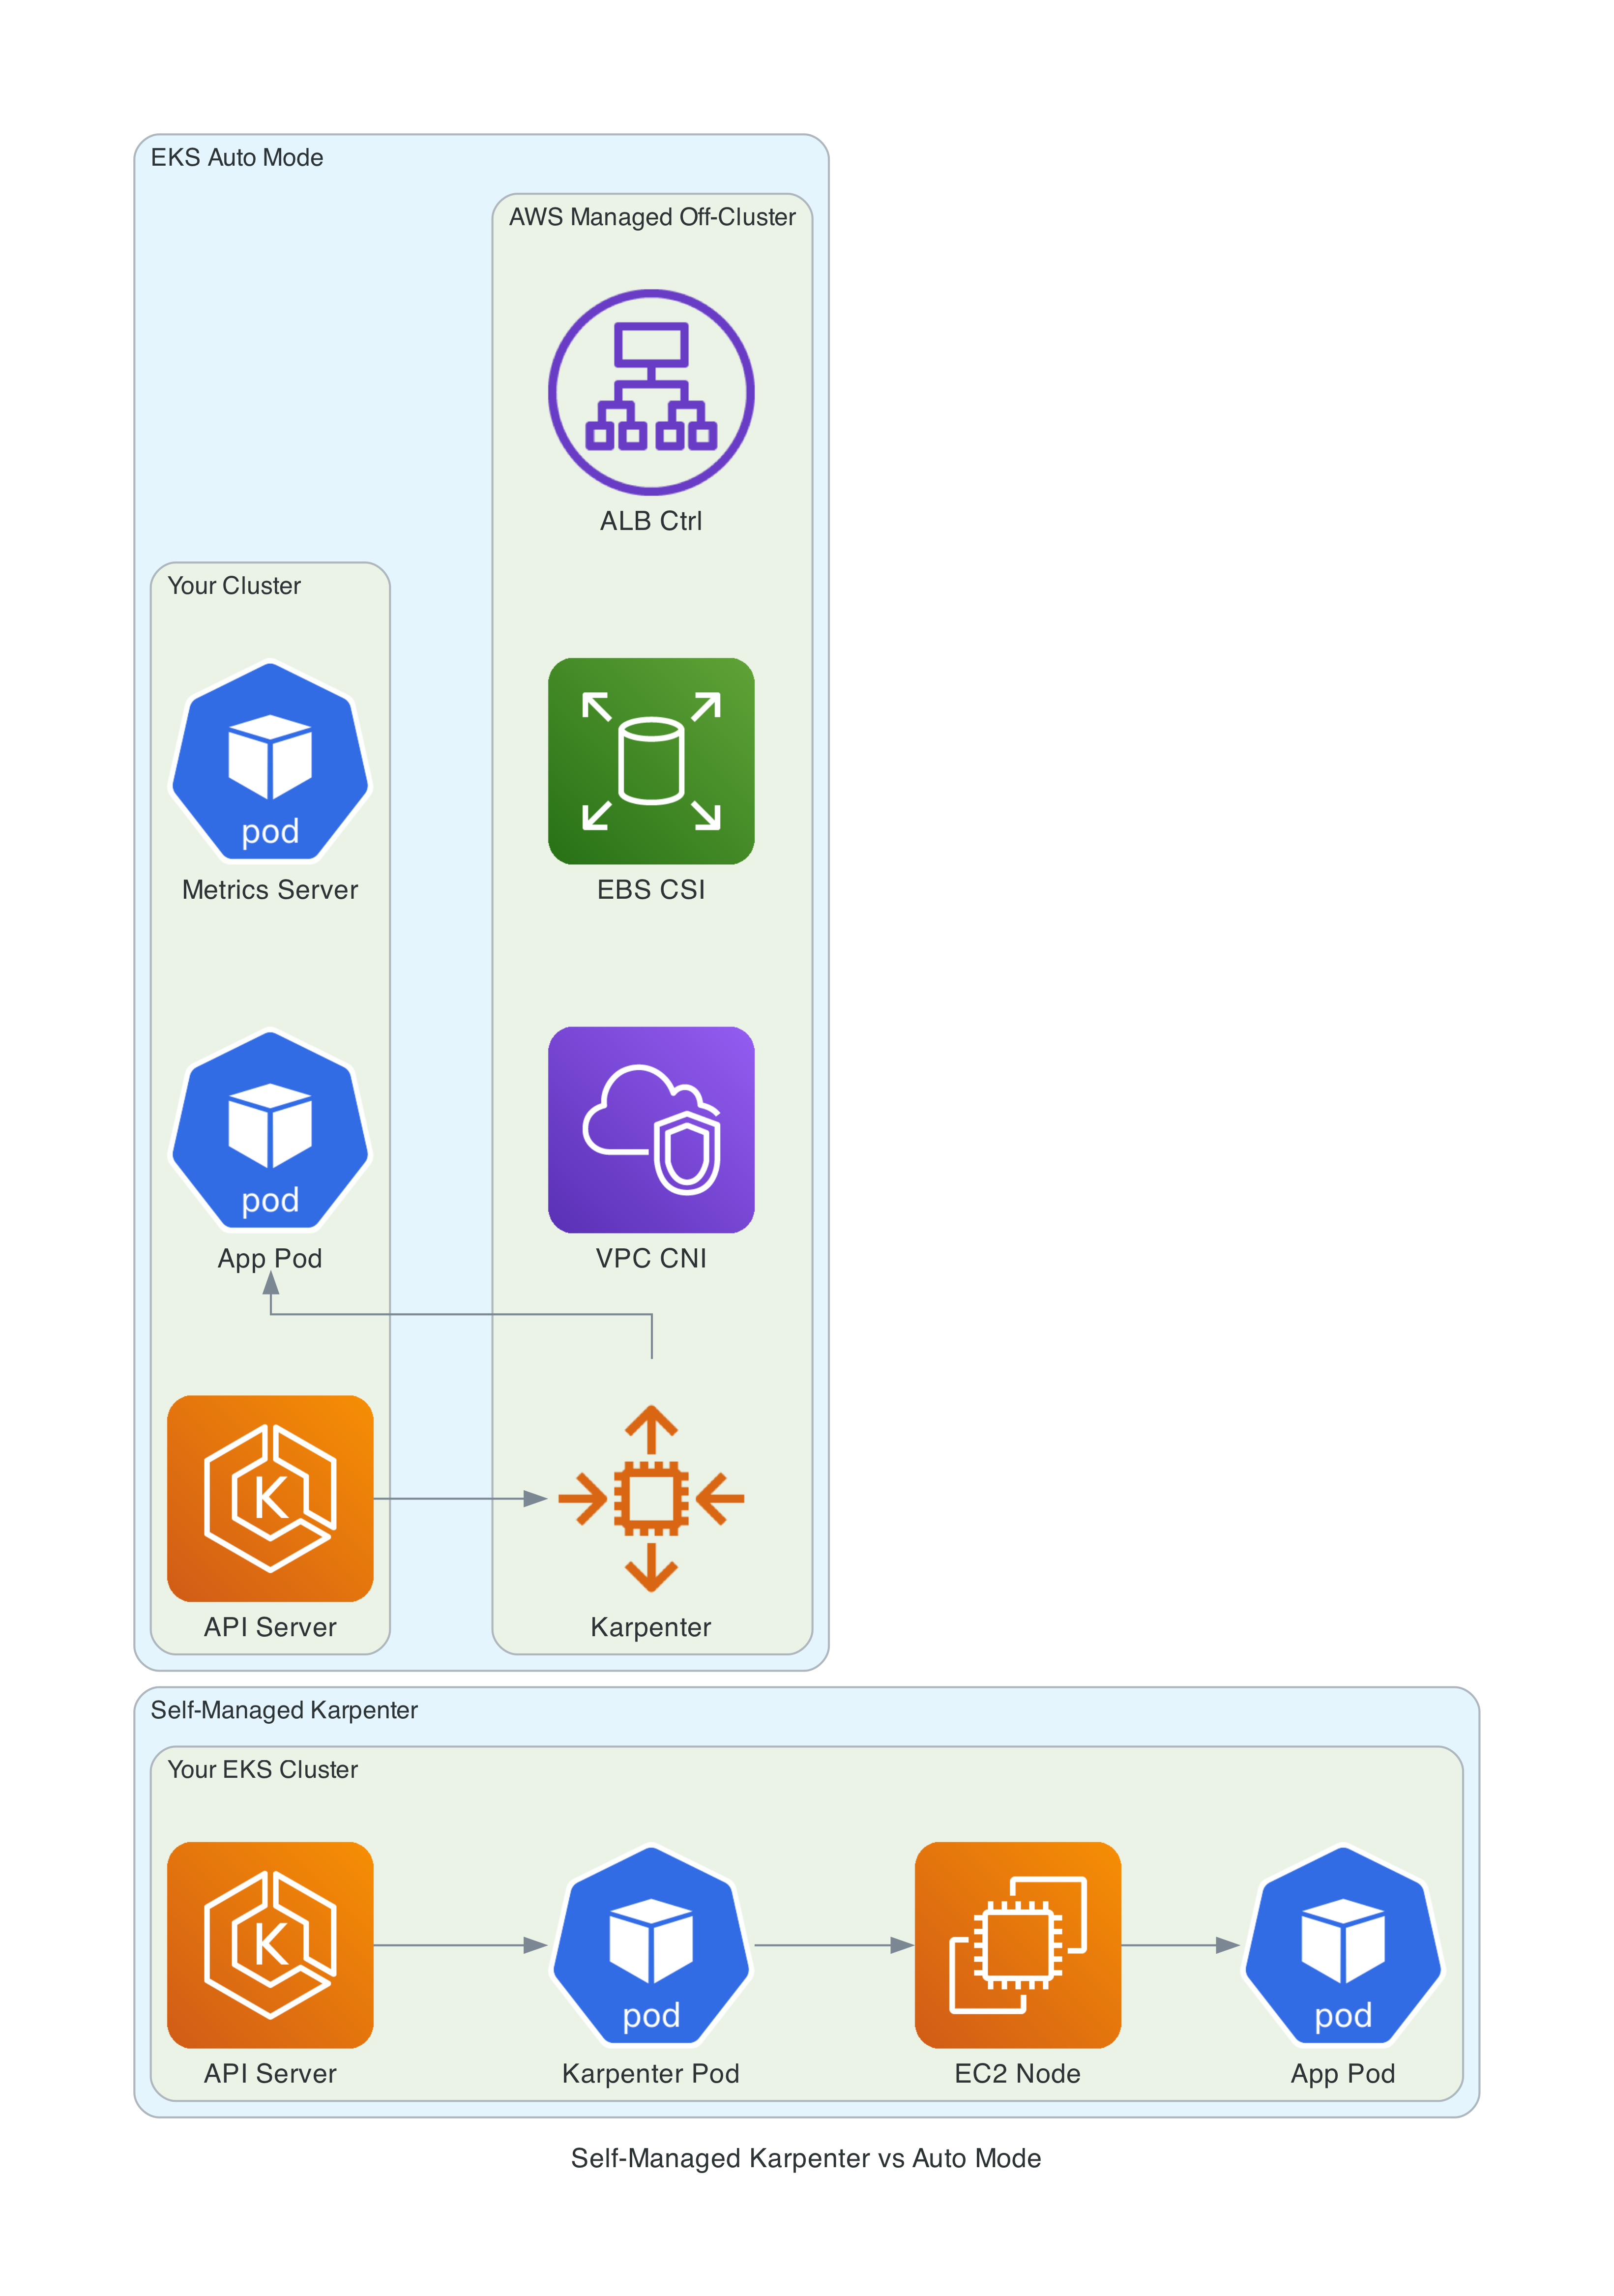
EKS Auto Mode eliminates all of this. AWS takes over the entire data plane - compute, networking, storage, load balancing, and health monitoring. The only pods running in your cluster are the Kubernetes Metrics Server. Everything else runs off-cluster as managed services.
What AWS Manages For You
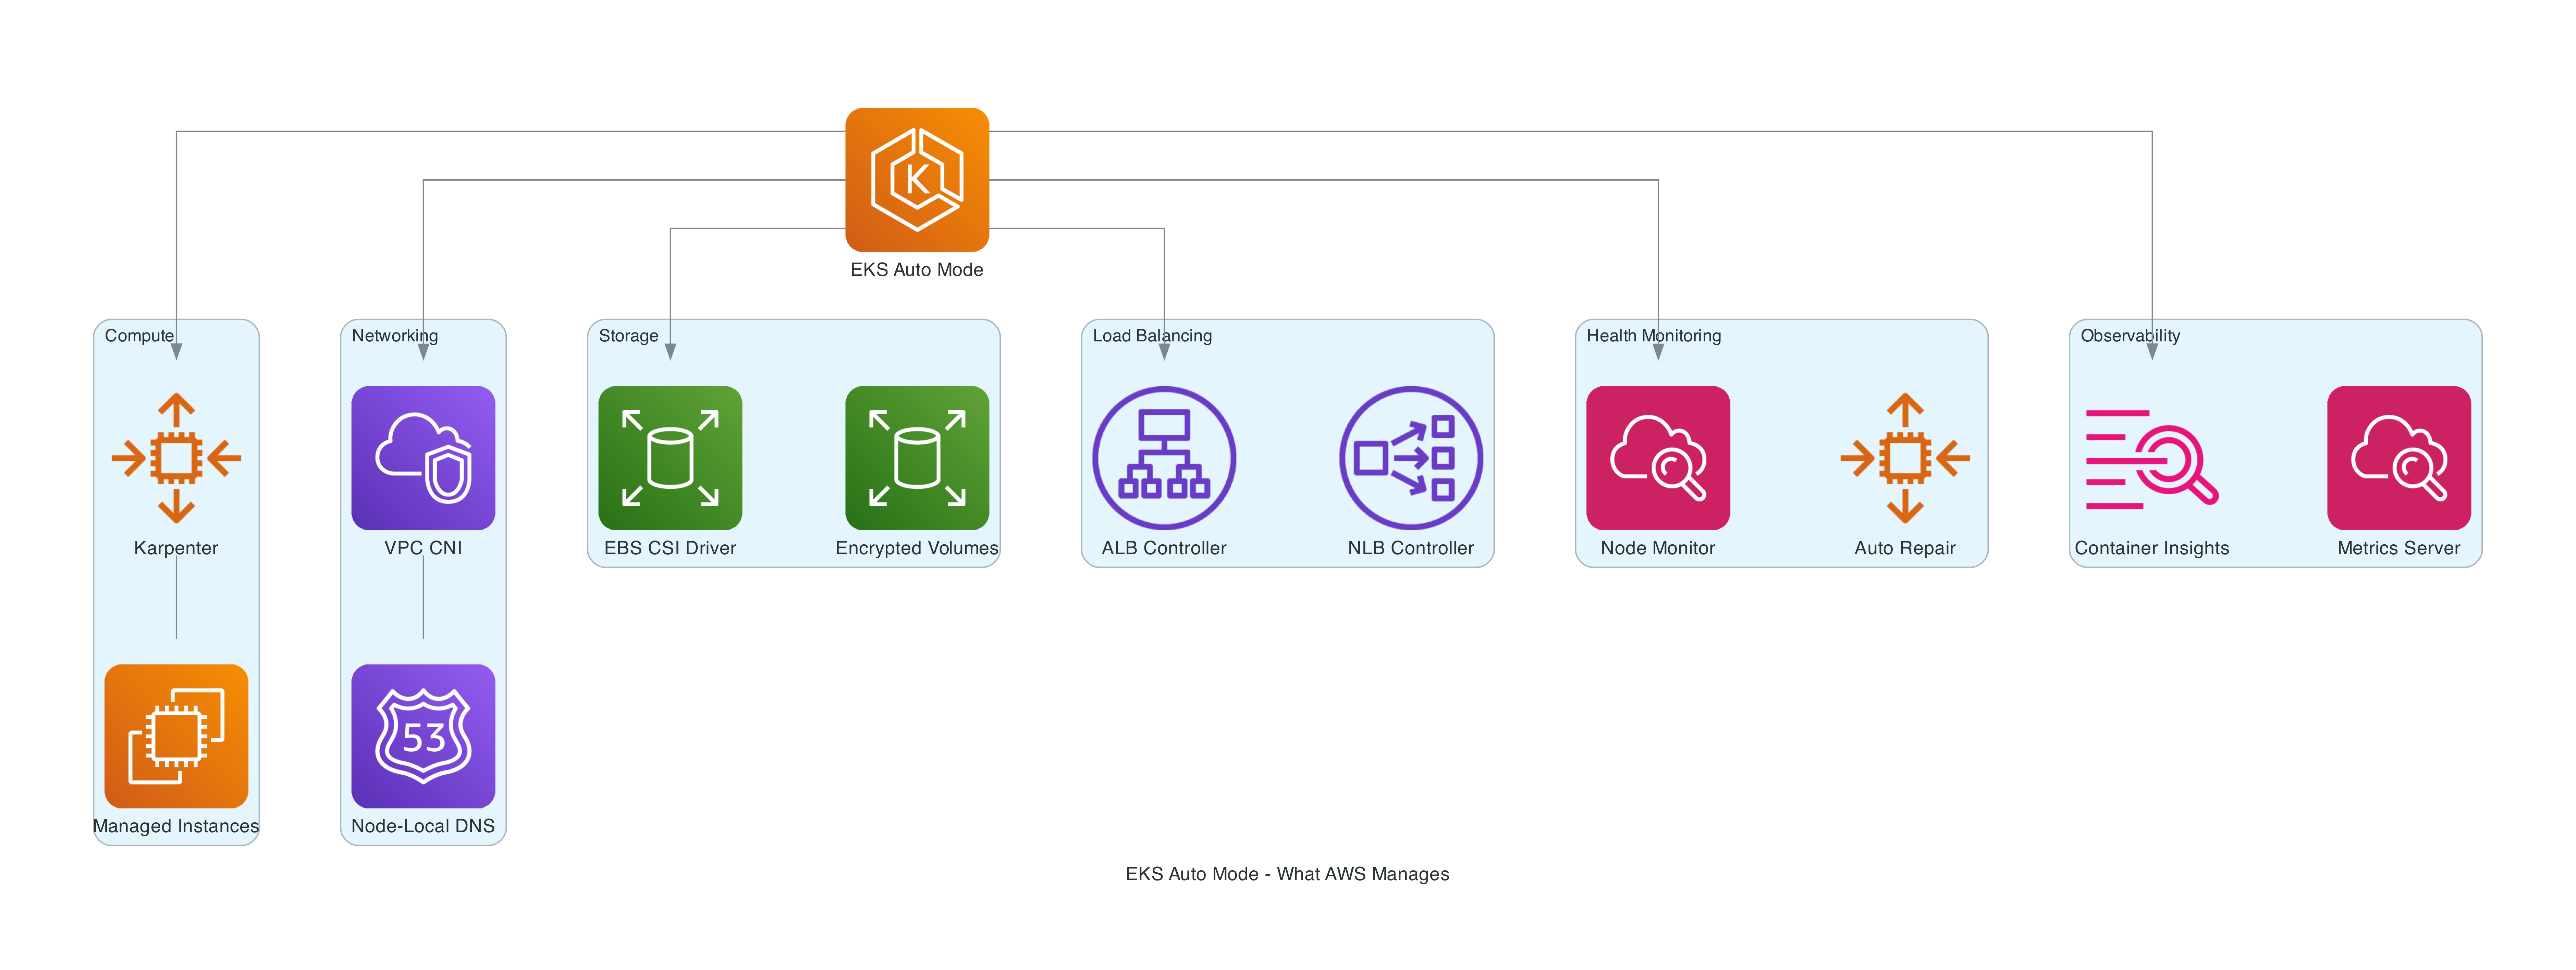
When you enable Auto Mode, AWS takes responsibility for six major areas:
Compute
Auto Mode uses Karpenter under the hood, running it as a managed service outside your cluster. You never see Karpenter pods, never upgrade them, never troubleshoot their OOM kills. Karpenter is a significant upgrade over the standard Cluster Autoscaler in my experience. With Auto Mode, AWS handles:
- Node provisioning, scaling, and termination
- AMI selection - custom Bottlerocket variants with SELinux enforcing and read-only root filesystem
- OS patching via a continuous deployment pipeline with CVE scanning and staged rollout
- 14-day default node expiration (configurable up to 21 days) with automatic replacement
- Spot Instance interruption handling
- GPU support with drivers for NVIDIA, Neuron (Trainium/Inferentia), and EFA
The nodes are EC2 managed instances - a new EC2 primitive where operational control is delegated to AWS. They appear in your account, use your Reserved Instances and Savings Plans, but you cannot SSH into them or modify their configuration directly.
Networking
The VPC CNI runs as a managed component:
- Pod networking with IPv4 and IPv6 support
- Network Policy enforcement
- Node-local DNS - CoreDNS runs as a system service directly on each node rather than as a traditional cluster deployment. This eliminates cross-node DNS latency and removes CoreDNS pods from your workload scheduling
- Pod Identity Agent (built-in, no add-on installation)
Storage
The EBS CSI driver is managed with provisioner ebs.csi.eks.amazonaws.com:
- Persistent volume provisioning with configurable IOPS, throughput, and encryption
- Ephemeral storage configuration
- Automatic NVMe setup for supported instance types
Load Balancing
The AWS Load Balancer Controller runs as a managed service:
- ALB and NLB provisioning from Kubernetes Ingress/Service resources
- Uses IngressClass
alb(controller:eks.amazonaws.com/alb) and loadBalancerClasseks.amazonaws.com/nlb - Supports Ingress API and Service annotations only
- Gateway API is not supported. The managed ALB controller only supports the Ingress API and Service annotations. This could be a deal breaker for teams adopting the Gateway API.
Health Monitoring
- Automatic detection and repair of unhealthy nodes
- Replaces unresponsive kubelets and PID-exhausted nodes
- Reports through Kubernetes events and conditions
The Terraform Setup
I used the terraform-aws-modules/eks/aws community module (v21.x) with the AWS provider ~> 6.0. There is no separate official AWS Terraform module for EKS Auto Mode - the community module maintained by Anton Babenko is the de facto standard for EKS on Terraform, and it has first-class Auto Mode support. When you set compute_config.enabled = true, the module automatically handles the storage and load balancing configuration, hardcodes the right bootstrap settings, creates least-privilege IAM roles, and attaches the five managed policies the cluster role needs. You could build this with raw aws_eks_cluster resources, but the module eliminates several hundred lines of boilerplate and is referenced in AWS's own documentation.
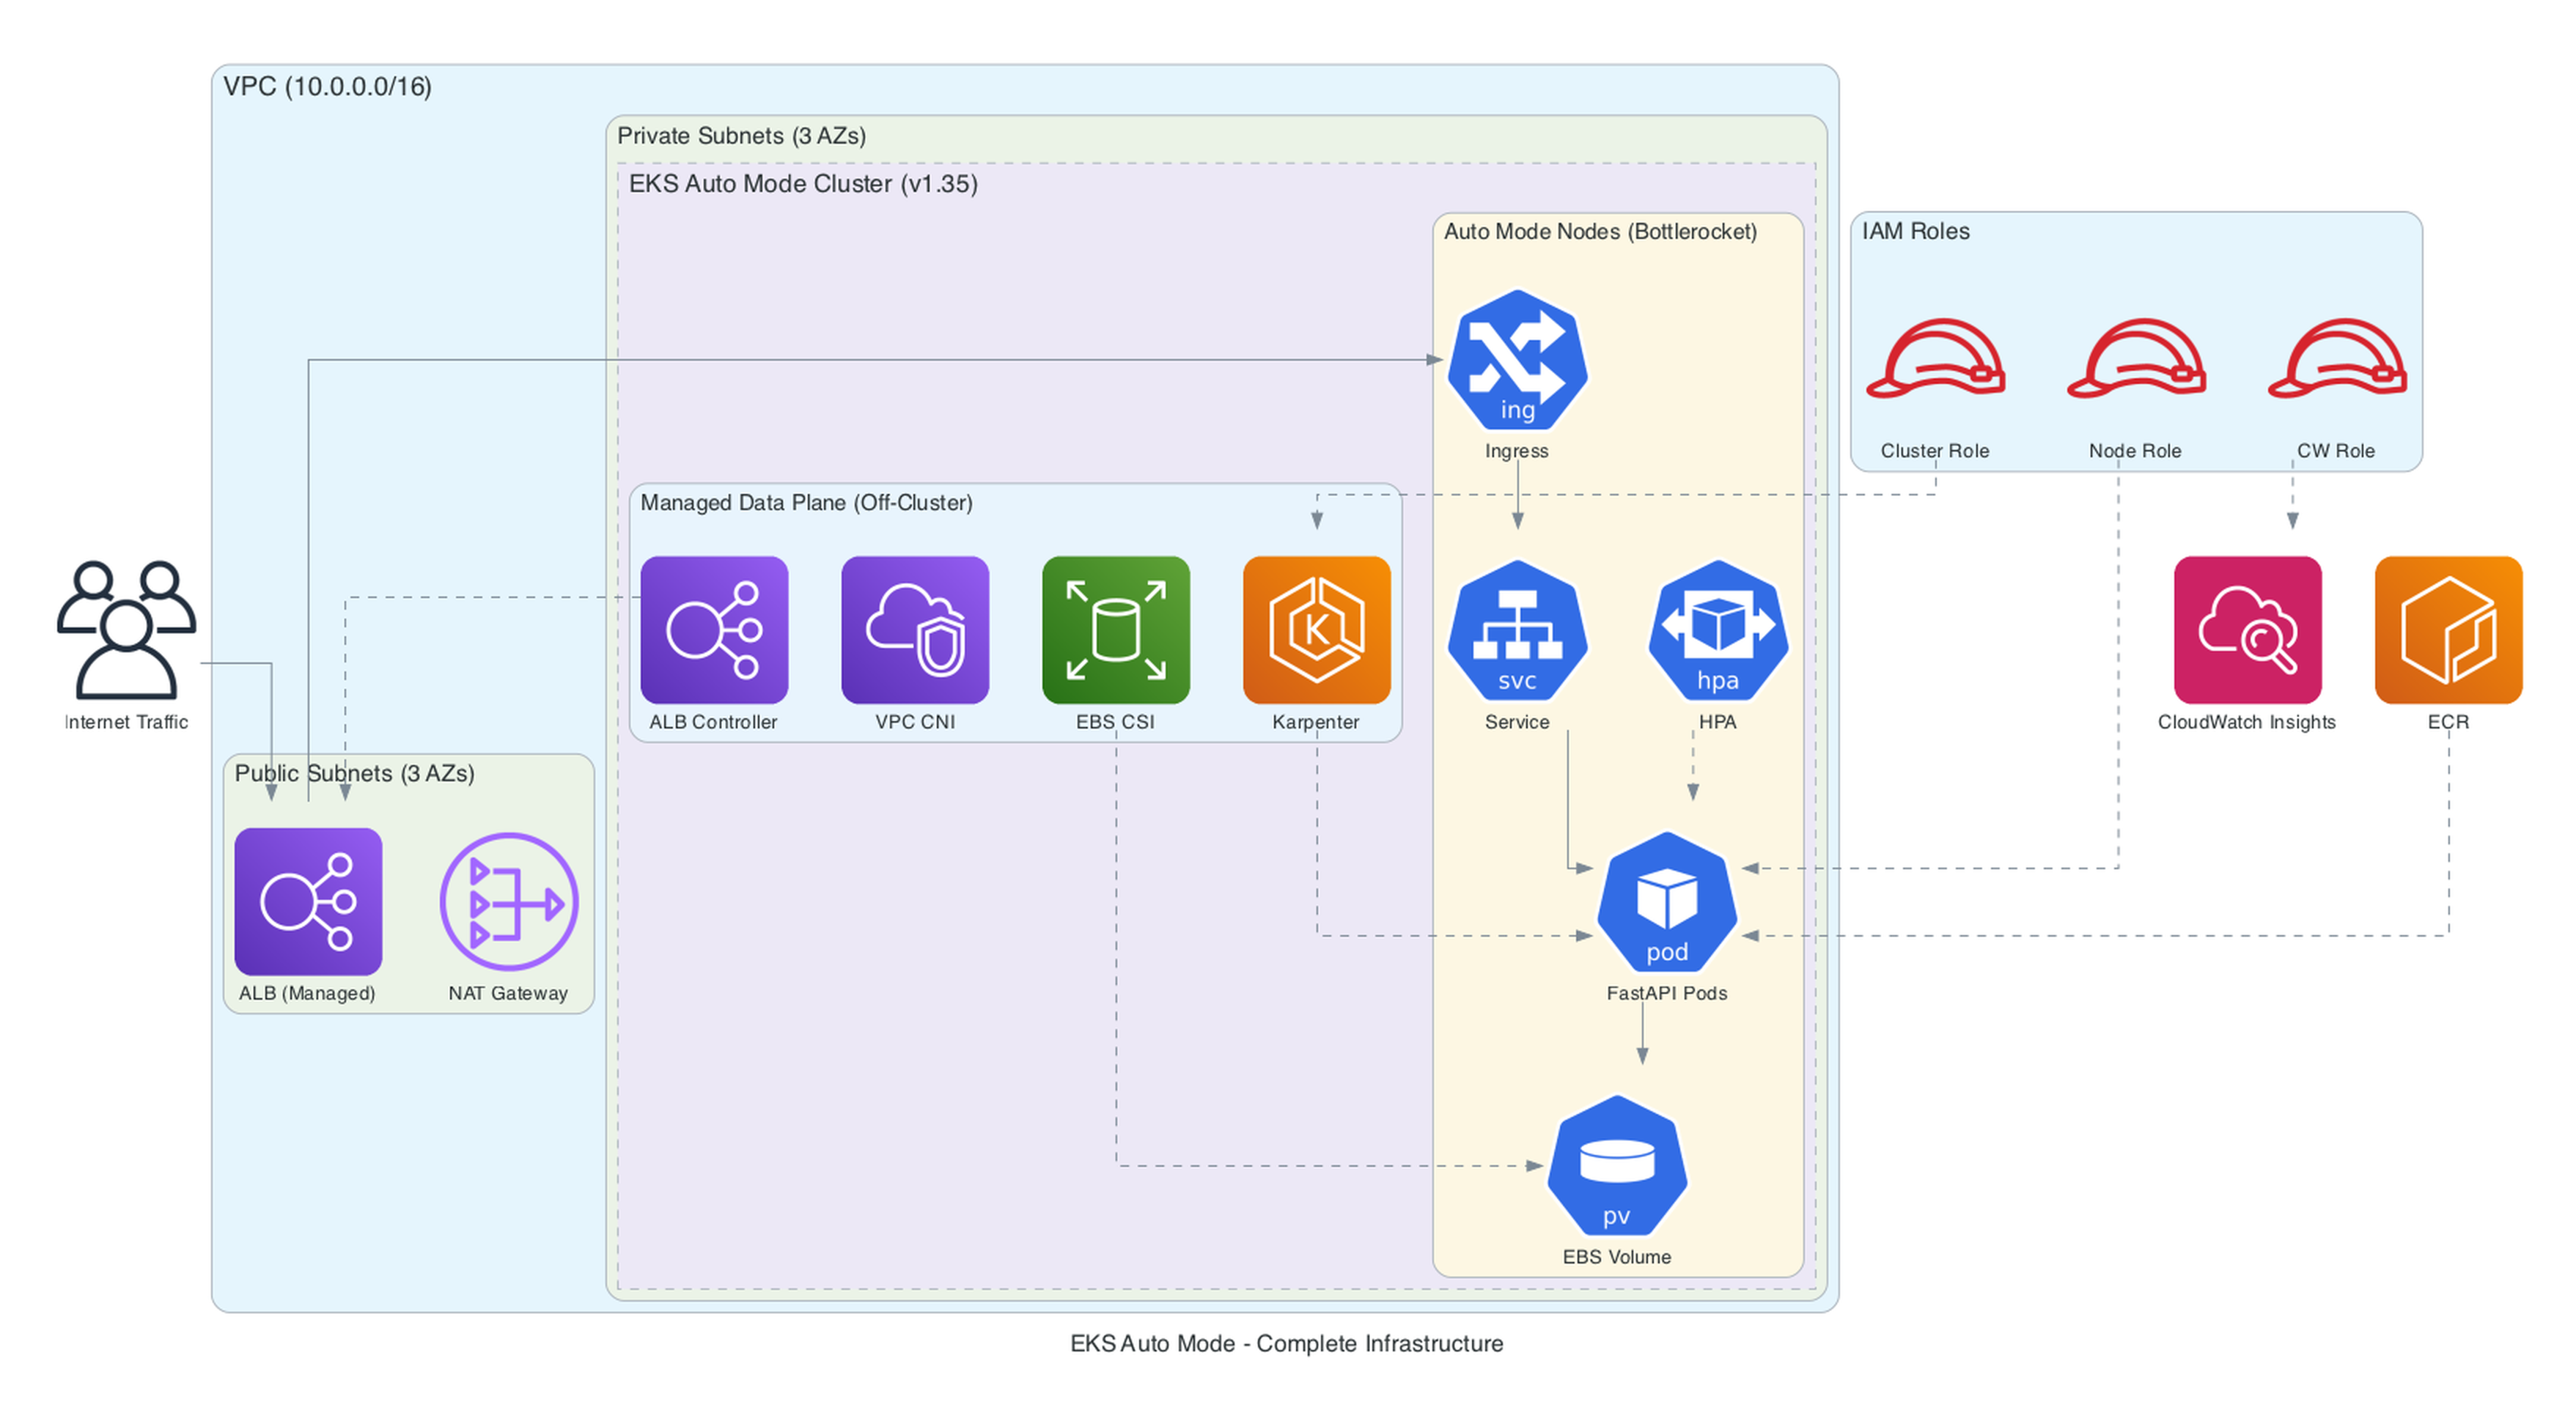
The complete setup creates a production-ready cluster with VPC, Auto Mode enabled, custom NodePools, Container Insights observability, and least-privilege IAM configuration. Here is what the full infrastructure looks like:
Provider Configuration
terraform {
  required_version = ">= 1.10"

  required_providers {
    aws = {
      source  = "hashicorp/aws"
      version = "~> 6.0"
    }
    kubernetes = {
      source  = "hashicorp/kubernetes"
      version = "~> 2.38"
    }
    kubectl = {
      source  = "alekc/kubectl"
      version = "~> 2.1"
    }
  }
}

provider "aws" {
  region = var.aws_region

  default_tags {
    tags = {
      Project     = var.project_name
      Environment = var.environment
      ManagedBy   = "terraform"
    }
  }
}
A note on the kubectl provider: I use the alekc/kubectl fork rather than gavinbunney/kubectl. The alekc fork is actively maintained and handles CRD resources (like Karpenter NodePools and NodeClasses) reliably.
VPC
The VPC uses the community VPC module (v6.x) with both private and public subnets. The key detail is the subnet tags - EKS Auto Mode uses these to discover where to place nodes and load balancers:
module "vpc" {
  source  = "terraform-aws-modules/vpc/aws"
  version = "~> 6.0"

  name = "${var.project_name}-vpc"
  cidr = "10.0.0.0/16"

  azs             = slice(data.aws_availability_zones.available.names, 0, 3)
  private_subnets = ["10.0.1.0/24", "10.0.2.0/24", "10.0.3.0/24"]
  public_subnets  = ["10.0.101.0/24", "10.0.102.0/24", "10.0.103.0/24"]

  enable_nat_gateway   = true
  single_nat_gateway   = true
  enable_dns_hostnames = true

  public_subnet_tags = {
    "kubernetes.io/role/elb" = 1
  }

  private_subnet_tags = {
    "kubernetes.io/role/internal-elb" = 1
  }
}
A few things worth noting:
- Single NAT gateway for cost optimization in non-production. Use one per AZ for production HA.
- No VPC endpoints in this demo for simplicity. Production setups should add VPC endpoints for ECR (both
ecr.apiandecr.dkr), S3, STS, and CloudWatch to reduce NAT gateway costs and keep traffic private. This is especially impactful at scale - NAT gateway data processing charges add up quickly. - Public subnet tags with
kubernetes.io/role/elbtell the managed load balancer controller where to create internet-facing ALBs/NLBs. - Private subnet tags with
kubernetes.io/role/internal-elbare for internal load balancers. - Nodes always run in private subnets. The load balancers sit in public subnets.
EKS Cluster with Auto Mode
This is where Auto Mode gets enabled:
module "eks" {
  source  = "terraform-aws-modules/eks/aws"
  version = "~> 21.0"

  name               = var.project_name
  kubernetes_version = "1.35"

  endpoint_public_access = true
  # UNCOMMENT for production: restrict to your IP ranges or use private-only access
  # cluster_endpoint_public_access_cidrs = ["YOUR_CIDR/32"]

  # Enable Auto Mode - this single block enables:
  #   - Managed Karpenter (compute)
  #   - Managed EBS CSI driver (storage_config derived from compute_config.enabled)
  #   - Managed ALB/NLB Controller (elastic_load_balancing derived from compute_config.enabled)
  #   - Managed VPC CNI, kube-proxy, CoreDNS (bootstrap_self_managed_addons hardcoded false)
  compute_config = {
    enabled    = true
    node_pools = ["general-purpose", "system"]
  }

  vpc_id     = module.vpc.vpc_id
  subnet_ids = module.vpc.private_subnets

  # Auto Mode IAM resources - creates the node IAM role with required policies
  create_node_iam_role           = true
  create_auto_mode_iam_resources = true

  # Cluster access - grants the deploying identity cluster admin
  enable_cluster_creator_admin_permissions = true

  # Addons - metrics-server for HPA + Container Insights for observability
  addons = {
    metrics-server = {
      most_recent = true
    }
    amazon-cloudwatch-observability = {
      most_recent = true
      pod_identity_association = [{
        role_arn        = aws_iam_role.cloudwatch.arn
        service_account = "cloudwatch-agent"
      }]
    }
  }
}
Production notes: This demo uses a public API endpoint without CIDR restrictions and local Terraform state. For production, restrict cluster_endpoint_public_access_cidrs to your corporate IP ranges (or use private-only access with a VPN/bastion), and configure a remote backend (S3 + DynamoDB) for state locking and team collaboration.
The critical parameters:
compute_config.enabled = true- This is the flag that enables Auto Mode. The module automatically derivesstorage_config(block storage) andkubernetes_network_config(elastic load balancing) from this single flag - you do not need to set them separately.compute_config.node_pools- The built-in pools to activate.general-purposehandles your application workloads (On-Demand, C/M/R families, gen 4+, AMD and ARM).systemhandles EKS internal add-ons with aCriticalAddonsOnlytaint.bootstrap_self_managed_addons- The module hardcodes this tofalsewhen Auto Mode is enabled, so you do not need to set it. Auto Mode manages VPC CNI, kube-proxy, and CoreDNS off-cluster.create_auto_mode_iam_resources = true- Creates the node IAM role withAmazonEKSWorkerNodeMinimalPolicyandAmazonEC2ContainerRegistryPullOnly- the least-privilege policies AWS recommends for Auto Mode (not the broaderAmazonEKSWorkerNodePolicyorAmazonEC2ContainerRegistryReadOnly).create_node_iam_role = true- Must betrue(default) so the module creates the Auto Mode node role withnodeRoleArn. Setting this tofalsewithout providing a customnode_role_arncauses the EKS API to reject the cluster.addons- Deploys the metrics-server (required for HPA to read CPU/memory metrics) and CloudWatch Container Insights with Pod Identity for observability (more on this below).
The module also automatically attaches five managed policies to the cluster IAM role: AmazonEKSClusterPolicy, AmazonEKSComputePolicy, AmazonEKSBlockStoragePolicy, AmazonEKSLoadBalancingPolicy, and AmazonEKSNetworkingPolicy. Plus a custom tags policy for Auto Mode resource tagging.
Important Terraform caveat: When disabling Auto Mode later, you must first apply with compute_config.enabled = false before removing the block entirely. Removing it in one step causes issues.
IAM Architecture
The setup follows AWS recommended least-privilege principles with three distinct roles:
| Role | Policies | Purpose |
|---|---|---|
| Cluster Role | AmazonEKSClusterPolicy, AmazonEKSComputePolicy, AmazonEKSBlockStoragePolicy, AmazonEKSLoadBalancingPolicy, AmazonEKSNetworkingPolicy | Cluster control plane + Auto Mode capabilities |
| Node Role | AmazonEKSWorkerNodeMinimalPolicy, AmazonEC2ContainerRegistryPullOnly | Minimal node permissions (not the broader WorkerNodePolicy) |
| CloudWatch Role | CloudWatchAgentServerPolicy, AWSXrayWriteOnlyAccess | Container Insights via Pod Identity |
The node role uses AmazonEKSWorkerNodeMinimalPolicy instead of the broader AmazonEKSWorkerNodePolicy, and AmazonEC2ContainerRegistryPullOnly instead of AmazonEC2ContainerRegistryReadOnly. These are the least-privilege policies AWS specifically recommends for Auto Mode.
Custom NodePool for Spot Instances
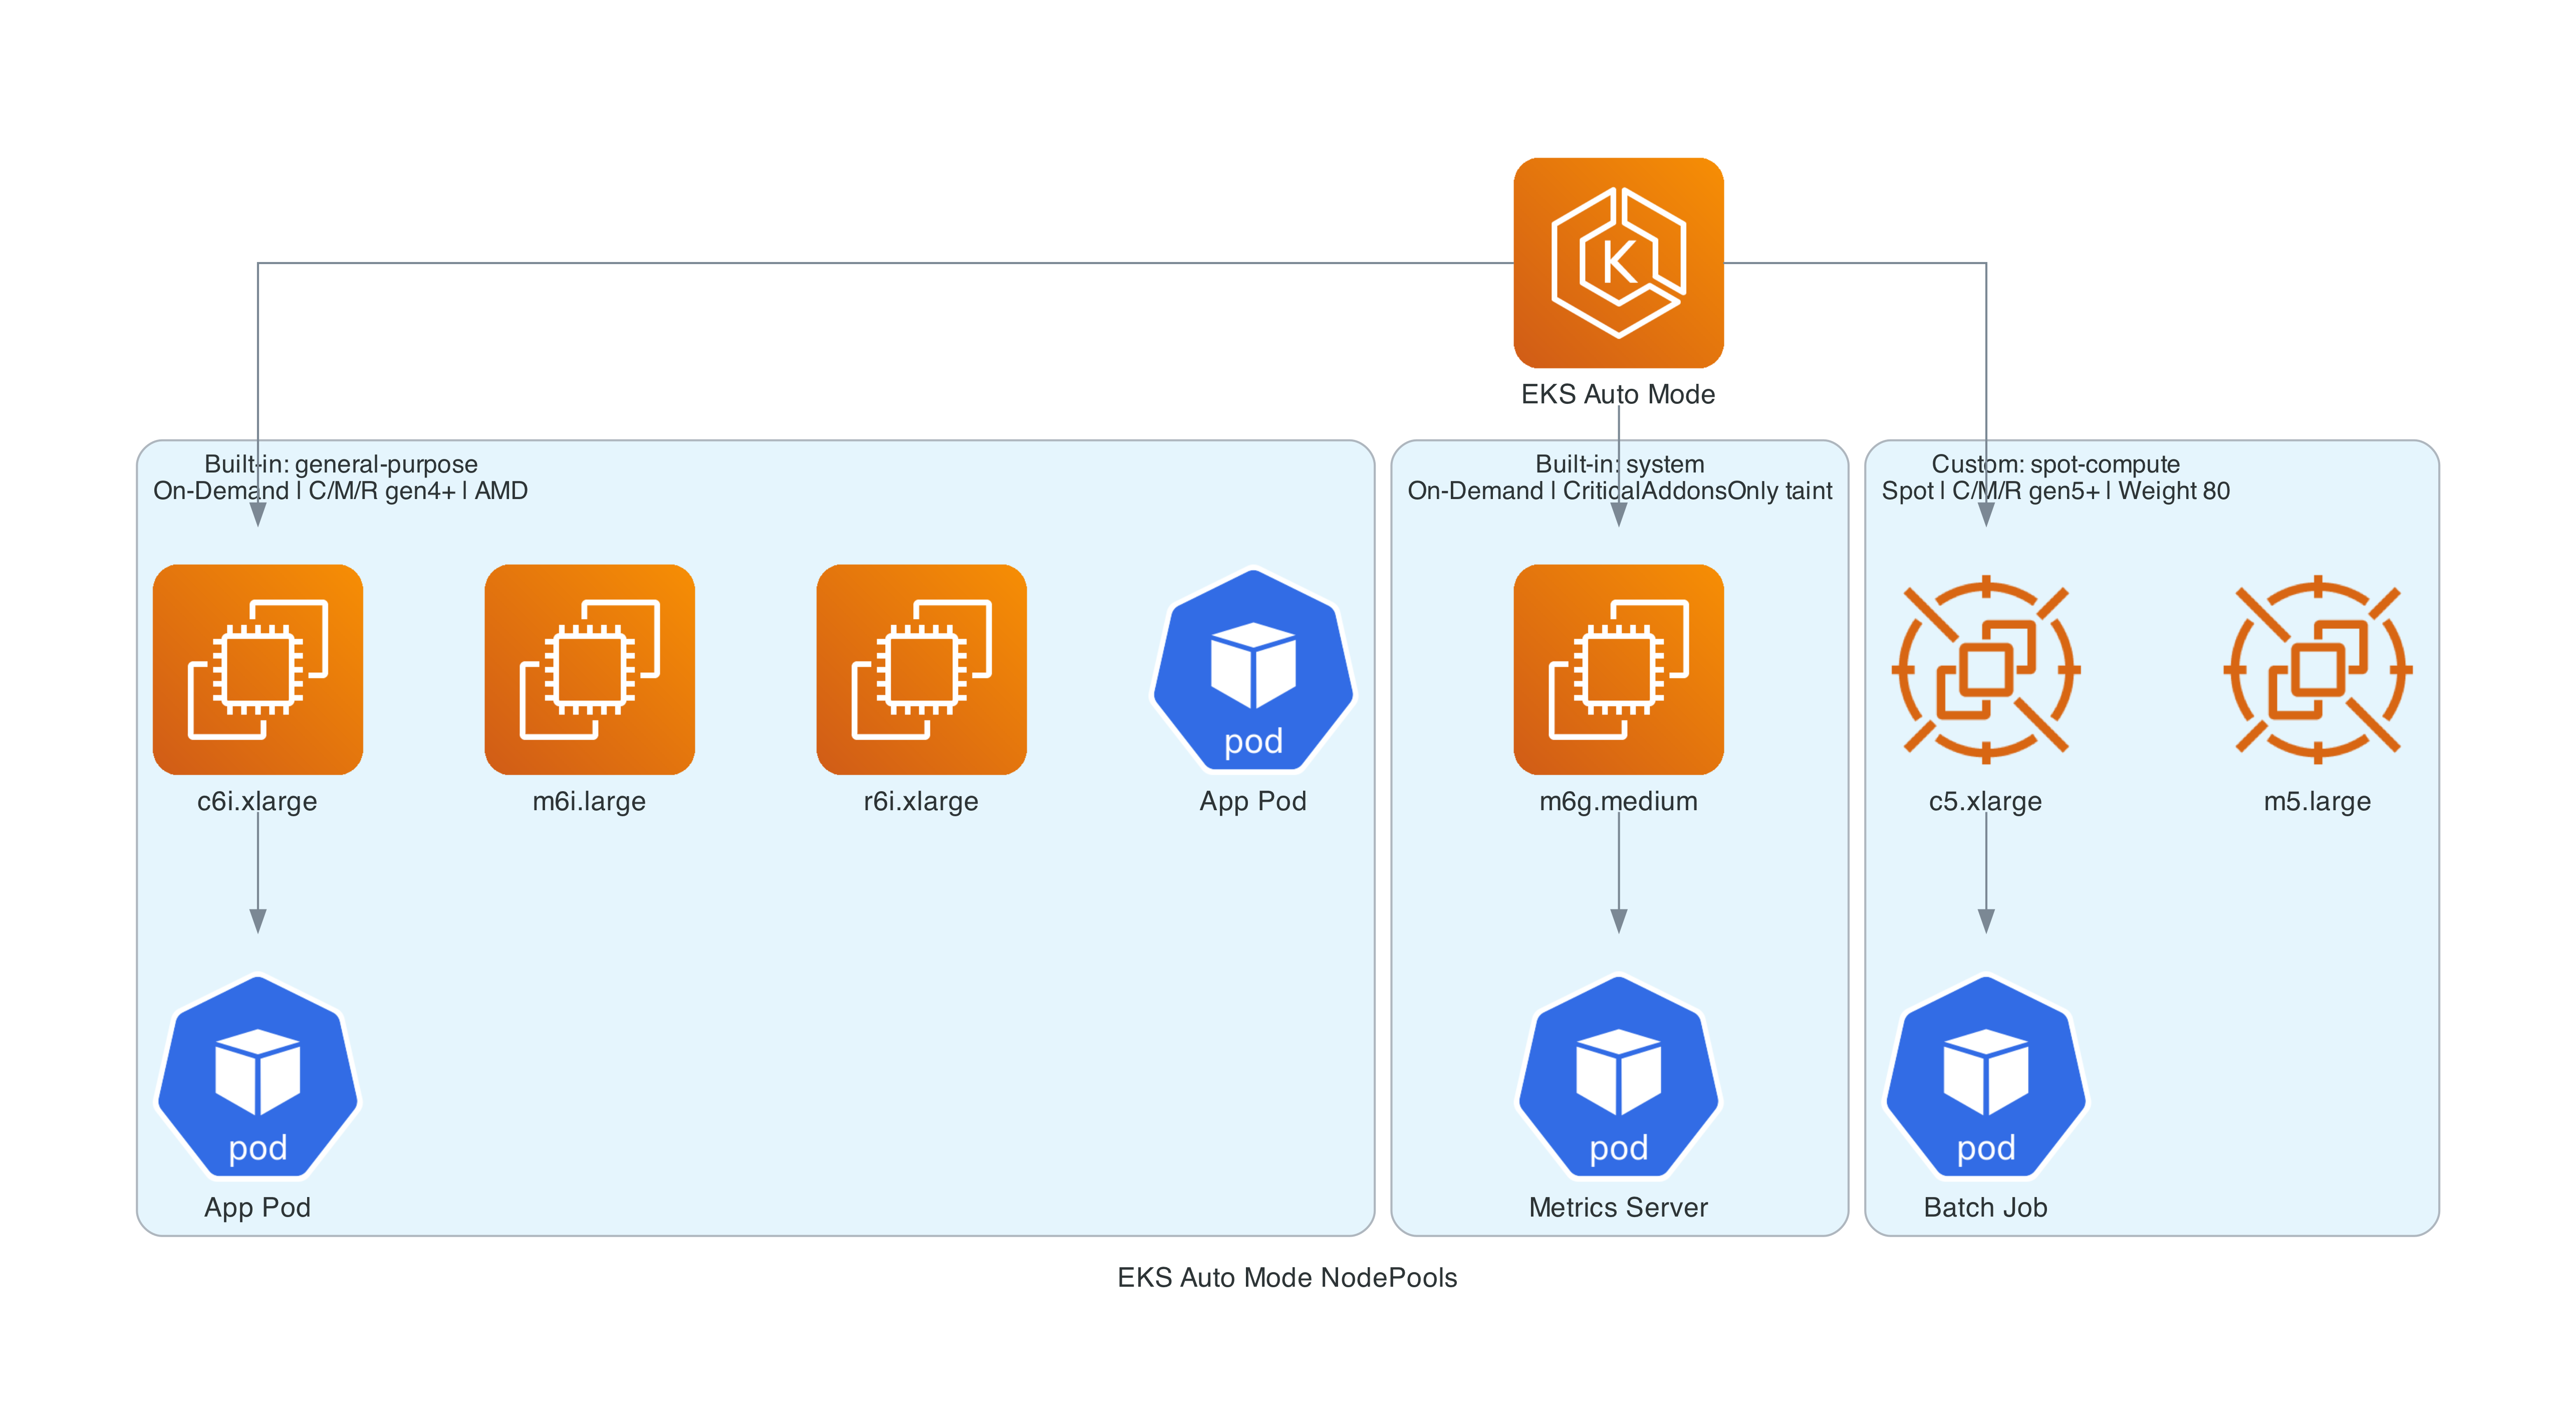
The built-in general-purpose pool uses On-Demand instances only, with C, M, and R instance families (generation 4+, both AMD and ARM/Graviton). For cost optimization, you can create a custom NodePool that uses Spot:
resource "kubectl_manifest" "spot_nodeclass" {
  yaml_body = yamlencode({
    apiVersion = "eks.amazonaws.com/v1"
    kind       = "NodeClass"
    metadata = {
      name = "spot-class"
    }
    spec = {
      role = module.eks.node_iam_role_name
      subnetSelectorTerms = [
        {
          tags = {
            "kubernetes.io/role/internal-elb" = "1"
          }
        }
      ]
      securityGroupSelectorTerms = [
        {
          tags = {
            "aws:eks:cluster-name" = var.project_name
          }
        }
      ]
    }
  })

  depends_on = [module.eks]
}

resource "kubectl_manifest" "spot_nodepool" {
  yaml_body = yamlencode({
    apiVersion = "karpenter.sh/v1"
    kind       = "NodePool"
    metadata = {
      name = "spot-compute"
    }
    spec = {
      template = {
        metadata = {
          labels = {
            "workload-type" = "spot-eligible"
          }
        }
        spec = {
          nodeClassRef = {
            group = "eks.amazonaws.com"
            kind  = "NodeClass"
            name  = "spot-class"
          }
          requirements = [
            {
              key      = "karpenter.sh/capacity-type"
              operator = "In"
              values   = ["spot"]
            },
            {
              key      = "eks.amazonaws.com/instance-category"
              operator = "In"
              values   = ["c", "m", "r"]
            },
            {
              key      = "eks.amazonaws.com/instance-generation"
              operator = "Gte"
              values   = ["5"]
            }
          ]
          expireAfter = "336h"
        }
      }
      disruption = {
        consolidationPolicy = "WhenEmptyOrUnderutilized"
        consolidateAfter    = "1m"
        budgets = [
          { nodes = "20%" }
        ]
      }
      weight = 80
    }
  })

  depends_on = [
    module.eks,
    kubectl_manifest.spot_nodeclass,
  ]
}
Key differences from self-managed Karpenter:
- NodeClass uses
eks.amazonaws.com/v1instead ofkarpenter.k8s.aws/v1 - NodeClass requires
role- You must specifyrole(IAM role name) orinstanceProfile. The EKS API rejects NodeClasses without one of these. Usemodule.eks.node_iam_role_namefrom the Terraform module - Labels use
eks.amazonaws.com/*instead ofkarpenter.k8s.aws/* - NodePool API is the same
karpenter.sh/v1in both cases consolidateAfteris required in thedisruptionblock - omitting it causes a validation error- The weight field (80 for Spot vs the default pool) determines scheduling preference
- Instance families (C/M/R) and generation (5+) are specified via
requirements- Karpenter selects the specific instance size based on pod resource requests at scheduling time
To direct workloads to Spot nodes, add a nodeSelector:
spec:
  nodeSelector:
    workload-type: spot-eligible
Deploying a Real Application
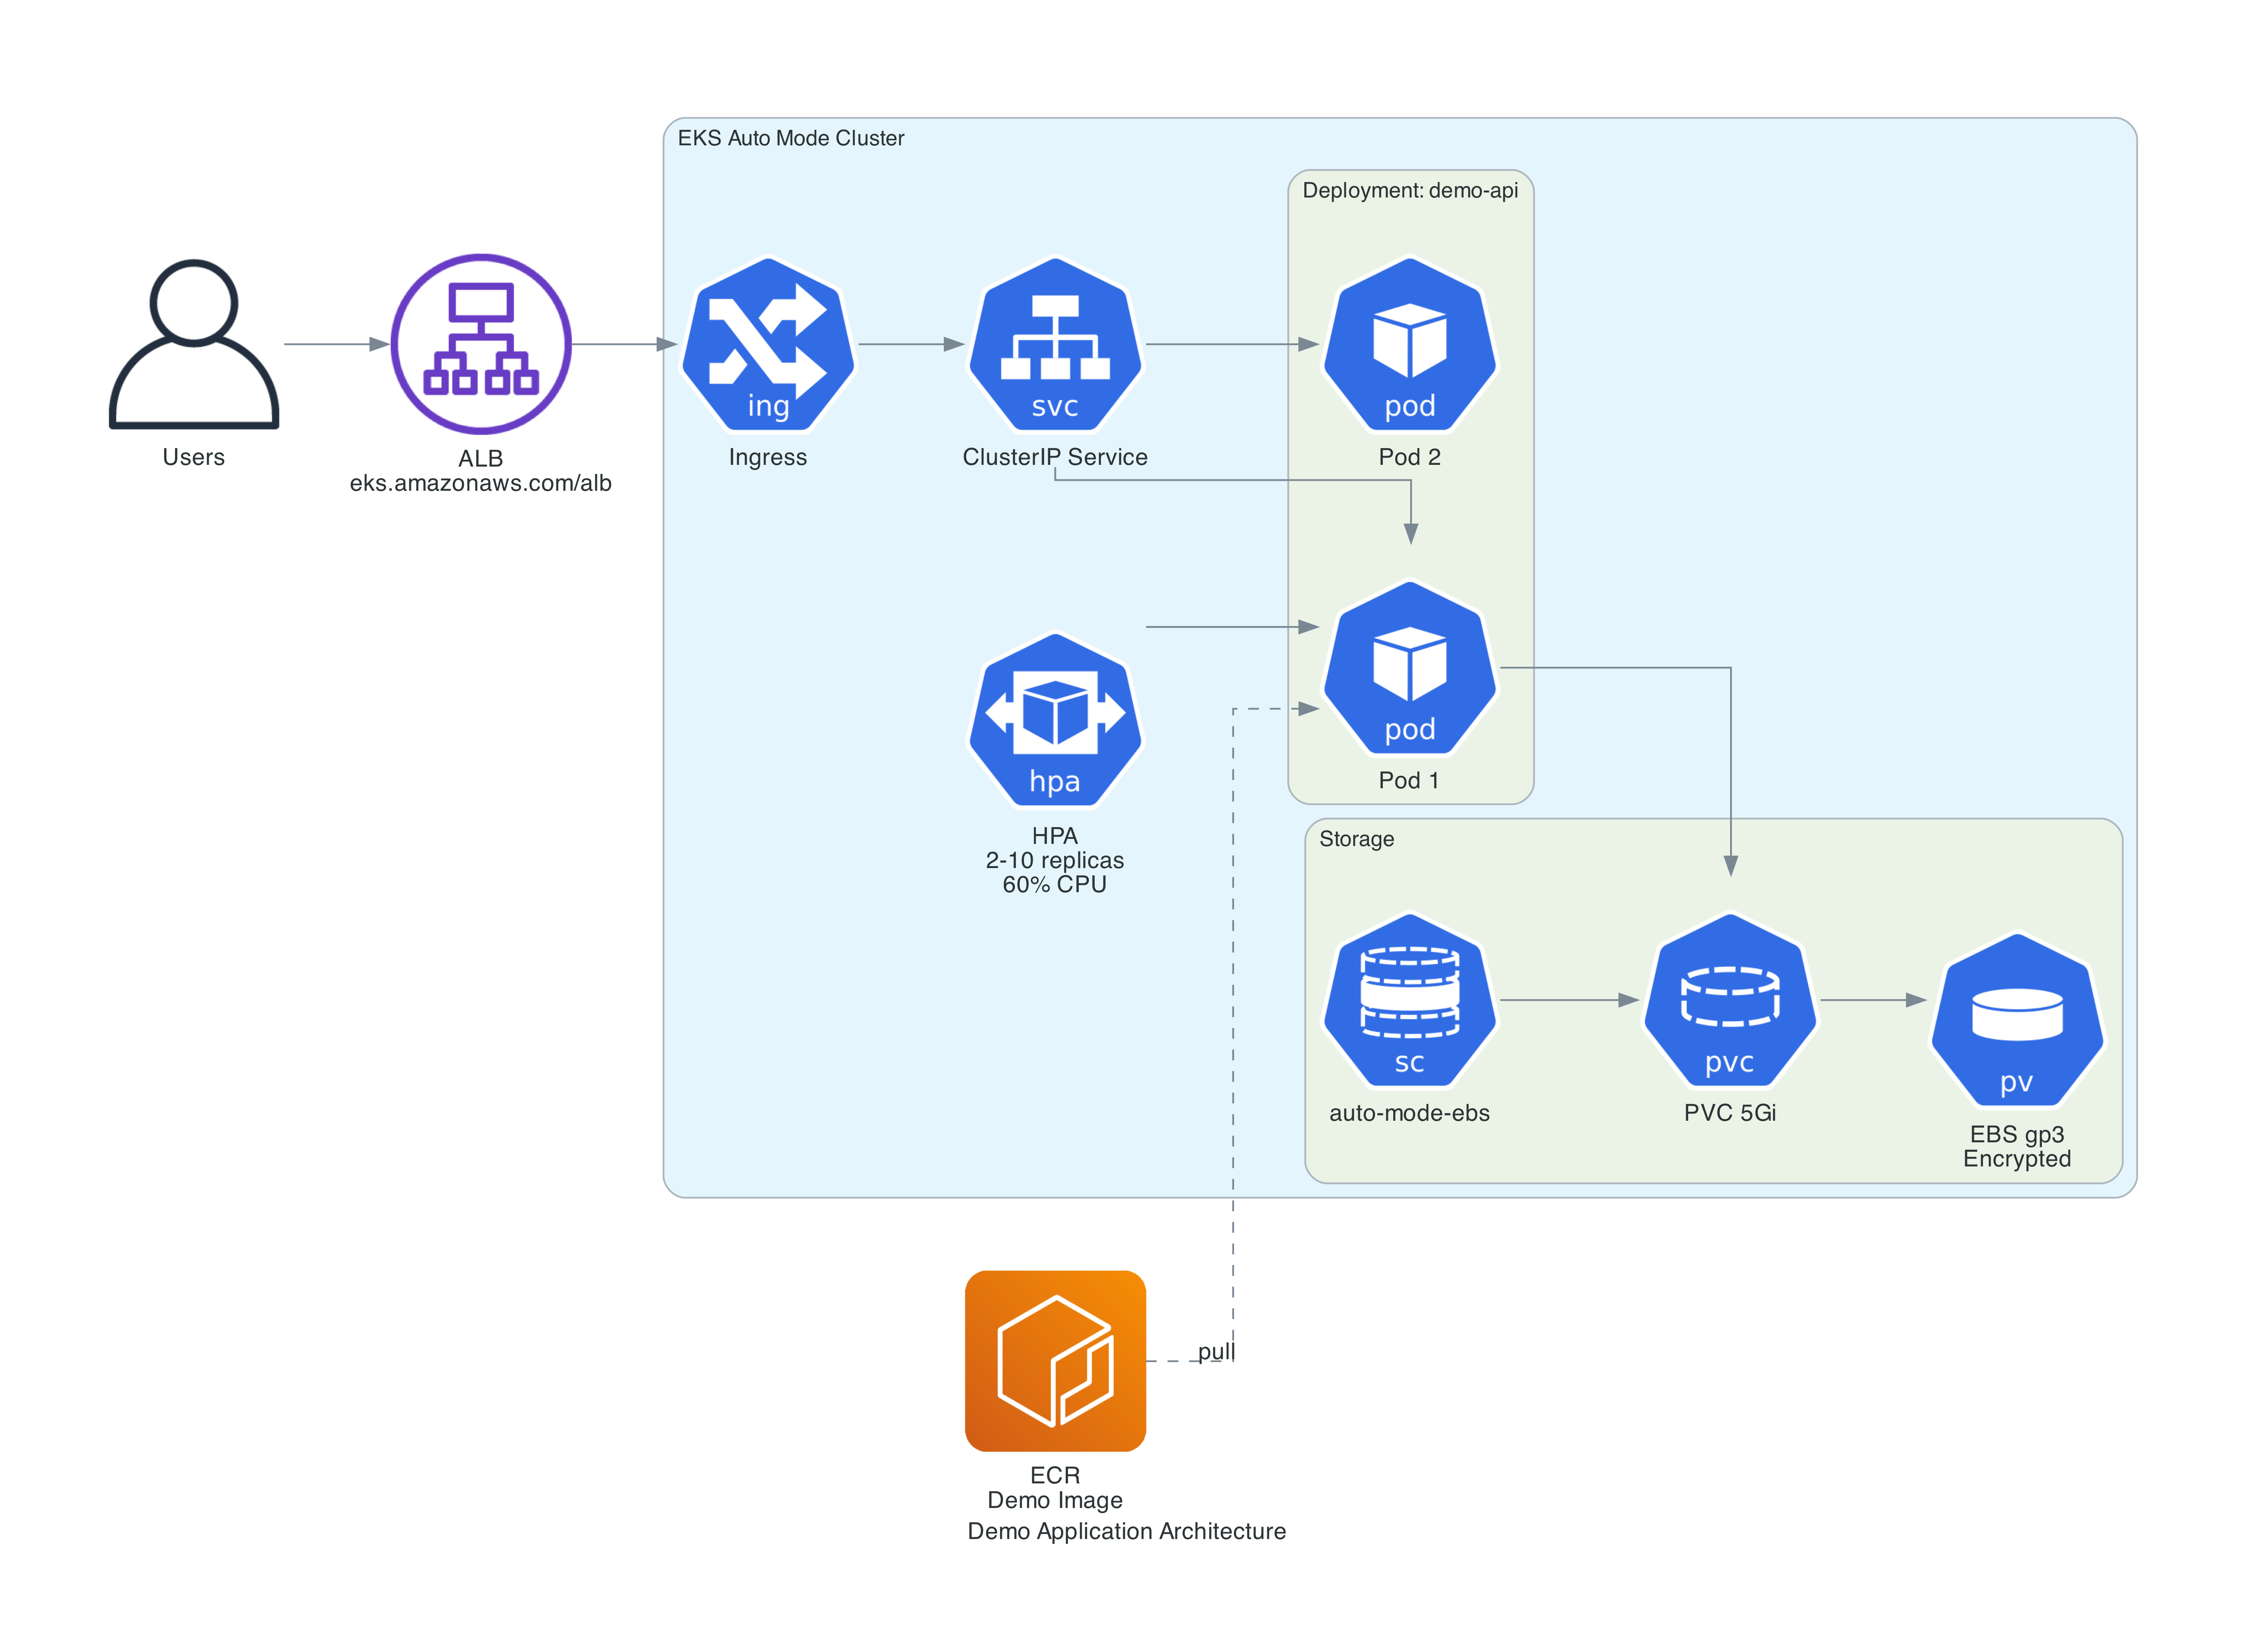
To demonstrate the full workflow, I deployed a Python FastAPI application with an ALB, autoscaling, and a load generator for scaling demos.
Application Code
A demo API with four endpoints designed to showcase Auto Mode's capabilities:
/health- Health check for probes and ALB health checks/info- Returns pod and node details including the instance type Karpenter selected, whether the node is Spot or On-Demand, which NodePool it belongs to, and the AZ. Uses the Kubernetes API with a read-only RBAC binding to query node labels/compute/{iterations}- CPU-intensive endpoint for triggering HPA scaling/stress/{mb}?seconds=30- Allocates memory to demonstrate memory pressure. Holds the allocation then auto-releases
The most interesting part is the /info endpoint, which queries the Kubernetes API to read node labels set by Karpenter:
def _get_node_info():
    """Fetch node labels via Kubernetes API to show Auto Mode scheduling decisions."""
    from kubernetes import client, config
    config.load_incluster_config()
    v1 = client.CoreV1Api()

    node = v1.read_node(os.getenv("NODE_NAME"))
    labels = node.metadata.labels or {}

    return {
        "node_name": os.getenv("NODE_NAME"),
        "instance_type": labels.get("node.kubernetes.io/instance-type", "unknown"),
        "capacity_type": labels.get("karpenter.sh/capacity-type", "unknown"),
        "nodepool": labels.get("karpenter.sh/nodepool", "unknown"),
        "zone": labels.get("topology.kubernetes.io/zone", "unknown"),
        "arch": labels.get("kubernetes.io/arch", "unknown"),
        "compute_type": labels.get("eks.amazonaws.com/compute-type", "unknown"),
    }
The other endpoints: /compute/{iterations} does CPU-intensive work for HPA scaling demos, and /stress/{mb} allocates memory (auto-releases after a configurable hold period) for memory pressure demos. Full app code on GitHub.
Here is a real response from the running demo:
{
  "pod": {
    "name": "demo-api-847f8d6ff5-9gvsq",
    "namespace": "demo",
    "ip": "10.0.3.184",
    "service_account": "demo-api"
  },
  "node": {
    "node_name": "i-01e881b330651bbc6",
    "instance_type": "c7g.large",
    "capacity_type": "spot",
    "nodepool": "spot-compute",
    "zone": "us-east-1c",
    "arch": "arm64",
    "compute_type": "auto"
  }
}
Notice Karpenter selected a c7g.large - a Graviton (ARM) Spot instance. This is a key insight: Karpenter optimizes for cost, and Graviton Spot instances are often the cheapest available option. The built-in general-purpose pool includes both AMD and ARM architectures, and the custom Spot pool does too. Hit the endpoint multiple times and you may see responses from different pods on different nodes, potentially in different AZs.
Building the Container Image
The Dockerfile is a standard Python 3.13-slim image running uvicorn.
Important: Build for the right architecture. Auto Mode's NodePools include ARM (Graviton) instances by default - Karpenter often selects them because they are the cheapest option. You need to target the right platform:
# Build for ARM (Graviton nodes - most common with Auto Mode Spot)
docker buildx build --platform linux/arm64 -t my-app:latest --load .

# Or if your nodes are AMD64
docker buildx build --platform linux/amd64 -t my-app:latest --load .
Using :latest tags with Auto Mode requires imagePullPolicy: Always in the deployment to ensure nodes pull the newest image on every pod creation.
Kubernetes Manifests
The key manifest design decisions (full manifests on GitHub):
RBAC for /info - The pod needs a ServiceAccount with a ClusterRole to read node labels. This is a minimal read-only get on nodes:
apiVersion: rbac.authorization.k8s.io/v1
kind: ClusterRole
metadata:
  name: node-reader
rules:
  - apiGroups: [""]
    resources: ["nodes"]
    verbs: ["get"]
Downward API env vars - The deployment injects NODE_NAME, POD_NAME, POD_NAMESPACE, POD_IP, and POD_SERVICE_ACCOUNT via the Kubernetes downward API. The /info endpoint uses NODE_NAME to query the Kubernetes API for that node's labels:
env:
  - name: NODE_NAME
    valueFrom:
      fieldRef:
        fieldPath: spec.nodeName
Other important details:
imagePullPolicy: Alwaysis required when using:latesttags, since nodes cache images- IngressClass is
alb(noteks.amazonaws.com/alb, since/is invalid in RFC 1123 subdomain names). You must explicitly create theIngressClassParamsandIngressClassresources - Auto Mode does not auto-register them - Resource requests are set on every container. This is critical with Auto Mode - Karpenter provisions nodes based on requested resources. If you don't set requests, Auto Mode has no signal for right-sizing
- Health probes are defined for proper rolling updates and load balancer health checks
Horizontal Pod Autoscaler
apiVersion: autoscaling/v2
kind: HorizontalPodAutoscaler
metadata:
  name: demo-api
  namespace: demo
spec:
  scaleTargetRef:
    apiVersion: apps/v1
    kind: Deployment
    name: demo-api
  minReplicas: 2
  maxReplicas: 10
  behavior:
    scaleDown:
      stabilizationWindowSeconds: 120
  metrics:
    - type: Resource
      resource:
        name: cpu
        target:
          type: Utilization
          averageUtilization: 60
    - type: Resource
      resource:
        name: memory
        target:
          type: Utilization
          averageUtilization: 70
The HPA scales on both CPU and memory - whichever metric exceeds its threshold first triggers a scale-up. The /compute endpoint drives CPU scaling, while the /stress endpoint drives memory scaling. Both trigger the same pod-to-node scaling chain through Auto Mode.
The stabilizationWindowSeconds: 120 shortens the default 5-minute stabilization window for scale-down, allowing the HPA to reduce replicas faster after load drops - useful for demos and workloads where you want quicker consolidation.
Important: The HPA requires the Kubernetes Metrics Server to read CPU/memory utilization. The metrics-server is deployed as an EKS addon in the Terraform configuration (see the EKS cluster configuration above). Without it, HPA reports cpu: <unknown> and never scales.
PodDisruptionBudget
Since Auto Mode consolidation is enabled by default, a PDB protects your application during node replacement:
apiVersion: policy/v1
kind: PodDisruptionBudget
metadata:
  name: demo-api
  namespace: demo
spec:
  minAvailable: 1
  selector:
    matchLabels:
      app: demo-api
This ensures at least one pod is always available when Auto Mode consolidates or rotates nodes. Without a PDB, Karpenter could drain all pods from a node simultaneously during consolidation.
When the HPA scales pods up and existing nodes can't fit them, Auto Mode's managed Karpenter automatically provisions new nodes. When pods scale down and nodes become underutilized, consolidation kicks in and nodes are terminated. You never interact with the scaling infrastructure directly.
Autoscaling in Action
One of the most compelling features of Auto Mode is how seamlessly pod-level and node-level scaling work together. The repo includes everything needed to demonstrate this end-to-end.
Manual Scaling Demo
The quickest way to see Auto Mode's node provisioning is to scale the deployment beyond what existing nodes can handle:
# Scale to 15 replicas - watch Auto Mode provision new nodes
kubectl scale deployment demo-api -n demo --replicas=15

# Watch the scaling in real time
kubectl get pods -n demo -o wide -w    # Pods scheduling across nodes
kubectl get nodes -w                    # New nodes appearing
kubectl get events -A --sort-by='.lastTimestamp' | grep -E 'Nominated|Launched'

# Scale back down - watch consolidation
kubectl scale deployment demo-api -n demo --replicas=2
When you scale to 15 replicas, each requesting 256m CPU and 512Mi memory, the existing nodes cannot fit all the pods. Auto Mode's managed Karpenter evaluates the pending pods, selects optimal instance types from the C/M/R families (generation 4+, including Graviton), and provisions new nodes. The instance type is determined by the aggregate resource requests and cost optimization - Karpenter might select a c7g.large (Graviton) over an m7i.large if it is cheaper and fits the workload. You can verify this by hitting the /info endpoint to see exactly what Karpenter chose.
When you scale back down, pods are removed and nodes become underutilized. Auto Mode's consolidation policy (WhenEmptyOrUnderutilized) kicks in, draining and terminating nodes that are no longer needed.
Load-Driven Scaling Demo
For a more realistic demonstration, the repo includes a load generator - a busybox pod that continuously hits /compute/500000 to drive CPU utilization above the HPA threshold.
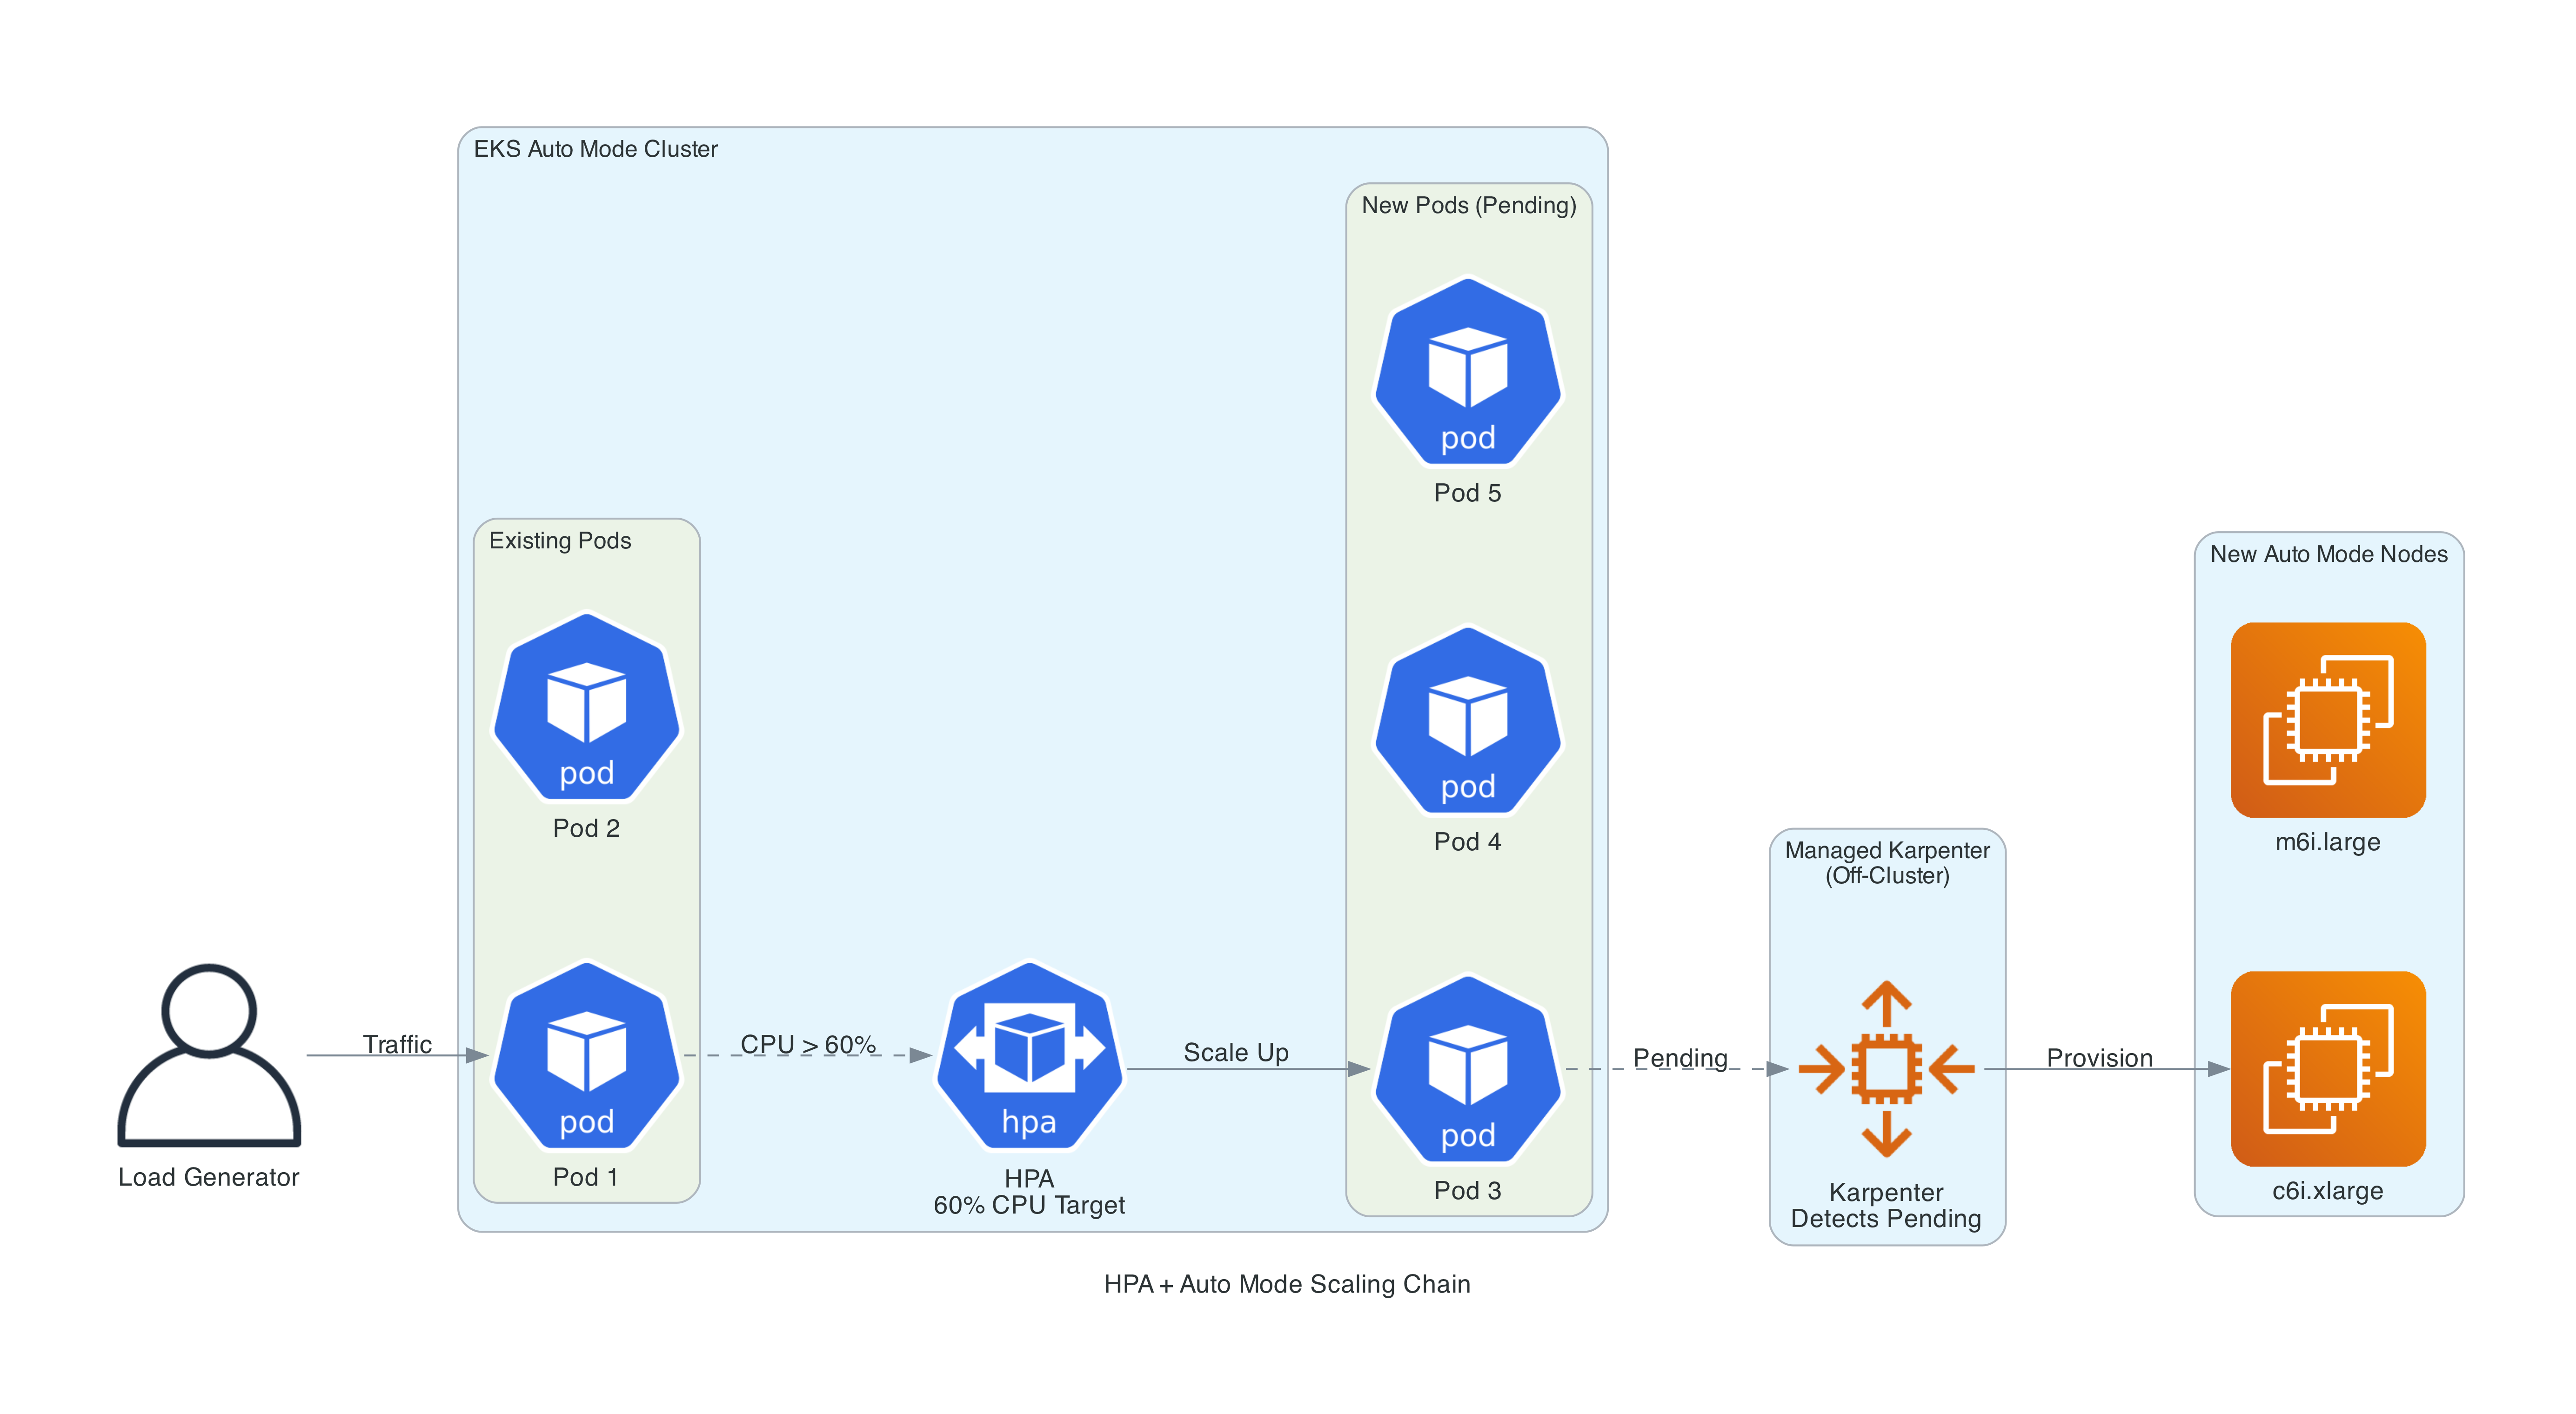
The full scaling chain works like this:
- Load generator drives traffic to the API
- CPU utilization exceeds the HPA's 60% target
- HPA increases the replica count
- New pods enter
Pendingstate (no room on existing nodes) - Auto Mode's Karpenter detects pending pods and provisions new nodes
- Pods schedule onto the new nodes and begin serving traffic
# Start the load generator
kubectl apply -f k8s/load-generator.yaml

# Watch the full chain: HPA -> pods -> nodes
kubectl get hpa -n demo -w
kubectl get pods -n demo -o wide -w
kubectl get nodes -w

# Stop the load
kubectl delete -f k8s/load-generator.yaml
# HPA scales pods down, Auto Mode consolidates nodes
The Makefile includes convenience commands for all of this: make demo-scale-up, make demo-scale-down, make demo-load-start, make demo-load-stop, and make demo-watch.
Observability with Container Insights
Since February 2026, Auto Mode supports Managed Capability Logging - you can deliver logs from compute autoscaling (Karpenter), block storage, load balancing, and pod networking to CloudWatch Logs, S3, or Kinesis Data Firehose using CloudWatch Vended Logs. This closed what was previously the biggest observability gap.
CloudWatch Container Insights complements this by providing node, pod, and container-level metrics with pre-built dashboards.
Terraform Setup
The CloudWatch observability addon is deployed as an EKS addon with Pod Identity - the recommended approach for Auto Mode:
# In the EKS module
addons = {
  metrics-server = {
    most_recent = true
  }
  amazon-cloudwatch-observability = {
    most_recent = true
    pod_identity_association = [{
      role_arn        = aws_iam_role.cloudwatch.arn
      service_account = "cloudwatch-agent"
    }]
  }
}
The metrics-server addon is required for HPA to read CPU and memory utilization. Without it, HPA cannot function.
The IAM role uses Pod Identity (not IRSA) with least-privilege policies:
data "aws_iam_policy_document" "cloudwatch_assume" {
  statement {
    actions = ["sts:AssumeRole", "sts:TagSession"]
    principals {
      type        = "Service"
      identifiers = ["pods.eks.amazonaws.com"]
    }
  }
}

resource "aws_iam_role" "cloudwatch" {
  name               = "${var.project_name}-cloudwatch-observability"
  assume_role_policy = data.aws_iam_policy_document.cloudwatch_assume.json
}

resource "aws_iam_role_policy_attachment" "cloudwatch_agent" {
  role       = aws_iam_role.cloudwatch.name
  policy_arn = "arn:aws:iam::aws:policy/CloudWatchAgentServerPolicy"
}

resource "aws_iam_role_policy_attachment" "xray_write" {
  role       = aws_iam_role.cloudwatch.name
  policy_arn = "arn:aws:iam::aws:policy/AWSXrayWriteOnlyAccess"
}
Key decisions:
- Pod Identity over IRSA - Pod Identity is the recommended approach for EKS addons. It is built into Auto Mode (the Pod Identity Agent runs on every node automatically).
- Trust principal is
pods.eks.amazonaws.com- This is the Pod Identity service, notec2.amazonaws.com. AWSXrayWriteOnlyAccess- Required alongsideCloudWatchAgentServerPolicyfor full observability including trace collection.
What You Get
Once deployed, Container Insights provides:
- Node metrics - CPU, memory, network, and disk utilization per node
- Pod metrics - CPU and memory usage per pod, with requests vs actual
- Container-level performance - Individual container metrics within pods
- Cluster dashboards - Pre-built CloudWatch dashboards for cluster health
- Log collection - Application and system logs forwarded to CloudWatch Logs
This complements Managed Capability Logging by providing resource-level metrics that controller logs don't surface. Container Insights gives you the visibility to understand scaling behavior, identify resource bottlenecks, and verify that consolidation is working as expected.
Security Out of the Box
Auto Mode provides a strong security posture with minimal configuration. Here is what you get by default:
Node Security
- Bottlerocket OS - Minimal, purpose-built container OS with SELinux enforcing and a read-only root filesystem. No package manager, no shell access.
- IMDSv2 enforced - Instance metadata hop limit hardcoded to 1, preventing containers from accessing node credentials via IMDS.
- No SSH/SSM access - Nodes are locked down. You cannot open a shell on an Auto Mode node.
- 14-day node rotation - Nodes expire after 14 days by default (configurable up to 21 days) and are automatically replaced with the latest patched Bottlerocket AMI, ensuring CVE fixes are applied continuously.
- Drift detection - When AWS releases a new AMI (approximately weekly), Auto Mode detects the drift and replaces nodes with the updated image.
Data Security
- Encrypted EBS volumes - Auto Mode's managed EBS CSI driver supports encrypted volumes via StorageClass parameters (
encrypted: "true"), ensuring persistent volumes are encrypted at rest. allowedTopologies- StorageClasses can restrict volume provisioning to Auto Mode compute nodes viaeks.amazonaws.com/compute-type: auto.- Secrets encryption - EKS supports envelope encryption for Kubernetes secrets using KMS. Add
encryption_configto the EKS module to encrypt etcd secrets at rest with your own KMS key. This is not enabled by default but is recommended for production clusters handling sensitive data.
IAM Security
- Least-privilege node role - Uses
AmazonEKSWorkerNodeMinimalPolicy(not the broaderAmazonEKSWorkerNodePolicy) andAmazonEC2ContainerRegistryPullOnly(notAmazonEC2ContainerRegistryReadOnly). - Pod Identity - Built-in, used for the CloudWatch addon. No need for IRSA or node-level IAM policies for application workloads.
- Separate IAM roles - Cluster role, node role, and addon roles are distinct with non-overlapping permissions.
Network Security
- Private subnets - Nodes run exclusively in private subnets with no direct internet access.
- Managed VPC CNI - Network policies are enforced at the CNI level without additional tooling.
- NAT gateway - Outbound traffic routes through NAT, providing a single egress point.
Resource Requests Matter More Than Ever
This deserves its own section because it is the single most important operational consideration with Auto Mode.
In a traditional EKS setup with Managed Node Groups, you might have fixed-size nodes (e.g., m5.xlarge) and the Kubernetes scheduler bins pods onto available capacity. Wasted capacity is absorbed by the fixed node pool.
With Auto Mode (and Karpenter in general), nodes are provisioned to fit the requested resources. If your pod requests 256m CPU and 512Mi memory, Karpenter might provision a small instance just for that pod. If your pod actually needs 2 vCPU but only requests 256m, it will get throttled.
Best practices for resource requests:
- Always set both CPU and memory requests on every container
- Use tools like Goldilocks or VPA in recommendation mode to determine actual usage before setting requests
- Set requests close to actual usage - not the theoretical maximum
- Set limits higher than requests for burst capacity, but not orders of magnitude higher
- Monitor actual vs requested using Container Insights or Prometheus
The Karpenter Connection
Understanding that Auto Mode is Karpenter helps explain its behavior:
- Consolidation is enabled by default. If a node is empty or underutilized, Auto Mode replaces it with a better-fitting instance
- Node expiration is 14 days by default (max 21 days). Nodes are automatically replaced, picking up the latest Bottlerocket AMI
- Drift detection triggers replacement when AWS releases a new AMI (approximately weekly)
- Disruption budget of 10% prevents too many nodes from being replaced simultaneously
- Instance selection is automatic - Karpenter evaluates the C/M/R families (generation 4+ for built-in, 5+ for our Spot pool) and picks the optimal size based on pending pod requests
Since February 2026, you can access Karpenter's logs through Managed Capability Logging. Configure CloudWatch Vended Logs to deliver compute autoscaling logs to CloudWatch Logs, S3, or Kinesis Data Firehose. For quick troubleshooting, Kubernetes events (from eks-auto-mode/compute) remain the fastest signal.
# View Auto Mode compute events
kubectl get events -A --sort-by='.lastTimestamp' | tail -20

# Check node provisioning
kubectl get nodes -o wide --show-labels

# See NodePool status
kubectl get nodepools
kubectl describe nodepool general-purpose
Cost Analysis
EKS Auto Mode has three cost components:
| Component | Cost |
|---|---|
| EKS cluster fee | $0.10/hour ($72/month) |
| EC2 instances | Standard pricing (On-Demand, RI, Savings Plans, Spot) |
| Auto Mode management fee | ~12% on top of EC2 instance costs |
Example Monthly Costs
For a cluster running 3x m6i.xlarge (4 vCPU, 16 GiB each) on On-Demand:
| Item | Monthly Cost |
|---|---|
| EKS cluster | $72 |
| 3x m6i.xlarge On-Demand | ~$432 |
| Auto Mode fee (~12%) | ~$52 |
| NAT Gateway (single) | ~$32 + data |
| ALB (light traffic) | ~$22 |
| Total | ~$610/month |
Compare to self-managed EKS with Karpenter:
| Item | Monthly Cost |
|---|---|
| EKS cluster | $72 |
| 3x m6i.xlarge On-Demand | ~$432 |
| Karpenter pod overhead | ~$0 (runs on existing nodes) |
| NAT Gateway | ~$32 + data |
| ALB | ~$22 |
| Total | ~$558/month |
The ~$52/month premium (9-12% of compute) buys you elimination of operational overhead for Karpenter, VPC CNI, EBS CSI driver, ALB controller, Pod Identity Agent, AMI lifecycle, OS patching, and node health monitoring. For most teams, that operational burden costs far more than $52/month in engineer time.
Cost Optimization Strategies
- Custom Spot NodePools - Create a Spot pool (shown above) for fault-tolerant workloads. Spot savings of 60-70% significantly offset the management fee
- Right-size resource requests - Auto Mode provisions exactly what you request. Accurate requests mean less wasted capacity
- Consolidation - Enabled by default. Auto Mode automatically bin-packs and replaces underutilized nodes
- Compute Savings Plans - Apply to Auto Mode EC2 instances just like regular instances
Recent Feature Additions
Auto Mode has been gaining features steadily since GA. Notable additions through early 2026:
- Managed Capability Logging (February 2026) - Deliver logs from compute autoscaling, block storage, load balancing, and pod networking to CloudWatch Logs, S3, or Kinesis Data Firehose via CloudWatch Vended Logs. This closed the biggest observability gap.
- Secondary IP mode (December 2025) - IP conservation for large clusters
- SOCI parallel pull (November 2025) - Up to 60% faster container image pulls for GPU instances
- Static-capacity NodePools (November 2025) - Fixed replica count for predictable workloads that need a guaranteed number of nodes
- GovCloud availability for Auto Mode (October 2025) - US-East and US-West GovCloud regions
- FIPS-compatible AMIs (October 2025) - For US compliance requirements
- Local Zones support (October 2025) - Deploy Auto Mode nodes to edge locations
- associatePublicIPAddress (August 2025) - Control public IP assignment in NodeClass
- ODCR/Capacity Reservation support (June 2025) - Use On-Demand Capacity Reservations with Auto Mode
- Pod subnet and security group selectors (June 2025) -
podSubnetSelectorTermsandpodSecurityGroupSelectorTermsin NodeClass for network isolation
Static-capacity NodePools and ODCR support are particularly relevant for enterprise readers who need guaranteed capacity for critical workloads.
Current Limitations
Auto Mode is not the right choice for every workload. Here are the constraints:
- No custom AMIs - Only AWS-provided Bottlerocket variants. If you need Amazon Linux, Ubuntu, or custom-built images with compliance tooling baked in, Auto Mode won't work. Workaround: deploy host-level tooling as DaemonSets
- No SSH/SSM access to nodes - Nodes are locked down. You can get node logs through Kubernetes APIs and EKS troubleshooting tools, but cannot open a shell on a node
- Controller logs require extra setup - Karpenter, ALB Controller, and other managed components run off-cluster. Since February 2026, you can access their logs via Managed Capability Logging (CloudWatch Vended Logs), but this requires explicit configuration - it is not enabled by default
- No self-managed Karpenter - Cannot coexist. Must uninstall before enabling Auto Mode
- No third-party CNI - Only the managed VPC CNI. Calico and Cilium (as CNI) are not supported. Cilium for network policy only may work
- Linux only - No Windows node support. This matters for .NET shops running Windows containers
- IMDSv2 hop limit of 1 - Hardcoded, cannot be changed. This breaks some tools that need IMDS access from within pods (Datadog agent, some AWS SDK configurations). Workaround: pods that require IMDS access must run with
hostNetwork: true - No DRA - Dynamic Resource Allocation is not yet supported
- No Gateway API - The managed ALB controller only supports the Ingress API and Service annotations (for NLB). If you need Gateway API (HTTPRoute, GatewayClass), you would need to disable Auto Mode's load balancing capability and self-manage the AWS Load Balancer Controller, which defeats much of the purpose of Auto Mode
The most common blocker I see discussed is the lack of custom AMIs and SSH access. If your security team requires specific hardening beyond what Bottlerocket provides, or your compliance framework mandates SSH-based auditing, Auto Mode is not ready for you yet.
Migration Considerations
If you have an existing EKS cluster, migration to Auto Mode is possible but has significant caveats.
Storage Migration
PVCs created with the self-managed EBS CSI driver (ebs.csi.aws.com) cannot be directly mounted by Auto Mode's driver (ebs.csi.eks.amazonaws.com). You need to recreate PV/PVC resources. AWS provides the eks-auto-mode-ebs-migration-tool to help.
Load Balancer Migration
Existing load balancers from the self-managed AWS Load Balancer Controller cannot be transferred to the managed controller. You need a blue-green approach - create new LBs under the managed controller and shift traffic via DNS.
From Self-Managed Karpenter
- Uninstall self-managed Karpenter
- Uninstall AWS Load Balancer Controller
- Enable Auto Mode
- Recreate NodePool/NodeClass resources with Auto Mode API versions
Real-World Advice
The Playtomic engineering team documented their migration experience and concluded: "If you're already running an EKS cluster with Karpenter and AWS Load Balancer Controller, we don't recommend migrating to EKS Auto Mode." Their recommendation is to adopt Auto Mode for new clusters.
I agree with this assessment. The migration path has enough friction that the ROI for existing, well-running clusters is questionable. For greenfield deployments, Auto Mode is the obvious choice (if the limitations don't block you and you want an easier approach to running full Kubernetes on AWS)
When to Use Auto Mode vs Standard EKS vs Fargate
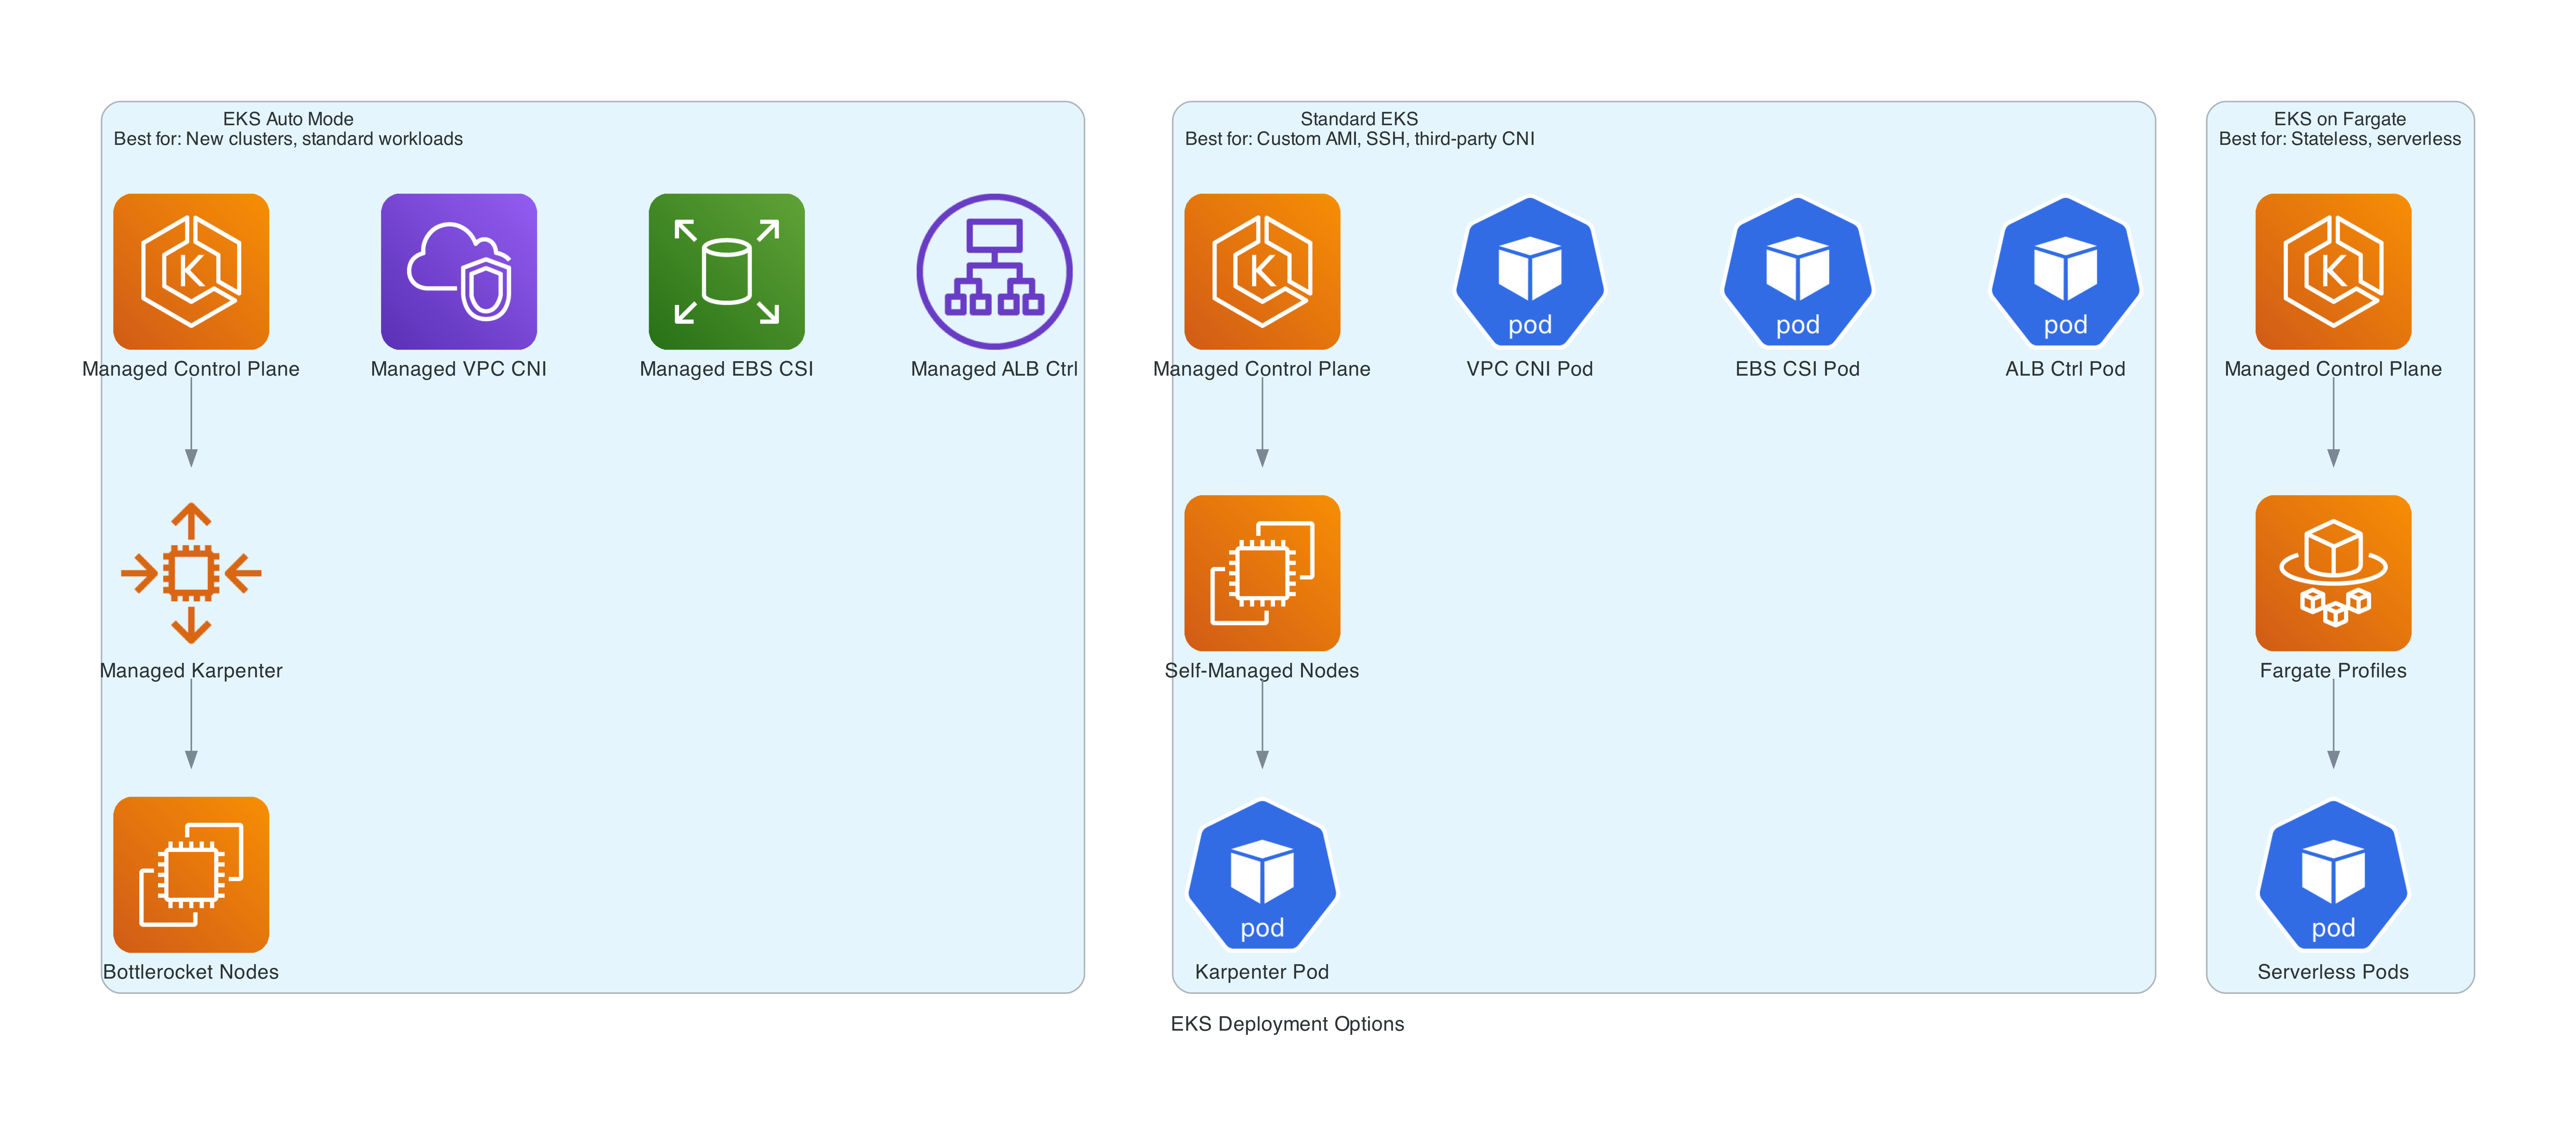
| Criteria | EKS Auto Mode | Standard EKS | EKS on Fargate |
|---|---|---|---|
| Node management | AWS managed | You manage | Serverless (no visible nodes) |
| Custom AMIs | No | Yes | N/A |
| SSH to nodes | No | Yes | N/A |
| DaemonSets | Yes | Yes | No |
| Persistent storage | Yes (managed EBS) | Yes | EFS only |
| GPU support | Yes (managed drivers) | Yes | No |
| Instance type control | Via NodePool constraints | Full control | N/A |
| Third-party CNI | No | Yes | No |
| Windows | No | Yes | No |
| Cost premium | ~12% on compute | None | Fargate pricing |
| Operational burden | Low | High | Lowest |
Choose Auto Mode when you want Kubernetes with minimal operational overhead, your workloads run on Linux, you don't need custom AMIs or SSH access, and you value AWS managing the full data plane.
Choose Standard EKS when you need custom AMIs, third-party CNIs, want to use Gateway API, need SSH access, or your team already has mature Karpenter automation.
Choose Fargate when you have lightweight stateless workloads, need true serverless (no node concept), or want the absolute simplest deployment model.
Best Practices
After building and testing this setup, here are the practices I recommend:
- Always set resource requests on every container. Auto Mode provisions based on requests. Missing requests means unpredictable bin-packing and potentially oversized nodes.
- Use custom Spot NodePools for non-critical workloads. The built-in
general-purposepool is On-Demand only. Creating a Spot pool can cut compute costs by 60-70% for batch jobs, dev environments, and other interruptible work. - Tag your subnets correctly. Auto Mode discovers subnets via
kubernetes.io/role/elbandkubernetes.io/role/internal-elbtags. Missing tags means load balancers and nodes won't land where you expect. - Use the right resource class names. StorageClass provisioner is
ebs.csi.eks.amazonaws.com, IngressClass isalb(noteks.amazonaws.com/alb), NLB loadBalancerClass iseks.amazonaws.com/nlb. You must createIngressClassParamsandIngressClassresources explicitly - Auto Mode does not auto-register them. - Configure PodDisruptionBudgets. Auto Mode consolidates underutilized nodes by default. PDBs ensure your application maintains availability during node replacement and consolidation. The demo includes a PDB with
minAvailable: 1. - Enable observability. Configure Managed Capability Logging for controller logs (compute, storage, LB, networking) and deploy Container Insights with Pod Identity for node and pod metrics.
- Start with Auto Mode for new clusters. Don't migrate existing clusters unless you have a compelling reason. The storage and load balancer migration paths add significant risk.
- Test the IMDSv2 hop limit. If your pods use the AWS SDK, IMDS, or tools like the Datadog agent that rely on instance metadata, verify they work with the hardcoded hop limit of 1. Pods that need IMDS access must use
hostNetwork: true. - Use least-privilege IAM. Stick with
AmazonEKSWorkerNodeMinimalPolicyandAmazonEC2ContainerRegistryPullOnlyfor the node role. Use Pod Identity for application IAM needs.
The Complete Terraform
The full Terraform code for this article is available on GitHub: github.com/RDarrylR/eks-auto-mode-terraform
The repository includes:
- VPC with public and private subnets across 3 AZs
- EKS cluster with Auto Mode enabled (Kubernetes 1.35)
- Custom Spot NodePool and NodeClass (Karpenter CRDs)
- Least-privilege IAM roles (cluster, node, CloudWatch)
- CloudWatch Container Insights with Pod Identity
- ECR repository for the demo application
- Demo FastAPI app with
/info(node scheduling details),/compute(CPU stress), and/stress(memory pressure) endpoints - Kubernetes manifests with ALB, HPA, and IngressClass configuration
- Load generator for autoscaling demos
- Makefile with deployment, scaling demo, and inspection commands
# Deploy the infrastructure
make init
make plan
make apply

# Build and push the demo app
make docker-build
make docker-push

# Deploy the application
make deploy-app

# Run the scaling demo
make demo-scale-up    # Scale to 15 replicas, watch node provisioning
make demo-watch       # Watch HPA, pods, nodes, and events
make demo-scale-down  # Scale back, watch consolidation

# Or trigger HPA-driven scaling
make demo-load-start  # Deploy load generator
make demo-watch       # Watch the full scaling chain
make demo-load-stop   # Clean up

# Clean up
make delete-app
make destroy
CLEANUP (IMPORTANT!!)
If you deploy this infrastructure, it will cost you real money (~$610/month for the default configuration). Please do not forget about it.
Make sure to delete all resources when you are done:
make delete-app   # Remove K8s resources first (avoids orphaned LBs/ENIs)
make destroy      # Destroy all Terraform resources
The EKS cluster, EC2 instances, NAT gateway, and ALB all incur hourly charges. Even if you are not running any application workloads, the cluster and VPC infrastructure will continue to cost you money until it is destroyed.
Wrapping Up
EKS Auto Mode represents a significant shift in how AWS approaches Kubernetes. Instead of handing you a control plane and saying "good luck with the rest," AWS now manages the entire stack - compute, networking, storage, and add-ons - while you focus on your applications. It's similar in philosophy to Fargate, but with full EC2 visibility and Kubernetes compatibility.
The ~12% cost premium is real, but the operational simplification is substantial. No more Karpenter upgrades, no more VPC CNI compatibility issues, no more EBS CSI driver version mismatches, no more ALB Controller deployments. For teams that want Kubernetes without the infrastructure burden, Auto Mode delivers.
The Terraform setup with the community module is straightforward - enable a flag, configure your NodePools, and deploy. The biggest adjustment is remembering the Auto Mode resource class names (eks.amazonaws.com/*) and accepting that you are trading visibility and control for operational simplicity.
The security posture is strong out of the box - Bottlerocket with SELinux, IMDSv2 enforced, encrypted storage, least-privilege IAM, and automatic node rotation. Observability is now comprehensive - Managed Capability Logging delivers controller logs to CloudWatch, and Container Insights provides pod and node metrics. And the autoscaling story is seamless - HPA drives pod scaling, Karpenter drives node scaling, consolidation cleans up the rest.
If you are starting a new Kubernetes project on AWS in 2026, Auto Mode should be considered for your default choice unless you have a problem with one of the things in the limitations list or have a specific reason to manage the data plane yourself.
Resources
- EKS Auto Mode Overview - AWS Docs
- EKS Auto Mode Best Practices
- Under the Hood: Amazon EKS Auto Mode
- Getting Started with EKS Auto Mode
- EKS Auto Mode Release Notes
- terraform-aws-modules/eks Auto Mode Example
- Migrate from Karpenter to Auto Mode
- EKS Auto Mode Security Whitepaper
- Playtomic Migration Experience
- Amazon EKS Pricing
- Full Terraform Code - GitHub
- AWS London Ontario User Group - Meetups, talks, and community for AWS builders in the London, Ontario area
- AWS London Ontario User Group YouTube - Recorded talks and presentations
Connect with me on X, Bluesky, LinkedIn, GitHub, Medium, Dev.to, or the AWS Community. Check out more of my projects at darryl-ruggles.cloud and join the Believe In Serverless community.
Comments
Loading comments...