AWS SSO Credentials With Multiple Accounts
AWS IAM Identity Center
Traditionally everyone has used usernames and passwords to access everything and has to keep track of the credentials for all the accounts they use. Now there are much better approaches available with many services and applications that are easy to use and much more secure.
On AWS, the IAM Identity Center (which was formally known as AWS Single Sign-On) is the recommended approach to allow users to access their AWS resources. With the IAM Identity Center you can setup access across all your users and all your accounts and assign roles with varying permissions to each of them.
Most companies already have identity providers that they are using to manage access to their own resources and those same identity providers can be used to manage user access to your AWS accounts with the IAM Identity Center. One key item that helps make the AWS IAM Identity Center more secure is the support of Multi-Factor Authentication (MFA). You can require users to login with a hardware or software-based MFA device which alleviates most of the issues with stolen usernames and passwords.
In order to get the AWS IAM Identity Center setup in your organization (if you have not already done so) you can refer to AWS documentation found here Enabling AWS IAM Identity Center.
Multiple AWS Accounts
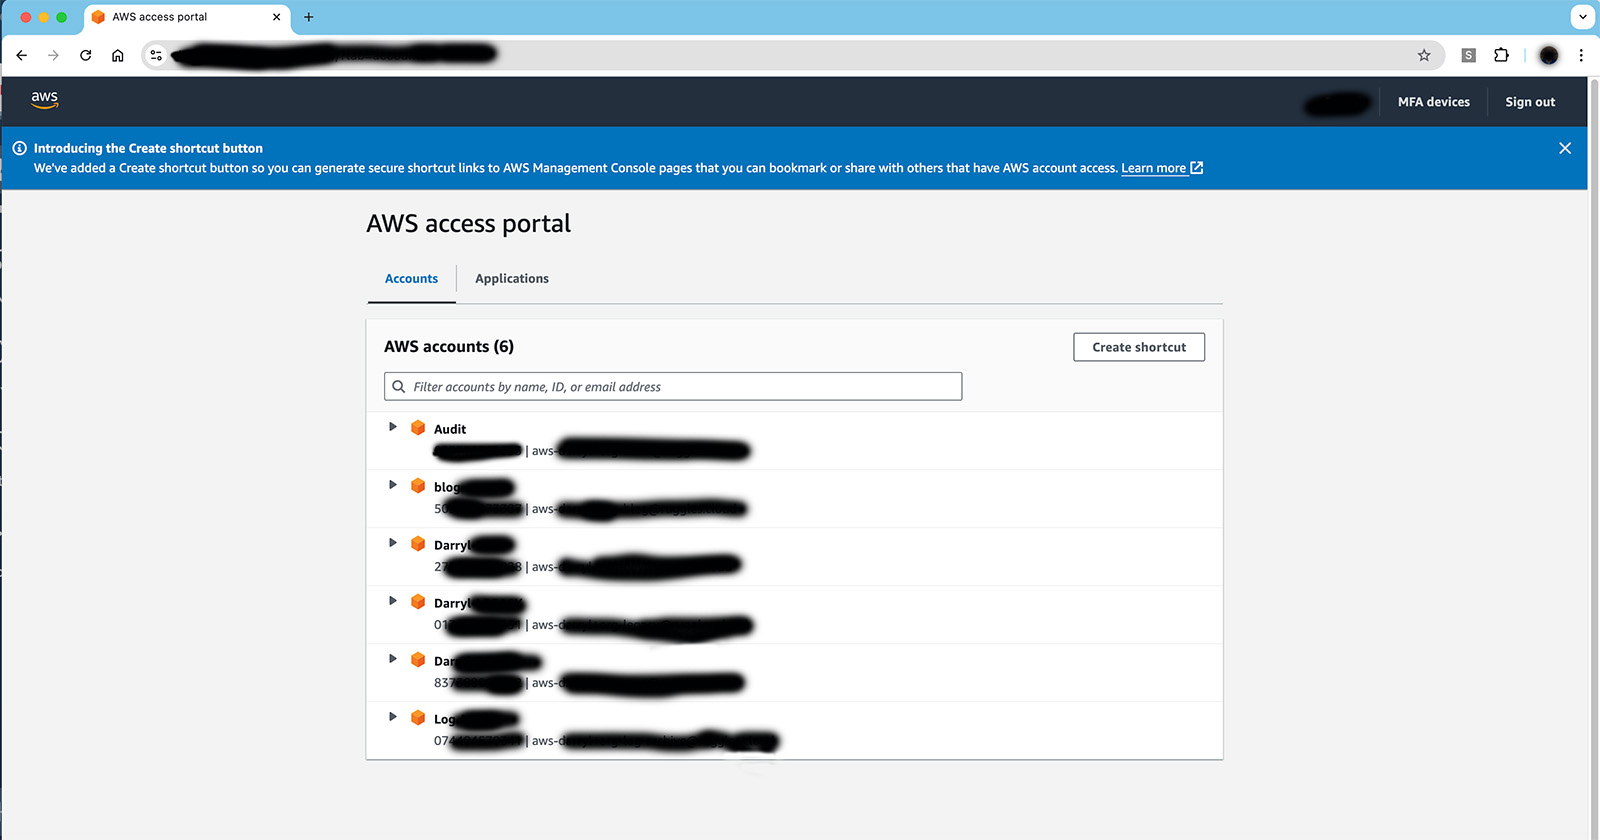
Once users are logged into the AWS IAM Identity Center they will see a list of the AWS accounts that your organization has setup access to for them. For each account there will be a list of roles that they have access to and they will see a link to login to the AWS console for that account as well as an option to get AWS Command Line Interface (CLI) credentials they can use for the account.
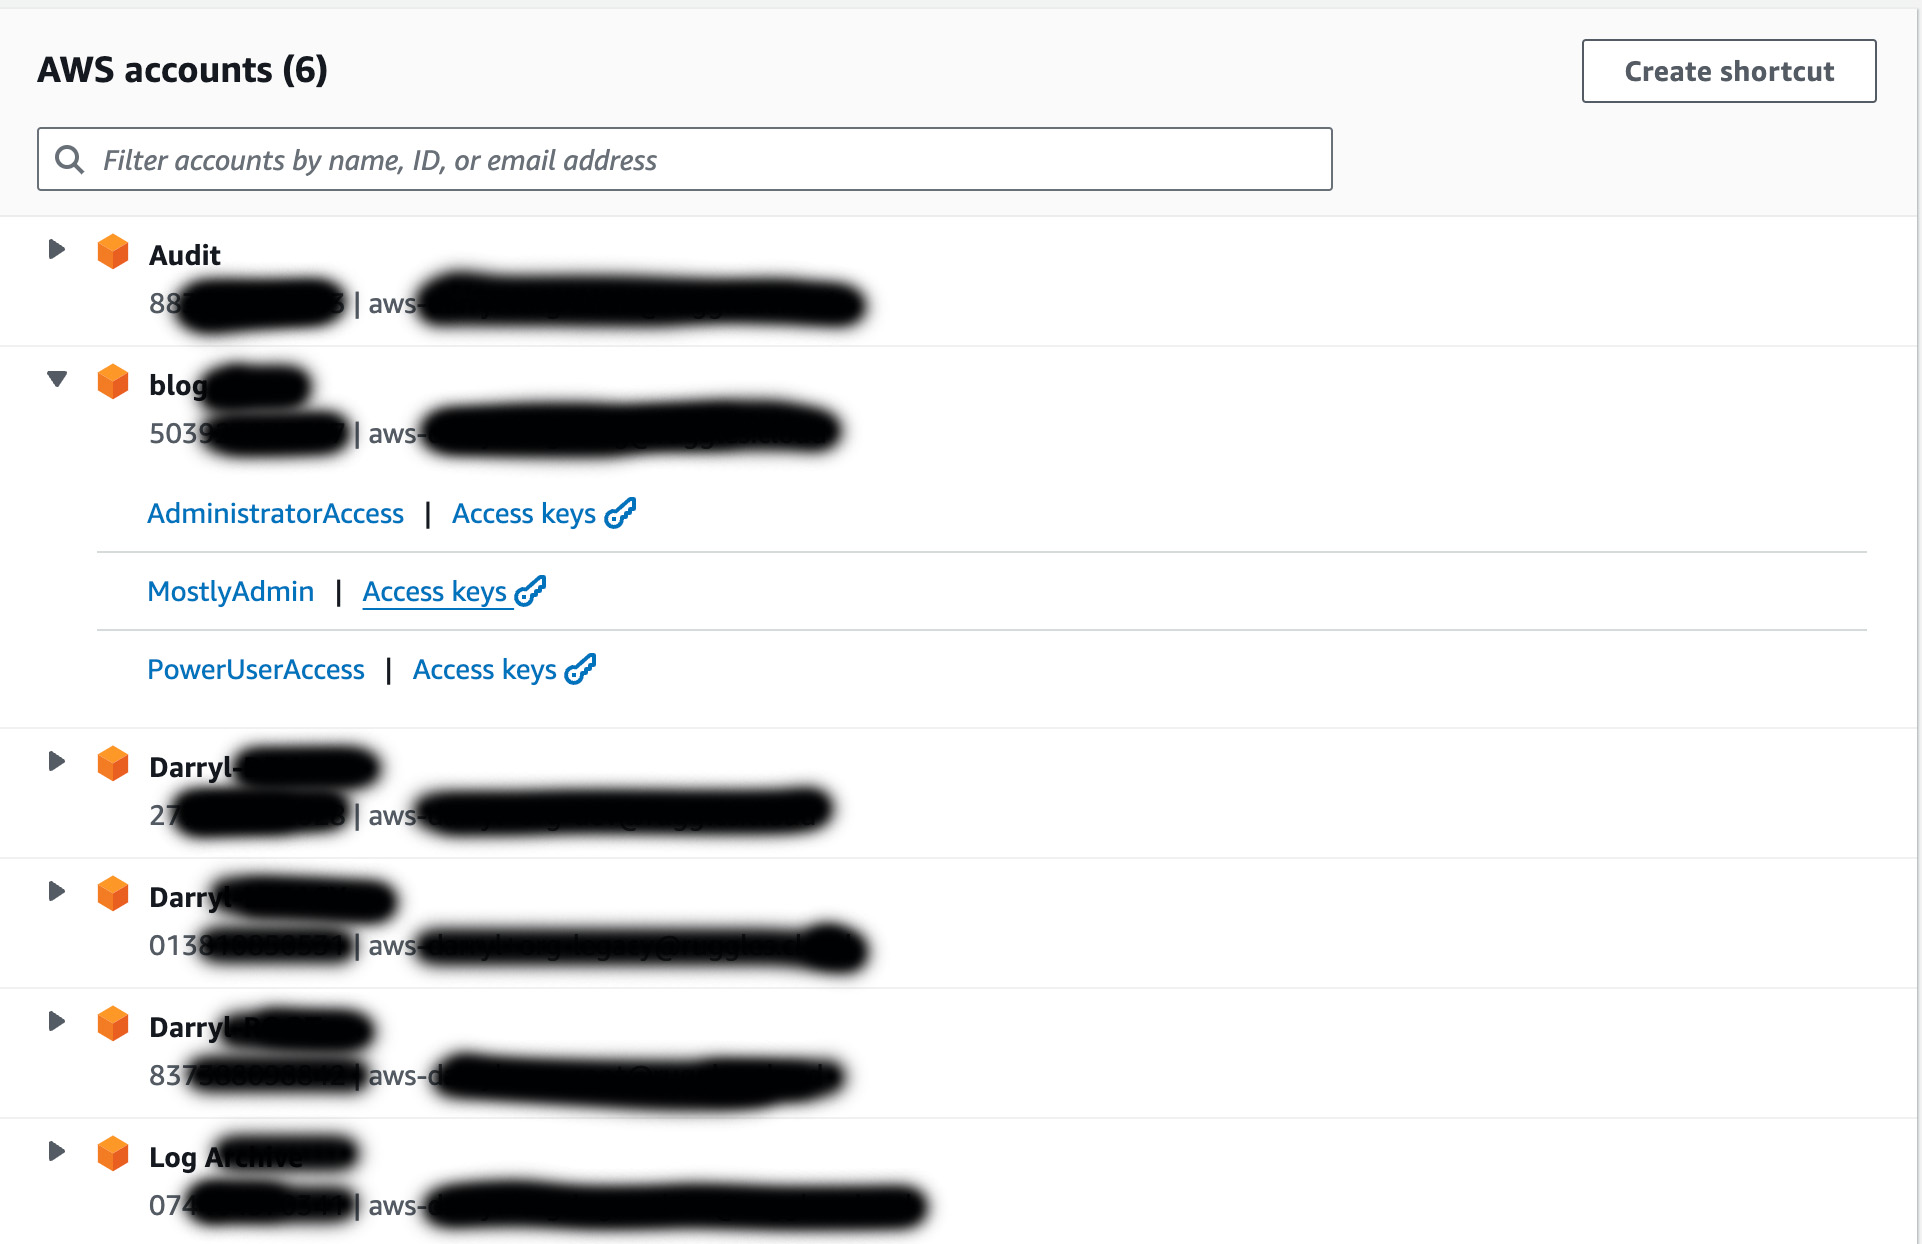
In the image above I am logged into the IAM Identity Center and it shows me i have access to six different AWS accounts in my organization and for the blog AWS account, three Roles are available to me: AdministratorAccess, MostlyAdmin, and PowerUserAccess. If I click on any of the links with those names I will be logged into the AWS console for the blog account and will assume the IAM role associated with the SSO Role that I click on. This IAM role will give me whatever IAM permissions the administrator had setup for me.
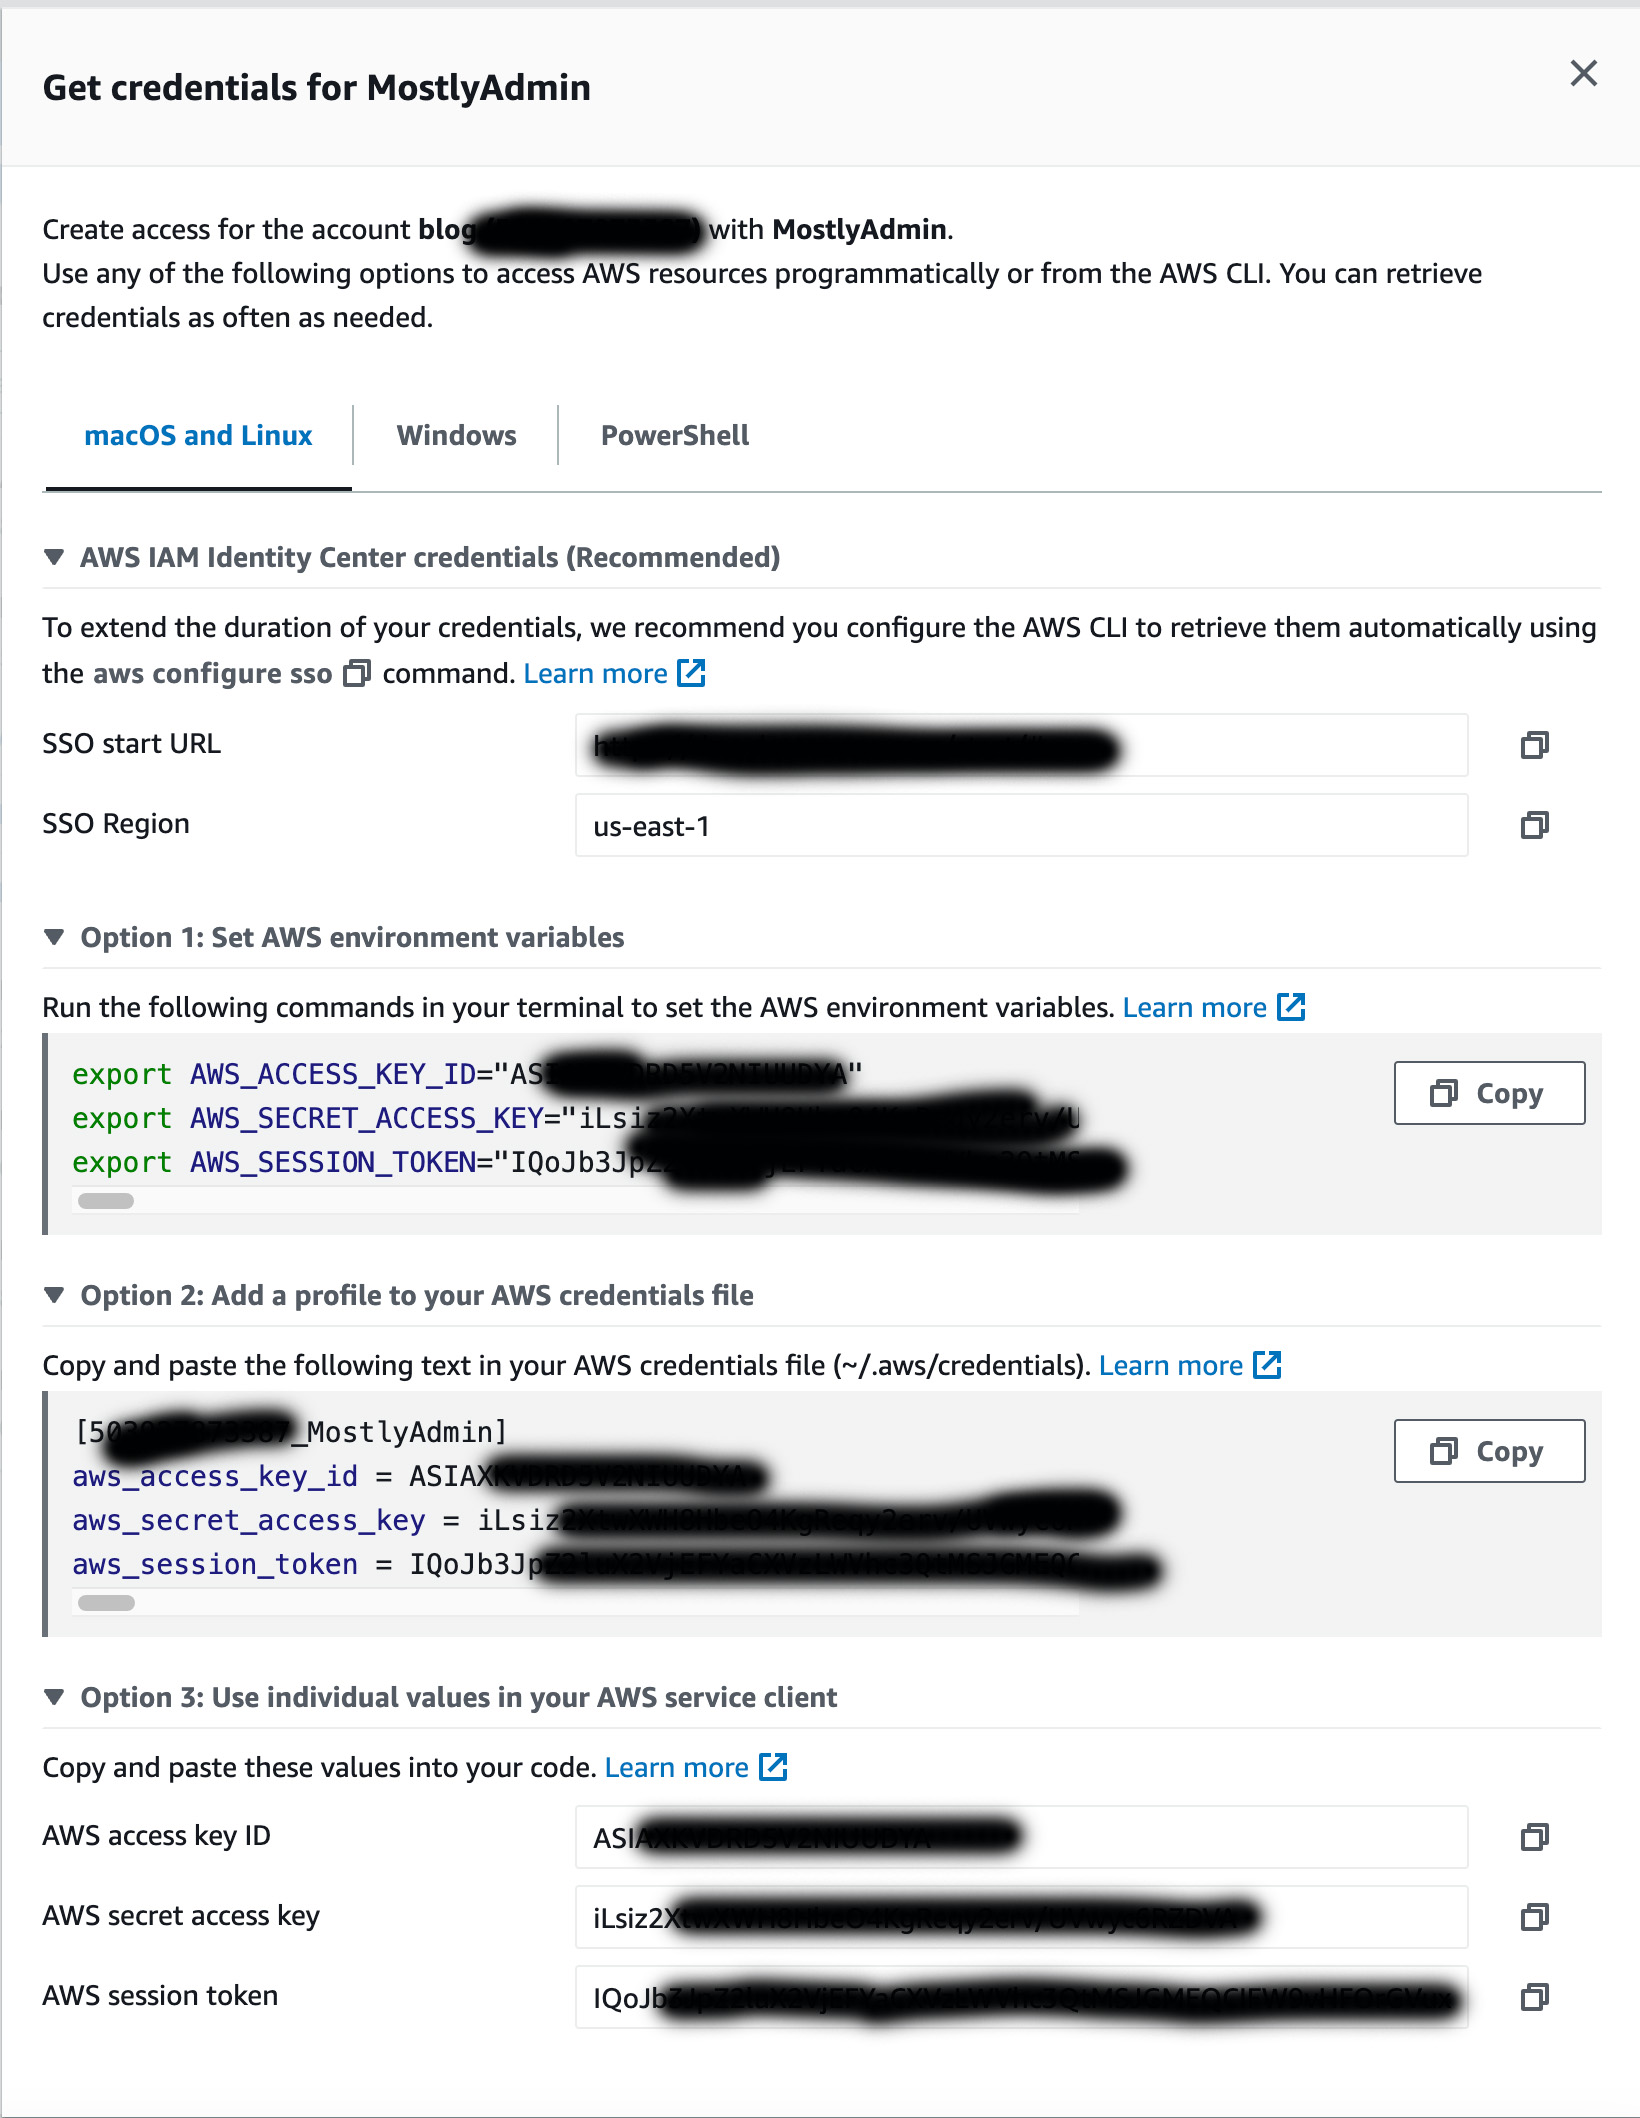
If I click on the Access Keys link for any of the accounts it will open a page where i will see temporary credentials for the chosen SSO role in the blog account. The image below shows an example.
Setting up your IAM Identity Center SSO with the AWS CLI
I do use the AWS console for some of the work I do with AWS but the majority of the time I use the AWS CLI or code via the AWS SDK to interact with AWS. The previous parts of this article work well to get access to the AWS console for all the AWS accounts you have access to in your organization and the Access Keys links are good to quickly get credentials to access accounts from the CLI.
The majority of the time I do not use the above pages but rather use the terminal on my Macbook or WSL2 in Windows to setup SSO access to my organization and then switch between by various AWS accounts to do my work. The same approach will work from terminal windows on Linux.
People who have used the AWS CLI before will be familiar with setting up access to an AWS account using the aws configure command. If you don't already have the AWS CLI installed you can get details to set it up here: Install AWS CLI.
In order to setup SSO access from the AWS CLI you run the command aws configure sso. NOTE: You can also just manually add/edit the sso-session information directly in the ~/.aws/config file.
When running the aws configure sso command, you will be asked to provide some values like below:
aws configure sso
SSO session name (Recommended): my_sso_session
SSO start URL [None]: https://my-sso-portal.awsapps.com/start
SSO region [None]: us-east-1
SSO registration scopes [sso:account:access]:
For the SSO session name you can pick any value that makes sense to you. All your AWS accounts that use the same IAM Identity Center setup will be accessible from the same SSO session name.
For the SSO start URL you will have to provide the URL that was used to setup your organization's IAM Identity Center. The format is typically <some-name-related-to-your-org>.awsapps.com/start. If you go to the IAM Identity Center dashboard page in the AWS console where you setup the IAM Identity Center the URL will be shown under "AWS access portal URL".
For the SSO region you need to enter the region where your IAM Identity Center SSO is setup. If you go to the IAM Identity Center dashboard page in the AWS console where you setup the IAM Identity Center the URL will be shown under "Region".
For the SSO registration scopes value you can enter sso:account:access. There are other possible values described here but for using AWS CLI SSO this is the best value.
Once you provide all the values an entry for the SSO session will be added to your ~/.aws/config file. You will also be given a link to open in a browser which will take you to the AWS Identity Center to provide your credentials to login and authenticate your AWS SSO session.
Your config file will have a new entry like what is shown below.

This is how you setup the SSO session information with your AWS CLI file but in order to more easily access and switch between your AWS accounts you can also setup entries in the ~/.aws/config file that refer to the above sso-session entry. I will detail this in the next section.
The AWS docs for the "aws configure sso" command can be found here if you want more details.
Associating an AWS account/role with your SSO session
Once you have your SSO session setup in your ~/.aws/config file you can add entries to the same config file so that's it super easy to switch between your AWS accounts and roles and get temporary credentials to do your work.
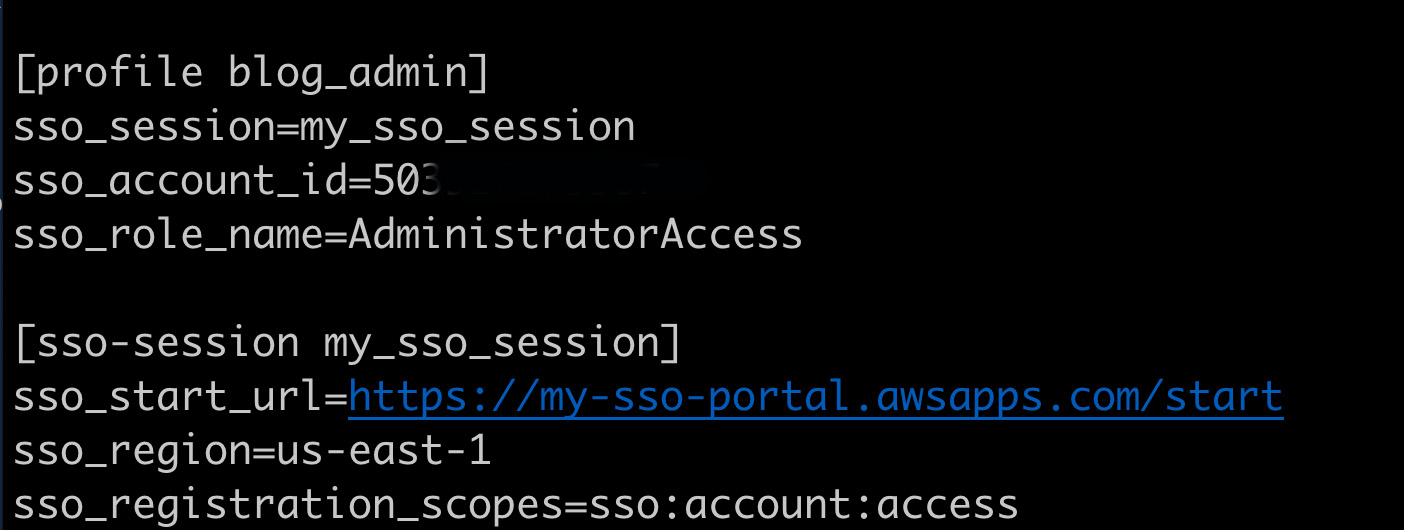
In your ~/.aws/config file you need to add a section for each account/role you want to have quick access to. The entries will look like the example below:
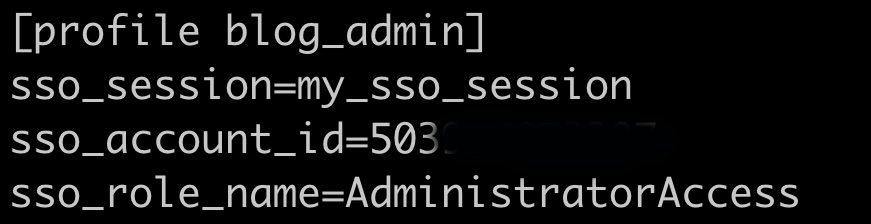
In the example above I have named my profile blog_admin since I will use it to connect to my blog AWS account and this will be for the AdministratorAccess role in that account. The "sso_session" value has to match the sso_session entry i created above. In my case it was called my_sso_session. The "sso_account_id" has the account number I want this entry to login to. The value i entered is the account number for my blog AWS account. "sso_role_name" contains the SSO Role name I want to use when working in this profile. This name has to match the SSO Role name setup in IAM Identity Center for this User/AWS Account. Once the entry is complete save the ~/.aws/config file
That's all you have to add for any given AWS account/Role to work with SSO for AWS. Here is what my config file looks like after all the above.
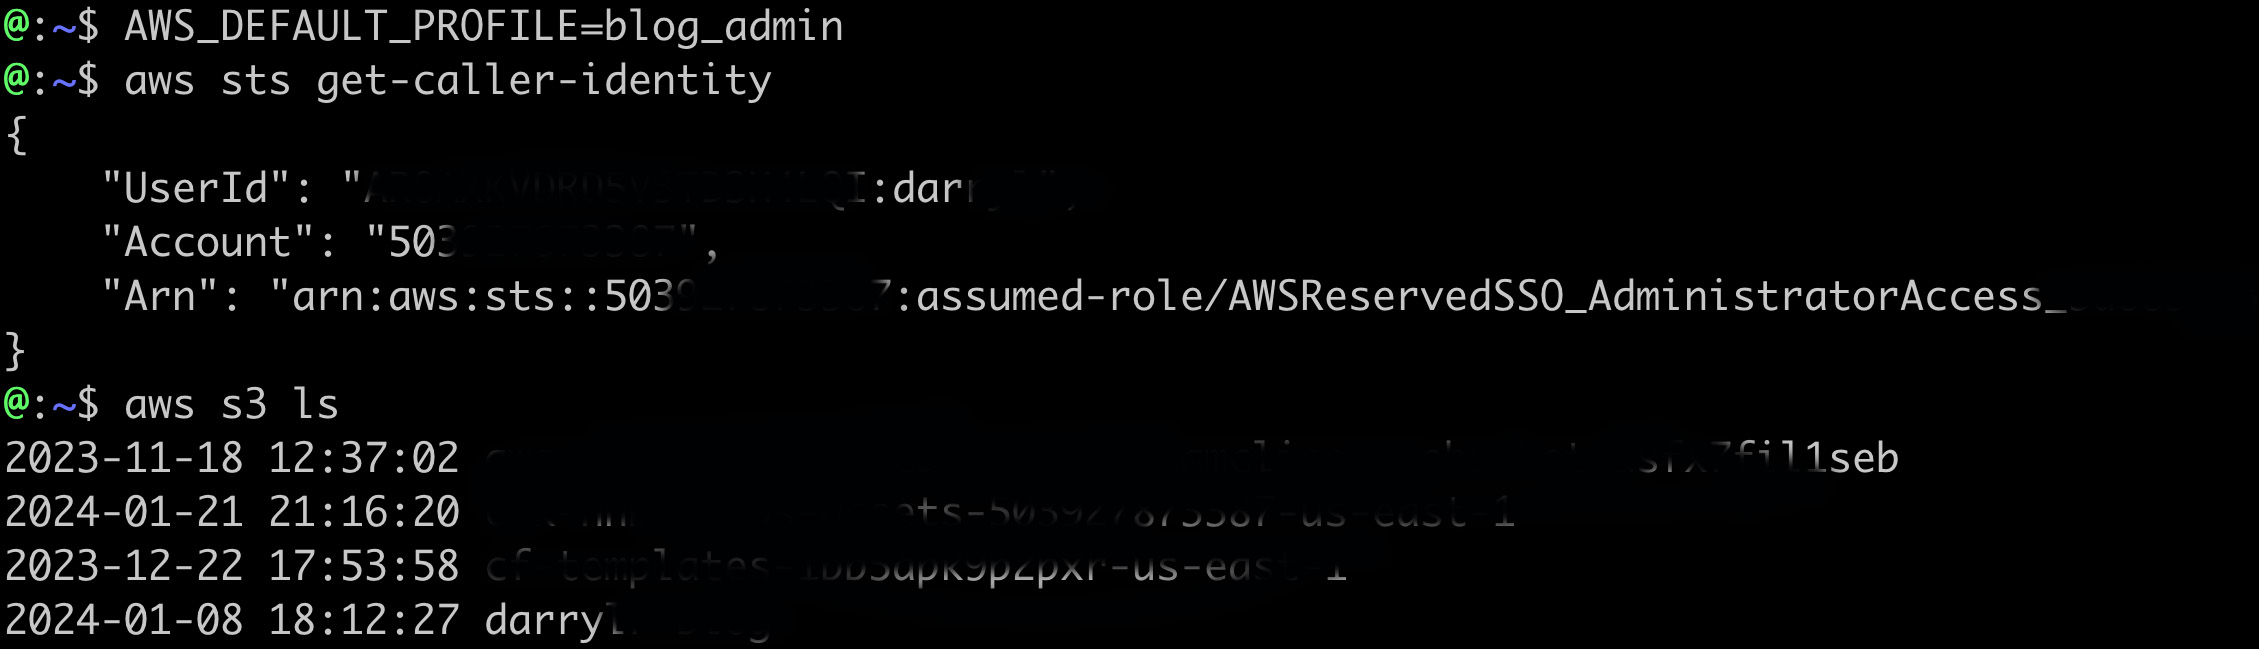
If you're still authenticated with the SSO session from when you set it up all you have to do now is set your AWS profile to the name above (i.e. "blog_admin") and then you are all setup to get temporary IAM credentials in your terminal and start interacting with AWS. In order to set the AWS profile you want to use, you set the environment variable named AWS_DEFAULT_PROFILE.
In the image below I set my profile to be blog_admin and then any AWS CLI commands I run will use that profile and will use SSO to get temporary tokens in the background to interact with AWS. When i run "aws sts get-caller-identity" it shows what AWS IAM principal I am currently using. The example below shows I am using my blog AWS account and using the AdministratorAccess role.
Setup with multiple AWS accounts/roles and easily switch between them
The real power of this setup is when you have multiple AWS accounts and roles setup with IAM Identity Center. You just need to add entries in your ~/.aws/config file and then once you are authenticated with SSO you can quickly move between them all in the terminal.
In the example config file below I have added four profile entries. There are two AWS accounts involved and two roles in each account. They are all linked to the same sso_session i setup above.
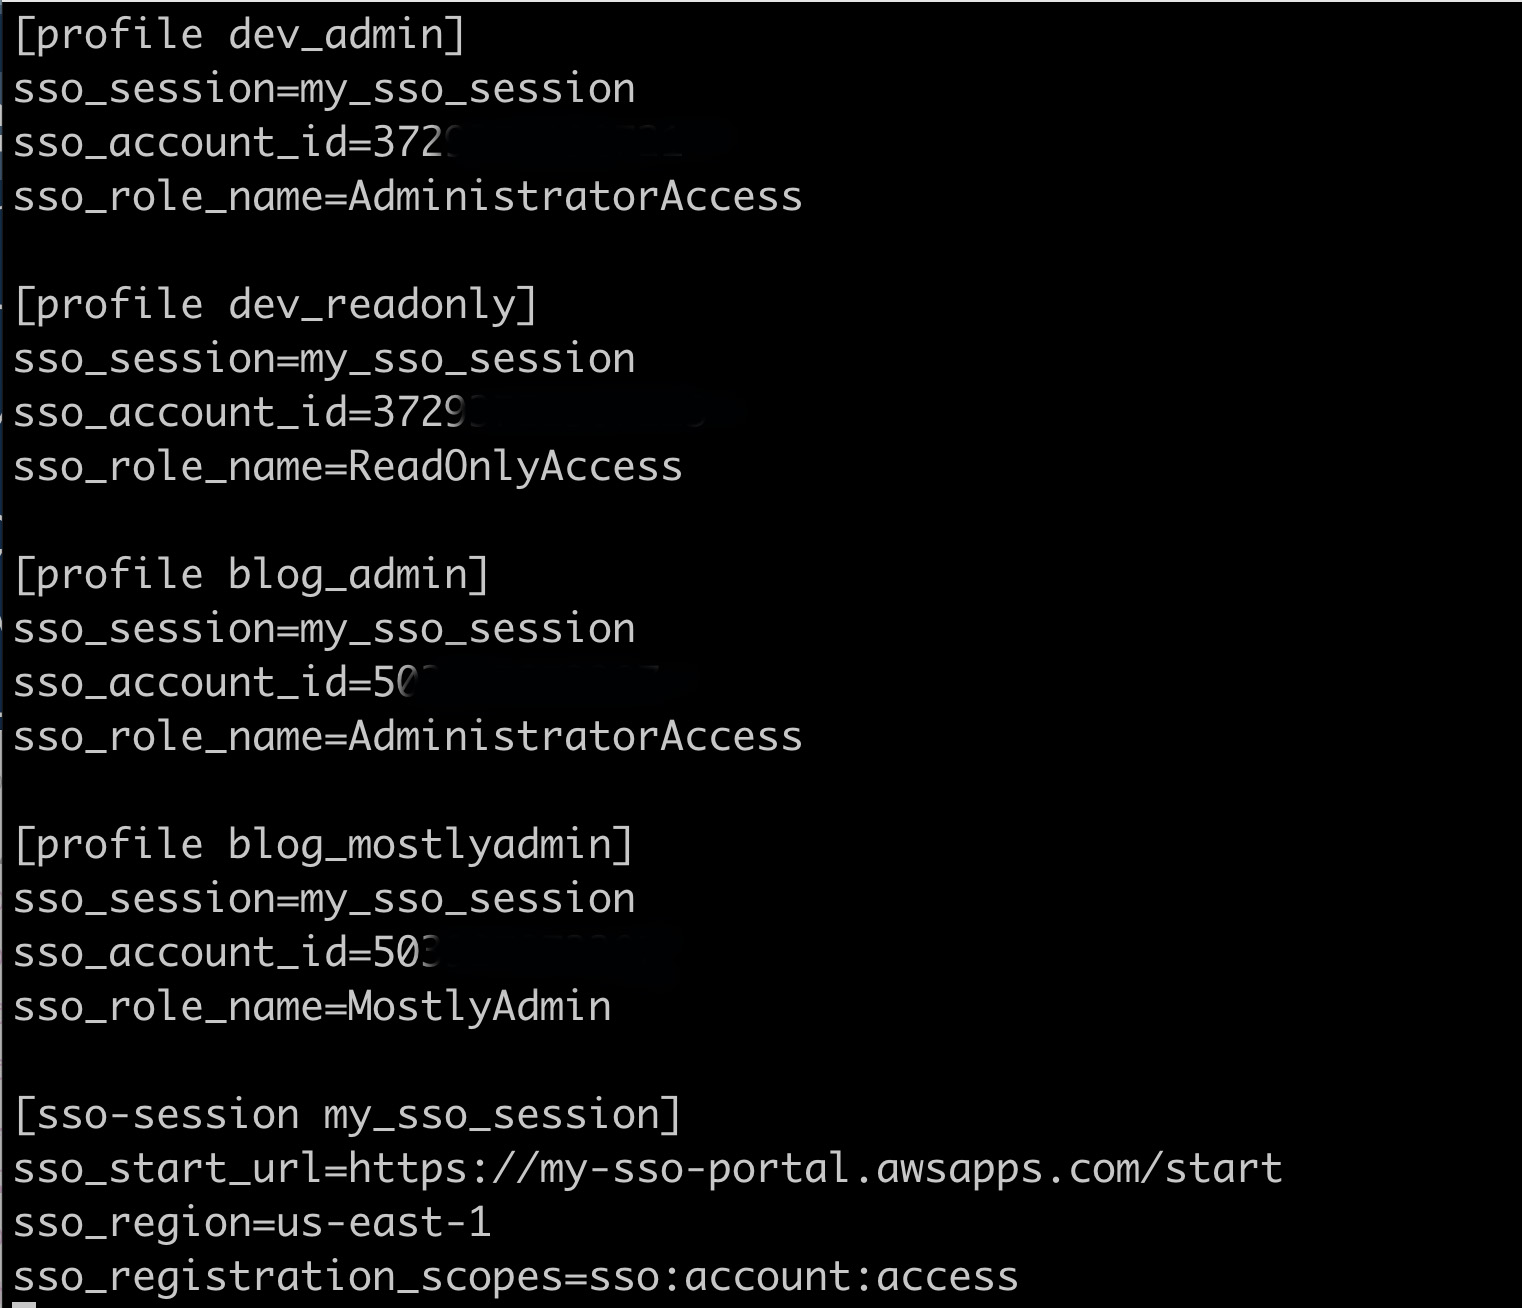
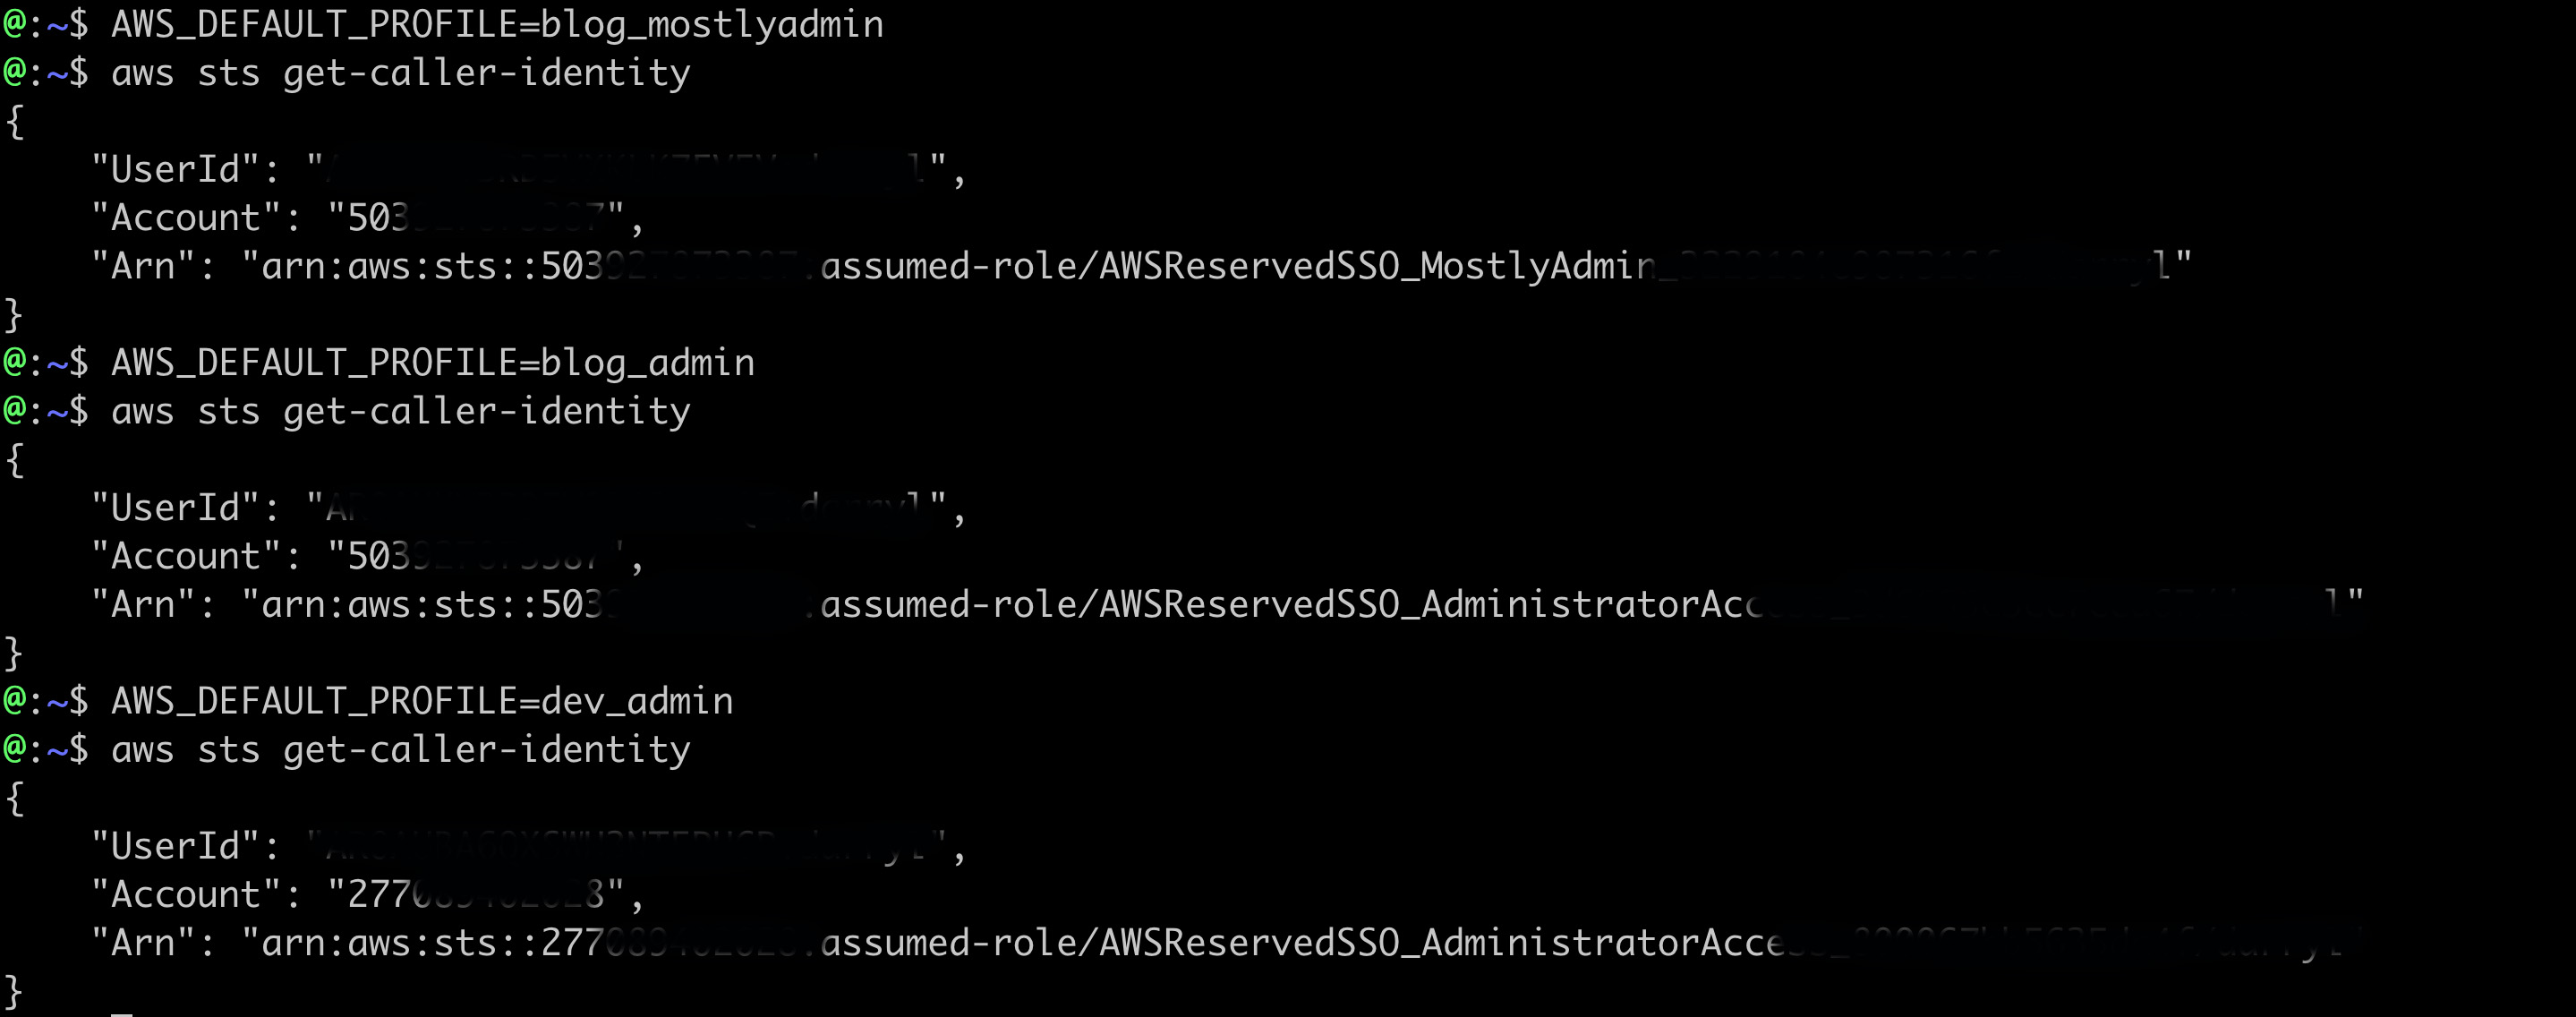
With all these entries in place I can just change the current profile i want to use in my terminal window and interact with whatever profile i want without having to authenticate again with SSO.
In order to make things simpler and not having to set the AWS_DEFAULT_PROFILE value whenever i want to change i simply made some Bash shell aliases like below. Using the aliases makes it less typing to switch accounts/roles.

Authenticating again with your SSO session
If you ran through everything above in order you likely were still authenticated with the SSO session from when you ran the aws configure sso command and it opened a browser to authenticate. If you didn't do this you would have likely seen an error like the following when trying to switch to AWS account/role profiles and use them.

When you setup IAM Identity Center the duration of SSO tokens is provisioned. It can be any duration between 1 and 12 hours (with 1 hour being the default i believe). After you authenticate with the IAM Identity Center you will no longer be able to use SSO in your terminal windows after this number of hours has passed.
You can trigger the authentication with IAM Identity Center from the CLI using the following command:
aws sso login --sso-session <SSO_SESSION_NAME>
Using my example values above this would be:
aws sso login --sso-session my_sso_session
When you run this command it will automatically open a browser where you can authenticate or if it cannot open a browser it will give you a URL and code you can enter in your browser using the URL provided to authenticate. In order to make this less to type I just have an alias for it that I run every morning before I start using AWS (since I have the SSO session timeout set to 12 hours which gets me through most days). My alias looks like this:

So authenticating with SSO for the day involves me running a few simple commands:
ssol (to authenticate with AWS SSO which opens a browser to login)
dev_admin (or whatever account/role i want to use)
And then when i need to use a different account role I just type in the alias name for that combination.
Thanks for reading this and I hope you gained something out of it and maybe simplified your life accessing AWS accounts via SSO.
For more articles from me please visit my blog at Darryl's World of Cloud or find me on X, LinkedIn, Medium, Dev.to, or the AWS Community.
For tons of great serverless content and discussions please join the Believe In Serverless community we have put together at this link: Believe In Serverless Community
Comments
Loading comments...