Bash Commands I Use Every Day: A Practical Guide to Terminal Productivity and Text Processing From an Old-School Terminal Guy
I've been a terminal person for over three decades. Not because I think GUIs are bad - they have their place - but because the terminal is where I think fastest. I started out on Slackware Linux back in the day and now use iTerm2 on my MacBook along with Bash on EC2s. I genuinely enjoy how much you can accomplish without ever leaving the command line. When I'm forced to use Windows, I reach for WSL2 immediately and pretend I'm on Linux. If you're stuck on Windows and haven't tried WSL2 yet, it'll change your life.
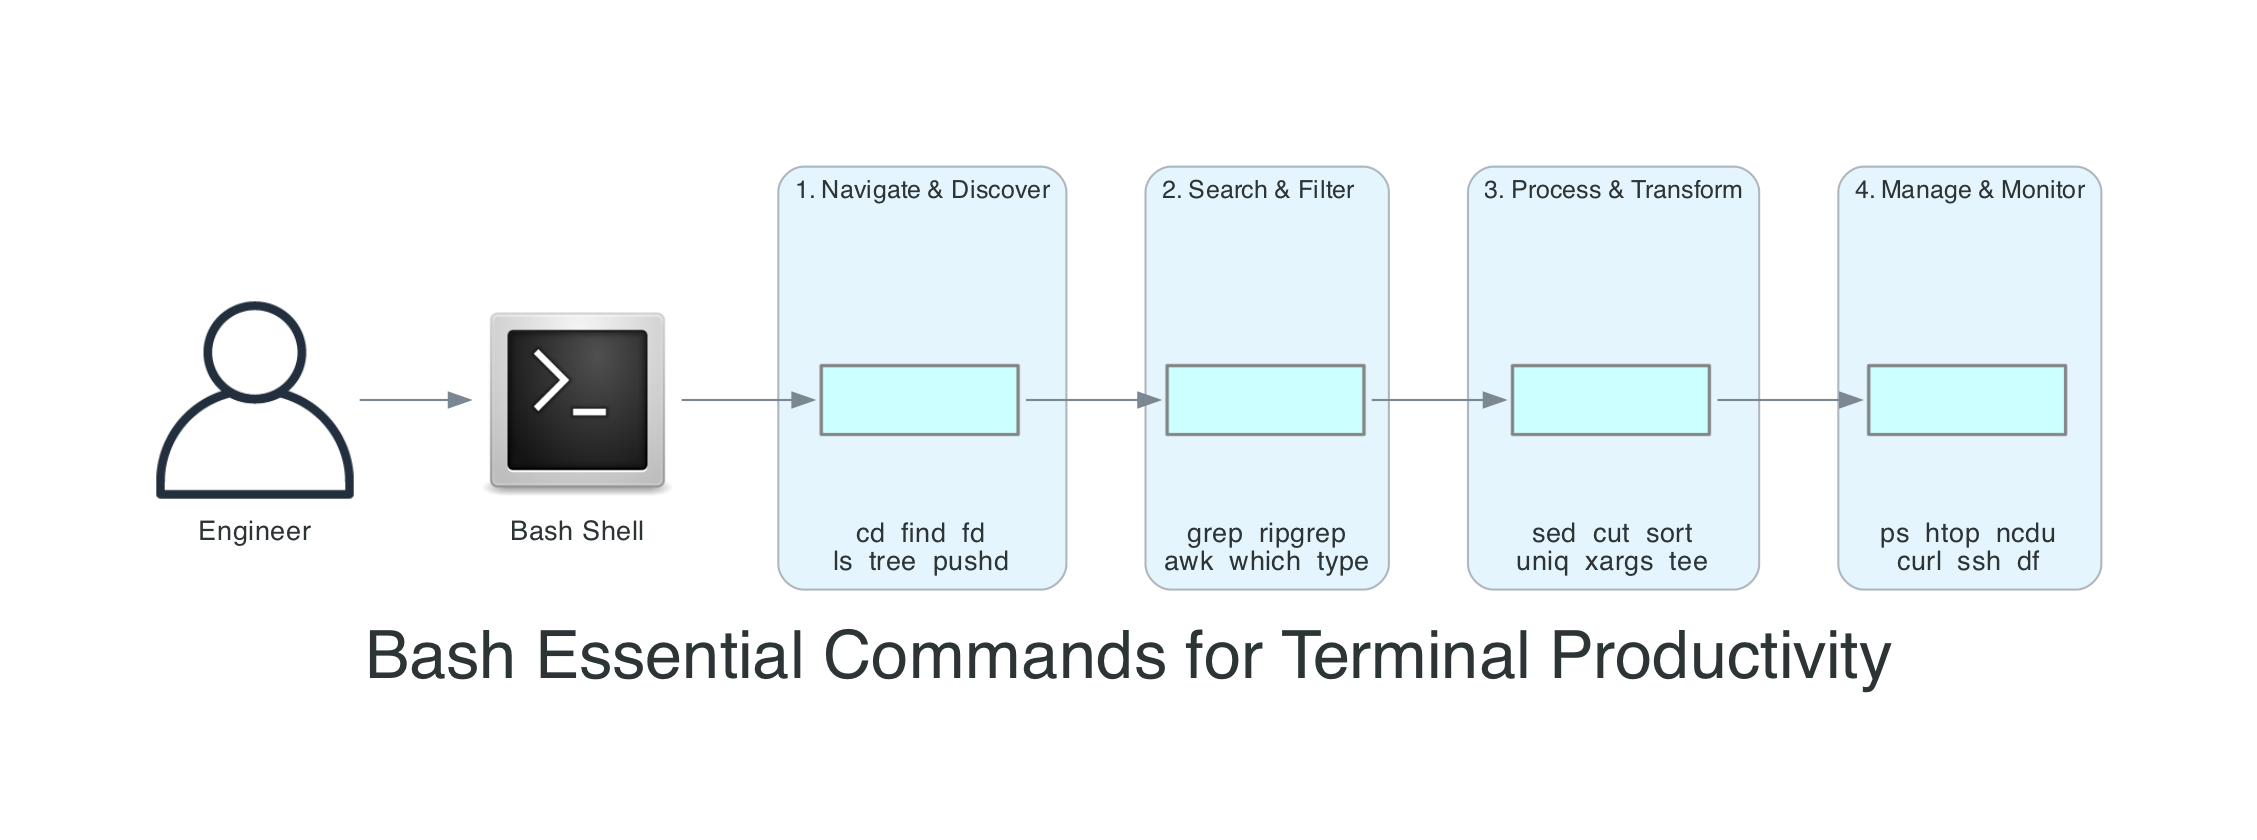
This isn't a comprehensive Bash reference. The GNU Bash Reference Manual covers that, excellently. This is the set of commands and patterns I use week after week - the ones that actually solve problems and save time. I've organised them as a daily workflow: navigate and discover, search and filter, process and transform, manage and monitor.
A note on shells and platforms: macOS uses zsh as the default shell and ships with an older Bash (3.2). Most modern Bash features (4.x/5.x) require installing a newer version via Homebrew. Many examples here also assume GNU utilities, which you'd install the same way. On Linux, EC2, and WSL2, you're almost certainly running modern Bash with GNU tools already. I call out platform-specific differences where they matter, and the Homebrew section below covers the macOS setup.
If you read my kubectl commands guide, you'll recognise the same approach. That post organised kubectl around a debugging workflow. This one organises Bash around a productivity workflow - because the shell is where all productive work starts, whether you're debugging a Kubernetes cluster, deploying serverless infrastructure, or just trying to figure out which process is eating all your CPU.
How Bash Processes Your Commands
Before diving into commands, it helps to understand what happens when you hit enter. Bash isn't executing your text directly - it runs through a well-defined sequence of steps that transforms your input into actual work. This matters because when something behaves unexpectedly (and it will), knowing this sequence tells you where to look.

Here's what happens, briefly:
- Tokenisation and parsing - Bash splits your input into words and operators, respecting quotes and escape characters. Alias expansion happens during parsing, before execution.
- Expansion - Bash processes commands in a defined expansion order: brace expansion; then tilde, parameter/variable, arithmetic, and command substitution (performed left-to-right); followed by word splitting, filename expansion, and finally quote removal.
- Command search - When Bash resolves a command to run, it checks shell functions, then builtins, and finally searches the
$PATHfor external commands. For$PATHlookups, Bash uses a hash table to remember where it found commands previously - which is why you occasionally needhash -rafter installing a new version of a tool in a different location. - Execution - Builtins run inside the Bash process itself (which is why
cdhas to be a builtin - an external program can't change your shell's working directory). External programs are forked as child processes.
The expansion order matters more than most people realise. When someone writes echo $HOME/*.txt and wonders why it doesn't work as expected, the answer is almost always in the expansion sequence. Parameter expansion ($HOME) happens before filename expansion (*.txt), and both happen before the command (echo) ever sees the result. Quote removal happening last is why "$variable" works - the quotes protect against word splitting and globbing in the middle stages, then get stripped at the end.
Essential Setup
The first thing I do on any new machine - whether it's a fresh EC2 instance, a new MacBook, or a WSL2 installation - is configure my shell properly. Five minutes of setup saves hundreds of hours over a career.
Homebrew - The Missing Package Manager for macOS
If you're on macOS (or Linux, for that matter), Homebrew is the very first thing to install. Nearly every tool in this article that doesn't ship with the OS - htop, tree, watch, jq, yq, ripgrep, fd, bat, ncdu, and even a modern version of bash itself - is one brew install away. Without it, you're stuck compiling from source or hunting down .pkg installers.
# Install Homebrew (one command - follow the prompts)
/bin/bash -c "$(curl -fsSL https://raw.githubusercontent.com/Homebrew/install/HEAD/install.sh)"

# After installation, follow the instructions to add brew to your PATH
# On Apple Silicon Macs (M1/M2/M3/M4), Homebrew installs to /opt/homebrew
# On Intel Macs, it installs to /usr/local

# Verify it works
brew --version

# Install everything you will need for this article in one shot
brew install bash coreutils gnu-sed gawk grep \
  tree htop watch ncdu \
  ripgrep fd bat eza git-delta \
  jq yq curl wget

# Keep everything up to date
brew update && brew upgrade
The coreutils, gnu-sed, gawk, and grep packages give you the GNU versions of the core tools that behave identically to Linux. By default they install with a g prefix (gsed, gawk, ggrep) so they don't shadow the BSD versions. If you want the GNU versions to be the default, Homebrew tells you exactly what to add to your $PATH after installation.
On WSL2, you already have apt so Homebrew is optional - but it works there too if you prefer a single package manager across macOS and Linux.
Where to Put Your Shell Config
Before we dive into aliases and shell options, a quick word on which file to edit. Put your interactive shell settings (aliases, prompt, history options) in ~/.bashrc. If you've switched macOS to Bash (or you're on any system where Bash runs as a login shell), make sure ~/.bash_profile sources it:
# Add to ~/.bash_profile (if it doesn't already source .bashrc)
[[ -f ~/.bashrc ]] && source ~/.bashrc
This way your settings work in both login and non-login shells, and you only maintain one file. Every code block in the rest of this section assumes you're adding to ~/.bashrc.
Aliases That Matter
# Add to ~/.bashrc

# Single-character shortcuts for commands I type hundreds of times a day
alias lll='ls -atrl'
alias ll='ls -alFh'
alias la='ls -A'
alias l='ls -CF'

# Safety nets - ask before overwriting
alias cp='cp -i'
alias mv='mv -i'

# Navigation
alias ..='cd ..'
alias ...='cd ../..'
alias ....='cd ../../..'

# Always remember the past
alias h='history'

# grep with colour by default (works on GNU and modern BSD grep)
alias grep='grep --colour=auto'

# Show disk usage sorted by size
alias ducks='du -cksh * | sort -rh | head -20'

# Reload shell config without restarting
alias reload='source ~/.bashrc'
If you work with the AWS CLI daily like I do, add tab completion to your ~/.bashrc:
# AWS CLI v2 completion
# The location of aws_completer varies depending on how the CLI was installed,
# so discover it dynamically. command -v is more shell-native than which.
complete -C "$(command -v aws_completer)" aws
This gives you tab completion for every AWS service and parameter - aws s3 then tab shows all S3 subcommands, aws lambda invoke -- then tab shows all available flags. On Amazon Linux EC2 instances, completion is already enabled by default. If you manage multiple AWS accounts, I covered the SSO credential setup in my AWS SSO Credentials with Multiple Accounts post.
Shell Options Worth Setting
# Add to ~/.bashrc

# Append to history instead of overwriting (critical for multiple terminals)
shopt -s histappend

# Save multi-line commands as one entry
shopt -s cmdhist

# Unlimited history - Bash 4.3+ treats negative values as unlimited
# Portable alternative for macOS stock Bash (3.2): HISTSIZE=50000 / HISTFILESIZE=100000
HISTSIZE=-1
HISTFILESIZE=-1

# Ignore duplicate commands and commands starting with a space
# Use ignoreboth for basic dedup, or erasedups to remove ALL previous
# occurrences of a command from history when you run it again
HISTCONTROL=ignoreboth:erasedups

# Add timestamps to history
HISTTIMEFORMAT='%F %T  '

# Correct minor typos in cd commands
shopt -s cdspell

# Allow cd into directories by just typing the directory name
shopt -s autocd

# Better globbing
shopt -s globstar    # ** matches recursively
shopt -s nocaseglob  # Case-insensitive globbing
The histappend option is the one I see people miss most often. Without it, each terminal session overwrites the history file when it closes. If you've got three terminals open and close them, you only keep the history from whichever one closed last. With histappend, all sessions contribute to the same history. Combined with unlimited HISTSIZE, you build up a searchable archive of everything you've ever typed.
Step 1: Navigate and Discover
Every terminal session starts with the same question: where am I, and where do I need to be?
cd - Moving Around
# Go home
cd ~
# Or just
cd

# Go to the previous directory (toggle between two locations)
cd -

# This is incredibly useful when you're bouncing between two directories
cd /var/log/app
# ... read some logs ...
cd /etc/nginx
# ... edit a config ...
cd -
# You're back in /var/log/app
pushd and popd - Directory Stack
When you need to visit more than two directories and come back, cd - isn't enough. The directory stack solves this.
# Push the current directory onto the stack and cd to a new one
pushd /var/log

# Push another
pushd /etc/nginx

# See the stack
dirs -v
# 0  /etc/nginx
# 1  /var/log
# 2  ~

# Pop back to the previous directory
popd
# Now in /var/log

popd
# Now back in ~
I use pushd/popd constantly when working across project directories - jumping between infrastructure code, application code, and deployment scripts without losing my place.
ls and Its Modern Alternatives
# Long listing with human-readable sizes
ls -alFh

# Sort by modification time (newest first)
ls -lt

# Sort by size (largest first)
ls -lS

# Recursive listing
ls -R

# Only directories
ls -d */
find - The Swiss Army Knife
find is one of the most powerful commands in the Unix toolkit, and one of the least intuitive. I use it daily.
# Find files by name
find . -name "*.log"

# Case-insensitive search
find . -iname "*.txt"

# Find files modified in the last 24 hours
find . -mtime -1

# Find files larger than 100MB
find . -size +100M

# Find and delete old log files (older than 30 days)
find /var/log -name "*.log" -mtime +30 -delete

# Find empty directories
find . -type d -empty

# Find files and execute a command on EACH one (\; runs the command per file)
find . -name "*.py" -exec grep -l "import boto3" {} \;

# Same thing but faster - + batches files into fewer command invocations
# (like xargs, but built into find - this is the modern idiom)
find . -name "*.py" -exec grep -l "import boto3" {} +

# Or use xargs with null delimiters for safe handling of special filenames
find . -name "*.py" -print0 | xargs -0 grep -l "import boto3"
The difference between {} \; and {} + trips people up. \; runs the command once per file found - if find matches 1,000 files, it spawns 1,000 grep processes. + batches as many filenames as possible into a single command invocation, which is dramatically faster. Use + when the command accepts multiple file arguments (most do), and \; only when the command must run once per file.
The -print0 | xargs -0 pattern is the alternative you need for more complex pipelines. It handles filenames with spaces, quotes, and other special characters safely. The standard find | xargs breaks on filenames with spaces because xargs splits on whitespace by default. The -print0 flag uses null bytes as delimiters instead, and -0 tells xargs to expect that format.
tree - Visual Directory Structure
# Show directory tree (install with brew install tree or apt install tree)
tree -L 2

# Show only directories
tree -d -L 3

# Include hidden files but exclude .git
tree -a -I '.git' -L 2

# With file sizes
tree -sh -L 2
I use tree constantly when exploring unfamiliar codebases. It gives you the mental model of a project's layout in seconds.
Step 2: Search and Filter
Once you know where things are, you need to find specific content. This is where the terminal absolutely destroys GUI-based search.
grep - Pattern Matching
# Search for a pattern in files (case-sensitive - won't match ERROR or Error)
grep "error" application.log

# Case-insensitive search - matches error, ERROR, Error, eRrOr
grep -i "error" application.log

# Recursive search through all files in a directory
grep -r "TODO" ./src/

# Case-insensitive search
grep -ri "database" ./config/

# Show line numbers
grep -rn "def main" ./src/

# Show 3 lines of context before and after each match
grep -C 3 "Exception" application.log

# Invert match - show lines that do NOT contain the pattern
grep -v "DEBUG" application.log

# Count matches per file
grep -rc "import" ./src/

# Only show filenames that contain matches
grep -rl "password" ./config/

# Extended regex (ERE) - match IP-like patterns (intentionally loose -
# matches 999.999.999.999 too, but good enough for log grep. \b is a
# GNU extension, works on BSD grep but is not POSIX)
grep -E '\b[0-9]{1,3}\.[0-9]{1,3}\.[0-9]{1,3}\.[0-9]{1,3}\b' access.log

# Search only specific file types
grep -rn "SELECT" --include="*.py" ./src/
The --include flag is one I wish I had learned earlier. Without it, grep -r searches everything - binaries, images, node_modules. With --include="*.py", it only searches Python files, which is both faster and produces cleaner output.
A note on grep flavours: GNU grep (the default on Linux) and BSD grep (the default on macOS) behave slightly differently with extended regex and some flags. If you're on macOS and something works differently than expected, install GNU grep with brew install grep and use ggrep instead, or add it to your path.
which and type - Finding Commands
# Where is a command located?
which python3
# /usr/bin/python3

# type gives more detail - tells you if it's an alias, function, or builtin
type cd
# cd is a shell builtin

type ll
# ll is aliased to 'ls -alFh'

type grep
# grep is aliased to 'grep --colour=auto'

# Show all locations (useful when multiple versions exist)
type -a python3
# python3 is /usr/local/bin/python3
# python3 is /usr/bin/python3
I use type more than which because it tells you the full story. If a command is aliased, which might show the alias target, but type explicitly tells you it's an alias and what it expands to.
Common File Operations
Before moving to text processing, here's a quick reference for the file operations I reach for most often.
| Command | What It Does | Example |
|---|---|---|
cp -r | Copy directory recursively | cp -r ./src ./src-backup |
mv | Move or rename | mv old-name.txt new-name.txt |
rm -rf | Remove directory and contents | rm -rf ./node_modules |
mkdir -p | Create nested directories | mkdir -p ./src/components/auth |
ln -s | Create symbolic link | ln -s /path/to/target ./link-name |
chmod | Change permissions | chmod 755 deploy.sh |
chown | Change ownership | chown user:group file.txt |
tar czf | Create compressed archive | tar czf backup.tar.gz ./project |
tar xzf | Extract compressed archive | tar xzf backup.tar.gz |
wc -l | Count lines | wc -l *.py |
Step 3: Process and Transform
This is where the terminal goes from "convenient" to "incredibly powerful." The ability to chain simple commands into data processing pipelines is the single most valuable skill you can develop on the command line.
Pipes and Redirection
# Pipe - send stdout of one command to stdin of the next
cat access.log | grep "POST" | wc -l

# Redirect stdout to a file (overwrite)
ls -la > filelist.txt

# Redirect stdout to a file (append)
echo "new entry" >> log.txt

# Redirect stderr to a file
make build 2> errors.txt

# Redirect both stdout and stderr to the same file
make build > output.txt 2>&1

# Modern syntax for the same thing (Bash 4+)
make build &> output.txt

# Discard output entirely
make build > /dev/null 2>&1

# Pipe stderr as well as stdout
make build |& grep "error"

# Process substitution - treat command output as a file
diff <(ls dir1) <(ls dir2)

# This is incredibly useful for comparing outputs without temp files
diff <(aws s3 ls s3://bucket-a/) <(aws s3 ls s3://bucket-b/)
That last pattern - diff <(command1) <(command2) - is one I use all the time to compare the output of two commands. Process substitution creates a temporary file descriptor for each command's output and passes it to diff. No temp files, no cleanup, just a clean comparison.
The Text Processing Toolkit
Here's the pipeline that demonstrates why Bash is such a powerful data processing environment. Say you have a web server access log and you want to find the top 10 most frequent error types:
grep "ERROR" access.log | awk '{print $4}' | sort | uniq -c | sort -rn | head -10
That single line replaces what would be a 20-line Python script. Here's what each stage does:

Let me break down the individual tools:
cut - Column Extraction
# Extract the first field from a CSV (comma-delimited)
cut -d',' -f1 data.csv

# Extract fields 1 and 3
cut -d',' -f1,3 data.csv

# Extract a range of fields
cut -d':' -f1-3 /etc/passwd

# Character positions (useful for fixed-width formats)
cut -c1-10 fixed-width-report.txt
sort - Ordering
# Alphabetical sort
sort names.txt

# Numeric sort
sort -n numbers.txt

# Reverse sort
sort -r names.txt

# Sort by a specific field (tab-delimited, second column, numeric)
sort -t$'\t' -k2 -n data.tsv

# Sort by human-readable sizes (1K, 2M, 3G)
du -sh * | sort -rh

# Remove duplicates while sorting
sort -u names.txt
uniq - Deduplication and Counting
# Remove adjacent duplicates (input MUST be sorted first)
sort names.txt | uniq

# Count occurrences of each line
sort names.txt | uniq -c

# Show only duplicated lines
sort names.txt | uniq -d

# Show only unique lines (no duplicates)
sort names.txt | uniq -u
The most common mistake with uniq is forgetting that it only removes adjacent duplicates. If your input isn't sorted, uniq will miss duplicates that aren't next to each other. Always sort first.
awk - Field Processing
awk is a full programming language, but I use about 5% of its features 95% of the time:
# Print the second column (space-delimited by default)
awk '{print $2}' file.txt

# Print the last column
awk '{print $NF}' file.txt

# Custom delimiter (colon)
awk -F: '{print $1, $3}' /etc/passwd

# Filter rows where a field matches a condition
awk '$3 > 100 {print $1, $3}' data.txt

# Sum a column
awk '{sum += $2} END {print sum}' data.txt

# Print lines longer than 80 characters
awk 'length > 80' file.txt

# Add line numbers
awk '{print NR, $0}' file.txt

# Multiple field separators (comma or semicolon)
awk -F'[,;]' '{print $1, $2}' data.txt
sed - Stream Editing
Heads-up before you copy these: BSD sed on macOS handles -i (in-place edit) differently from GNU sed on Linux. Check the macOS gotcha note below before running any in-place edits.
# Replace first occurrence on each line
sed 's/old/new/' file.txt

# Replace ALL occurrences on each line (global)
sed 's/old/new/g' file.txt

# Replace in-place (modifies the file)
sed -i 's/old/new/g' file.txt
# On macOS BSD sed, you need a backup extension:
sed -i '' 's/old/new/g' file.txt

# Delete lines matching a pattern
sed '/^#/d' config.txt

# Delete blank lines
sed '/^$/d' file.txt

# Print only lines 10-20
sed -n '10,20p' file.txt

# Insert text before a matching line
sed '/pattern/i\New line above' file.txt
macOS gotcha: BSD sed (the default on macOS) requires -i '' (with an empty string argument) for in-place editing, while GNU sed (Linux) uses just -i. This trips people up constantly when moving scripts between Linux and macOS. If you need portable scripts, always use -i '' on macOS or install GNU sed with brew install gnu-sed.
xargs - Building Commands from Input
# Delete all .tmp files found by find
find . -name "*.tmp" -print0 | xargs -0 rm

# Run a command on each file (one at a time)
find . -name "*.py" | xargs -I {} pylint {}

# Parallel execution (4 processes at once)
find . -name "*.png" -print0 | xargs -0 -P 4 optipng

# Build a command with multiple arguments batched together
cat urls.txt | xargs curl -s -o /dev/null -w "%{http_code} %{url_effective}\n"
tee - Split Output
# Write to a file AND display on screen
make build 2>&1 | tee build.log

# Append instead of overwrite
make build 2>&1 | tee -a build.log

# Write to multiple files
echo "entry" | tee file1.txt file2.txt
tee is essential when you want to save output for later review but also watch it in real time. I use it for build logs, deployment output, and any long-running process where I want both a live view and a record.
Real-World Pipeline Examples
Here are pipelines I actually use on a regular basis:
# Find the 20 largest files in a directory tree
find . -type f -exec du -h {} + | sort -rh | head -20

# Count lines of code by file extension (grouped -name tests, null-safe for spaces)
find . \( -name "*.py" -o -name "*.js" -o -name "*.ts" \) -print0 | xargs -0 wc -l | sort -rn | head -20

# Extract unique IP addresses from an access log
awk '{print $1}' access.log | sort -u

# Find processes listening on a specific port
lsof -i :8080

# Show HTTP response codes from an access log, sorted by frequency
awk '{print $9}' access.log | sort | uniq -c | sort -rn

# Tail a log file and HIGHLIGHT errors/warnings in colour while showing all lines
# (the |$ trick matches end-of-line on every line, so nothing gets filtered out)
tail -f application.log | grep --colour=auto -E "ERROR|WARN|$"

# If you only want to SEE error and warning lines (filter, not highlight)
tail -f application.log | grep -E "ERROR|WARN"

# Compare two sorted CSV files (find rows only in file1)
comm -23 <(sort file1.csv) <(sort file2.csv)

# Convert a file from DOS line endings (CRLF) to Unix (LF)
# Linux/GNU sed:
sed -i 's/\r$//' script.sh
# macOS/BSD sed:
sed -i '' 's/\r$//' script.sh
Step 4: Manage and Monitor
The fourth part of the daily workflow is keeping tabs on what's running and managing system resources.
A heads-up on GNU vs BSD flags: Some commands in this section (like ps --sort, top -b, du --max-depth) use GNU-specific flags that differ on macOS (BSD tools). I've included macOS alternatives where it matters. When working cross-platform, verify flags or install GNU utilities via Homebrew.
ps - Process Listing
# All processes with full detail
ps aux

# All processes in tree format (Linux/GNU ps only)
ps auxf
# macOS alternative: pstree -p (brew install pstree, -p shows PIDs)
# pstree -p

# Find a specific process
ps aux | grep nginx

# Better: use pgrep to avoid matching the grep command itself
pgrep -a nginx

# Show processes sorted by CPU (Linux/GNU ps)
ps aux --sort=-%cpu | head -20
# macOS/BSD equivalent
ps aux -r | head -20

# Show processes sorted by memory (Linux/GNU ps)
ps aux --sort=-%mem | head -20
# macOS/BSD equivalent
ps aux -m | head -20
top and htop - Live Monitoring
# Basic top
top

# Better: htop (install with brew install htop or apt install htop)
htop

# Sort by memory in top (press M)
# Sort by CPU in top (press P)
# Filter by user in top (press u)

# Non-interactive top sorted by CPU (Linux/GNU; macOS uses -l instead of -b)
top -b -n 1 | head -20
htop is one of the first things I install on any system. The colour coding, mouse support, tree view, and the ability to kill processes with a single keypress make it worth the install. On macOS, brew install htop is all you need.
watch - Repeat a Command on an Interval
watch is one of those commands that sounds trivial until you realise how often you need it. It runs any command repeatedly at a fixed interval and displays the output full-screen, highlighting what changed between runs. I use it constantly for polling. Note that watch isn't available everywhere - it ships with most Linux distributions via procps-ng, but isn't present on minimal container images or embedded systems, and isn't installed by default on macOS (see the portability note below).
# Run a command every 2 seconds (the default)
watch df -h

# Custom interval (every 5 seconds)
watch -n 5 'kubectl get pods'

# Highlight differences between updates
watch -d free -m

# Exit when the output changes (useful for waiting on a condition)
watch -g 'aws cloudformation describe-stacks --stack-name my-stack --query "Stacks[0].StackStatus" --output text'

# Monitor a log file's line count growing
watch -n 1 'wc -l /var/log/app/current.log'

# Watch disk usage of a specific directory during a build
watch -n 10 'du -sh /tmp/build-artifacts'

# Monitor pod count during a deployment
watch -n 2 'kubectl get pods -l app=api-gateway | tail -n +2 | wc -l'

# Watch for a file to appear
watch -g 'ls -la /tmp/process-complete.flag 2>/dev/null'

# Combine with pipes (wrap in quotes so watch runs the whole pipeline)
watch -n 5 'ps aux | grep python | grep -v grep | wc -l'
The key thing that trips people up: when your command includes pipes, you must wrap the entire thing in quotes. Without quotes, watch only runs the first command and the rest of the pipeline runs once at startup. watch 'ps aux | grep python' is correct. watch ps aux | grep python isn't.
The -d flag for highlighting differences is the one I use most. When I'm watching df -h to track a disk filling up, or kubectl get pods during a rollout, the highlights make changes jump out immediately instead of scanning the whole screen.
The -g flag (exit on change) turns watch into a simple polling mechanism. I use it to wait for CloudFormation stacks to finish deploying, for files to appear after a build, or for a pod count to stabilise. Combine it with && to trigger a follow-up action: watch -g 'condition command' && echo "Done".
Portability note: watch isn't installed by default on macOS. Install it with brew install watch. On Linux it comes from the procps-ng package (the maintained successor to the original procps), which ships with most distributions but isn't guaranteed on minimal images or stripped-down container environments. The -g flag is a procps-ng feature - some older or non-standard watch builds may not support it. If -g isn't available on your system, you can achieve the same thing with a while loop: while ! diff ... ; do sleep 5; done.
kill and Signal Management
# Graceful shutdown (SIGTERM - the default)
kill 12345

# Force kill (SIGKILL - last resort, no cleanup)
kill -9 12345

# Kill by process name
pkill nginx

# Kill all processes matching a full command line pattern
# CAUTION: -f matches the entire command line, so "server.py" also matches
# someone running "vim server.py" or "grep server.py" in another terminal.
# Always preview with pgrep -f first:
pgrep -af "python server.py"
# Then kill only if the matches look right:
pkill -f "python server.py"

# Send SIGHUP (commonly used to reload configuration)
kill -HUP $(pgrep nginx)
Always try SIGTERM before SIGKILL. kill -9 doesn't give the process a chance to clean up - it won't flush buffers, close file handles, or remove lock files. I've seen kill -9 leave behind orphaned lock files that prevented services from restarting. Use it only when SIGTERM doesn't work.
jobs, bg, fg - Job Control
# Run a long process and suspend it with Ctrl+Z
make build
# (press Ctrl+Z)
# [1]+  Stopped                 make build

# Resume in the background
bg

# List background jobs
jobs
# [1]+  Running                 make build &

# Bring it back to the foreground
fg

# Start a process in the background directly
make build &

# Run a process that survives terminal closure
nohup long-running-script.sh > output.log 2>&1 &
df and du - Disk Usage
# Filesystem disk usage (human-readable)
df -h

# Directory size
du -sh /var/log

# Top 10 largest subdirectories
du -h --max-depth=1 /var | sort -rh | head -10
# On macOS: du -h -d 1 /var | sort -rh | head -10

# Total size of current directory
du -sh .
ncdu - Interactive Disk Usage Explorer
du gives you numbers, but ncdu gives you answers. It's one of the first things I install on any machine and I use it constantly. Where du makes you pipe through sort and head and run the command again with a different path, ncdu lets you browse your entire filesystem interactively - drilling into directories, sorting by size, and deleting files - all from one screen.
# Install
# macOS:
brew install ncdu
# Ubuntu/Debian:
apt install ncdu

# Scan the current directory
ncdu

# Scan a specific directory
ncdu /var/log

# Scan the entire filesystem (run as root for full access)
sudo ncdu /

# Export a scan for later review (useful for remote servers)
ncdu -o scan-output.json /var
# Load a saved scan
ncdu -f scan-output.json

# Exclude specific directories from the scan
ncdu --exclude /var/lib/docker /var
Once inside ncdu, the interface is straightforward:
| Key | Action |
|---|---|
| Arrow keys / j,k | Navigate up and down |
| Enter / Right | Open directory |
| Left | Go back to parent |
d | Delete the selected file or directory |
n | Sort by name |
s | Sort by size (default) |
g | Toggle between size display modes (graph, percent, both) |
q | Quit |
The scenario where ncdu saves me the most time: a disk fills up on a production server and I need to figure out what is consuming space. With du, that's a series of commands - du -h --max-depth=1 / | sort -rh, then the same command on whatever directory is biggest, then again, and again, drilling down manually. With ncdu /, I scan once and then navigate instantly to the culprit. I've tracked down runaway log files, orphaned Docker images, and forgotten core dumps in seconds instead of minutes.
The export/import feature (-o and -f flags) is particularly useful for remote servers where you don't want to keep an SSH session open while browsing. Run ncdu -o scan.json / in the background, download the JSON file, and explore it locally at your leisure.
Networking Commands
# HTTP request (the most versatile networking tool)
curl -s https://api.example.com/health

# POST with JSON body
curl -X POST https://api.example.com/data \
  -H "Content-Type: application/json" \
  -d '{"key": "value"}'

# Download a file
curl -O https://example.com/file.tar.gz

# Follow redirects and show response headers
curl -L -i https://example.com

# Test connectivity and response time
curl -o /dev/null -s -w "HTTP %{http_code} - %{time_total}s\n" https://api.example.com

# Check which ports are open (Linux - needs sudo to show process names)
sudo ss -tlnp
# macOS equivalent
lsof -i -P -n | grep LISTEN

# SSH with port forwarding
ssh -L 8080:localhost:8080 user@remote-host

# Copy files to/from remote (recursive)
scp -r ./local-dir user@remote-host:/path/to/remote/
I use curl more than any other networking tool. The -w flag for custom output formatting is particularly powerful - I use it to build quick health check scripts that report response times alongside status codes. If you deploy APIs on AWS - whether through API Gateway, Lambda Function URLs, or ECS - you'll find yourself reaching for curl constantly.
For secure file transfers at scale, I covered Managed Secure SFTP using Terraform in a previous post.
The Daily Workflow
Here's how all of these commands fit together as a systematic workflow. Whether I'm debugging a deployment issue, analysing logs, or exploring an unfamiliar codebase, I follow this path from left to right.

- Navigate and Discover:
cd,find,ls -la,treeto understand the current state and structure - Search and Filter:
grep -rn,find -name,typeto locate the specific files and content I need - Process and Transform:
awk,sed,sort | uniq -c,xargsto extract, transform, and aggregate data - Manage and Monitor:
ps,htop,kill,ncdu,curlto control processes, track disk usage, and verify system state
Power User Techniques
These are the techniques that separate "I can use the terminal" from "the terminal is an extension of my brain."
Keyboard Shortcuts
These are GNU Readline shortcuts that work in any program using Readline - Bash, psql, the Python REPL, and many others. Learning them eliminates the need to reach for arrow keys and dramatically speeds up editing.
| Shortcut | Action |
|---|---|
Ctrl+R | Reverse search through history (press repeatedly to cycle) |
Ctrl+A | Jump to the beginning of the line |
Ctrl+E | Jump to the end of the line |
Ctrl+W | Delete the word before the cursor |
Ctrl+K | Delete from cursor to end of line |
Ctrl+U | Delete from cursor to beginning of line |
Ctrl+Y | Paste (yank) the last deleted text |
Ctrl+L | Clear the screen (same as clear command) |
Ctrl+Z | Suspend the current foreground process |
Ctrl+C | Send SIGINT (interrupt/cancel current command) |
Ctrl+D | Exit the shell (or send EOF to stdin) |
Alt+B | Move back one word |
Alt+F | Move forward one word |
Alt+. | Insert the last argument of the previous command |
Ctrl+R is the one I can't live without. It searches your command history as you type, and you can press Ctrl+R repeatedly to cycle through older matches. Combined with unlimited history, it means I almost never retype a command - I search for it, edit it slightly, and run it.
Alt+. (or Esc . on some terminals) is the hidden gem. It inserts the last argument from the previous command. So if you just ran mkdir -p /var/www/app/static and now want to cd into it, type cd then press Alt+. and it fills in /var/www/app/static. Press it again to cycle through last arguments from older commands.
History Expansion
# Repeat the last command
!!

# Most useful with sudo:
apt install nginx
# Permission denied
sudo !!
# Runs: sudo apt install nginx

# Reuse the last argument of the previous command
mkdir -p /var/www/new-site
cd !$
# Runs: cd /var/www/new-site

# Reuse the first argument
cp important-file.txt /backup/
ls !^
# Runs: ls important-file.txt

# Reuse all arguments
echo one two three
printf "%s\n" !*
# Runs: printf "%s\n" one two three

# Run a specific command from history by number
!42

# Run the most recent command starting with "ssh"
!ssh
The sudo !! pattern is the one everyone learns first, and for good reason - it saves you from retyping an entire command when you forget you needed elevated privileges. But !$ (last argument) is the one I use most often. It's invaluable when you're operating on the same file or directory across multiple commands.
Parameter Expansion
Bash has powerful built-in string manipulation that avoids the need to call external tools like sed or awk for simple operations:
filename="archive-2026-04-10-backup.tar.gz"

# Remove shortest match from the front (#)
echo "${filename#*.}"           # 2026-04-10-backup.tar.gz

# Remove longest match from the front
echo "${filename##*.}"          # gz

# Remove shortest match from the end
echo "${filename%.*}"           # archive-2026-04-10-backup.tar

# Remove longest match from the end
echo "${filename%%.*}"          # archive-2026-04-10-backup

# Substitution
echo "${filename/backup/restore}"  # archive-2026-04-10-restore.tar.gz

# Default value (use default if variable is unset or empty)
echo "${DB_HOST:-localhost}"

# Assign default (set the variable if unset or empty)
: "${LOG_LEVEL:=INFO}"

# String length
echo "${#filename}"             # 32

# Substring extraction
echo "${filename:0:7}"          # archive

# Uppercase / lowercase (Bash 4+)
name="hello world"
echo "${name^^}"                # HELLO WORLD
echo "${name^}"                 # Hello world (capitalise first letter)
The ${VAR:-default} pattern is essential for writing robust scripts. I use it in every deployment script to provide sensible defaults while allowing environment variable overrides:
#!/usr/bin/env bash
AWS_REGION="${AWS_REGION:-us-east-1}"
ENVIRONMENT="${ENVIRONMENT:-dev}"
LOG_LEVEL="${LOG_LEVEL:-INFO}"
Brace Expansion
# Create multiple directories at once
mkdir -p project/{src,tests,docs,config}

# Generate sequences
echo {1..10}       # 1 2 3 4 5 6 7 8 9 10
echo {a..z}        # a b c d ... z
echo {01..12}      # 01 02 03 ... 12 (zero-padded)

# Backup a file quickly
cp config.yaml{,.bak}
# Expands to: cp config.yaml config.yaml.bak

# Rename with a pattern
mv file.{txt,md}
# Expands to: mv file.txt file.md

# Multiple extensions
touch index.{html,css,js}
The cp file{,.bak} pattern is one I use before every manual edit. It creates a backup copy with a single, readable command. The expansion happens before the command runs, so file{,.bak} becomes two arguments: file and file.bak.
Process Substitution
# Compare the output of two commands
diff <(ls /dir1) <(ls /dir2)

# Compare sorted contents of two files
diff <(sort file1.txt) <(sort file2.txt)

# Feed multiple inputs to a command
paste <(cut -f1 file1.tsv) <(cut -f2 file2.tsv)

# Compare AWS resources across regions
diff <(aws ec2 describe-instances --region us-east-1 --query 'Reservations[].Instances[].InstanceId' --output text | sort) \
     <(aws ec2 describe-instances --region us-west-2 --query 'Reservations[].Instances[].InstanceId' --output text | sort)
Modern Alternatives Worth Knowing
The traditional Unix tools are excellent and universally available, but modern alternatives offer significant improvements in usability and performance. Here's what I've adopted and when the classic version is still the better choice.
| Classic | Modern | Install | Why Switch |
|---|---|---|---|
find | fd | brew install fd | Faster, simpler syntax, respects .gitignore |
grep | ripgrep (rg) | brew install ripgrep | Massively faster on large codebases, respects .gitignore |
cat | bat | brew install bat | Syntax highlighting, line numbers, git integration |
ls | eza | brew install eza | Colour coding, git status, tree view built in |
du | ncdu | brew install ncdu | Interactive browsing, drill into directories, delete from UI |
diff | delta | brew install git-delta | Syntax highlighting, side-by-side, line numbers |
awk (for JSON) | jq | brew install jq | Purpose-built JSON processor, essential for APIs |
sed (for YAML) | yq | brew install yq | Purpose-built YAML processor, preserves comments |
fd - A Better find
# Find files by pattern (no -name flag needed)
fd "*.py"

# Case-insensitive search (default)
fd readme

# Include hidden files and .gitignore'd files
fd -H -I "*.log"

# Find and execute (like find -exec)
fd -e py -x pylint {}

# Exclude directories
fd -E node_modules -E .git "*.js"
ripgrep - A Better grep
# Search recursively (default behaviour, no -r needed)
rg "TODO"

# Search specific file types
rg -t py "import boto3"

# Replace text (preview)
rg "old_function" --replace "new_function"

# Ignore specific directories
rg "pattern" --glob '!node_modules'

# Count matches per file
rg -c "error" ./logs/
jq - JSON Processing
If you work with AWS services, APIs, or any modern infrastructure, jq is non-negotiable. I use it every single day.
# Pretty-print JSON
echo '{"name":"test","value":42}' | jq '.'

# Extract a field
aws lambda get-function --function-name my-func | jq '.Configuration.Runtime'

# Filter arrays
aws ec2 describe-instances | jq '.Reservations[].Instances[] | {id: .InstanceId, state: .State.Name}'

# Select items matching a condition
cat data.json | jq '.items[] | select(.status == "active")'

# Count items
cat data.json | jq '.items | length'

# Convert JSON to CSV-ish output
aws s3api list-buckets | jq -r '.Buckets[] | [.Name, .CreationDate] | @tsv'
I covered working with AWS Lambda metadata and JSON processing in my Lambda AZ Metadata post. And for Powertools for AWS Lambda, jq is indispensable for parsing structured logs from CloudWatch.
yq - YAML Processing
If jq is non-negotiable for JSON, yq is its equally essential sibling for YAML. If you work with Kubernetes manifests, CloudFormation templates, Docker Compose files, GitHub Actions workflows, or any Helm chart, you're drowning in YAML - and yq lets you query, modify, and transform it from the command line instead of opening an editor and hand-editing a 500-line file.
There are two popular tools called yq. I use Mike Farah's version (written in Go) because it handles multi-document YAML, preserves comments, and uses a syntax similar to jq. The other one is the Python version by kislyuk, which wraps jq under the hood and uses a different syntax - if you've already got it installed, the examples below won't work as written. Install Mike Farah's version with brew install yq on macOS or snap install yq on Ubuntu.
# Pretty-print a YAML file
yq '.' config.yaml

# Extract a specific field
yq '.spec.replicas' deployment.yaml

# Extract nested values
yq '.metadata.labels.app' deployment.yaml

# Query all container images from a Kubernetes deployment
yq '.spec.template.spec.containers[].image' deployment.yaml

# Update a value in-place
yq -i '.spec.replicas = 5' deployment.yaml

# Add a new field
yq -i '.metadata.labels.version = "v2"' deployment.yaml

# Delete a field
yq -i 'del(.metadata.annotations)' deployment.yaml

# Convert YAML to JSON (pipe into jq for further processing)
yq -o json '.' config.yaml

# Convert JSON to YAML
yq -P '.' config.json

# Merge two YAML files (second overrides first)
yq eval-all 'select(fileIndex == 0) * select(fileIndex == 1)' base.yaml override.yaml

# Process multi-document YAML (common in Kubernetes)
yq eval-all '.metadata.name' multi-resource.yaml

# Select specific documents from a multi-doc file
yq 'select(.kind == "Deployment")' multi-resource.yaml

# Environment variable substitution in templates
export IMAGE_TAG="v1.2.3"
yq '.spec.template.spec.containers[0].image = env(IMAGE_TAG)' deployment.yaml
The conversion commands (-o json and -P) are the ones I reach for most often. When I need to do complex queries on YAML, I frequently convert to JSON first and then use jq, which I know inside and out. But for simple field extraction and in-place edits, yq directly is faster and preserves your comments and formatting - something jq round-tripping destroys.
The environment variable substitution with env() is a game changer for CI/CD pipelines. Instead of sed hacking placeholder strings in YAML files (which breaks the moment your replacement value contains a special character), yq does it properly with type awareness.
When to Stick with the Classics
I still use the traditional tools in these situations:
- Remote servers and containers: Production servers and Docker containers often have only the base GNU tools installed. Write your operational scripts with
grep,awk, andfindfor portability - POSIX shell scripts: If your script needs to run on
/bin/sh(not Bash), stick to the POSIX tools. This matters for Alpine-based Docker images and minimal environments - CI/CD pipelines: Unless you control the CI environment and can install tools, assume only standard utilities are available
- Teaching and documentation: Standard tools are universal. When writing scripts for a team, using
findoverfdmeans everyone can run them without installing anything
When I write deployment scripts - whether for Terraform infrastructure or serverless applications - I always use the standard tools to ensure portability.
Key Behaviours to Understand
- Always quote your variables.
rm $fileandrm "$file"aren't the same command. If$filecontains spaces or glob characters, the unquoted version will break or worse, delete the wrong files.rm "$file"is safe. This single habit prevents more bugs than any other practice in shell scripting. The only exception is inside[[ ]]tests, where word splitting doesn't occur. - Use
[[ ]]instead of[ ]for conditionals when writing Bash-specific code.[ ]is a regular command (a builtin in Bash, but still parsed like any command), so its arguments go through word splitting and filename expansion before[ever sees them.[[ ]]is a Bash keyword parsed specially by the shell, so word splitting and globbing don't occur on the right-hand side. It also adds regex matching with=~. The trade-off:[[ ]]is Bash-specific and won't work in POSIXshscripts, so use[ ]when you need portability. - Use
set -euo pipefailfor most non-trivial Bash scripts unless you have a reason not to. This is Bash strict mode:-eexits on any error,-utreats unset variables as errors, and-o pipefailcatches failures in the middle of pipelines (not just at the end). It catches whole classes of bugs that would otherwise go unnoticed. Caveat:set -ehas enough edge cases (it's suppressed insideifconditions,||chains, and certain compound commands) that you should understand how it behaves before relying on it. For one-line throwaway scripts, plain Bash is fine. For anything you'll run more than once, turn strict mode on. - Bash version differences matter. Bash 3.2 still ships with macOS (due to licensing - it's the last GPLv2 version). Bash 4+ features like associative arrays,
${var,,}for lowercase,**globbing, and|&for piping stderr aren't available on stock macOS Bash. Install a modern version withbrew install bashor usezsh, which Apple has shipped as the default shell since macOS Catalina (2019). readwithout-rmangles backslashes. Always useread -r. Without it,readinterprets backslash sequences in the input, silently changingpath\to\fileintopathoile. The safe idiom for reading files line by line iswhile IFS= read -r line; do ... done < file.- Never parse the output of
ls. The output format varies by locale, terminal width, and version. Use globs directly:for f in *.txt; doinstead offor f in $(ls *.txt); do. The glob version handles spaces, newlines, and special characters in filenames correctly. $PATHsearch order is first-match-wins. If you have multiple versions of a tool installed (say Python from both the system and Homebrew), the one whose directory appears first in$PATHwins. Usetype -a python3to see all installed locations and check your$PATHorder if you're getting the wrong version.- GNU vs BSD tool differences on macOS. The default macOS versions of
sed,awk,grep,date, andxargsare BSD variants with different flags and behaviours than the GNU versions found on Linux. If a command from a tutorial doesn't work on your Mac, this is almost certainly why. Install the GNU versions withbrew install coreutils gnu-sed gawk grepand either use theg-prefixed names (gsed,gawk) or add them to your path. Ctrl+Sfreezes your terminal,Ctrl+Qunfreezes it. This is XON/XOFF flow control, a holdover from the 1970s. If your terminal ever appears frozen and doesn't respond to anything, pressCtrl+Qbefore reaching for the close button. To disable this behaviour entirely, addstty -ixonto your shell profile.- Current Bash version landscape (April 2026): Bash 5.2 is widely deployed across Linux distributions; 5.3 has been released but distributions are still catching up. Check yours with
bash --version. macOS still ships Bash 3.2.57 (and zsh as the default). AWS CloudShell runs on Amazon Linux 2023 with Bash as the default shell and the AWS CLI pre-installed. Runbash --versionthere to see what you're working with. CloudShell gives you only 1 GB of persistent storage in$HOME(deleted after 120 days of inactivity) and sessions time out after idle periods, so it's great for quick tasks but not a replacement for a proper development environment.
Wrapping Up
The terminal isn't a relic. It's the fastest, most flexible interface for working with computers that we've ever built, and Bash is the language it speaks. The commands in this post cover the vast majority of what I do on a daily basis - from navigating codebases to processing log files to managing running processes.
The daily workflow - navigate, search, process, manage - is the real takeaway. Individual commands are easy to look up. The workflow is what turns a 10-minute task into a 30-second pipeline.
If you're just starting out, focus on these five patterns first:
find . -name "*.ext"to locate filesgrep -rn "pattern" ./dir/to search contentcommand | sort | uniq -c | sort -rn | headto count and rank anythingCtrl+Rto search your command historyecho "$variable"to remember always quoting your variables (drop the quotes once and you'll learn why)
Everything else builds on top of those.
And if you spend most of your day on AWS like I do, remember that every service you interact with - from S3 to Lambda to ECS to EventBridge - has a CLI interface that you can script, pipe, and automate from your terminal. The Bash skills in this post are the foundation that makes all of that possible.
Resources
- GNU Bash Reference Manual - The authoritative reference for all Bash features
- The Art of Command Line - Joshua Levy's curated collection of command-line tips
- Bash Pitfalls - Greg Wooledge's catalog of common mistakes and their fixes
- Pure Bash Bible - Pure Bash alternatives to external commands
- ShellCheck - Static analysis tool for shell scripts (catches quoting errors, POSIX issues, and more)
- ripgrep (rg) - Faster grep with .gitignore support
- fd - A simple, fast alternative to find
- bat - cat with syntax highlighting and git integration
- eza - Modern replacement for ls with git integration
- jq - Command-line JSON processor
- ncdu - Interactive disk usage analyser with browsing and deletion
- yq - Command-line YAML processor (jq but for YAML)
- AWS CLI Command Completion - Tab completion setup for the AWS CLI
- AWS CloudShell - Browser-based Bash shell with AWS tools pre-installed
- explainshell.com - Paste a command to see what each part does
Connect with me on X, Bluesky, LinkedIn, GitHub, Medium, Dev.to, or the AWS Community. Check out more of my projects at darryl-ruggles.cloud and join the Believe In Serverless community.
Comments
Loading comments...